How to Transfer Photos from iPhone to Laptop (Win & Mac)
With the iPhone’s camera getting better with high image quality and video resolution, it is quite common for iOS users to use the device as their go-to camera. Over time, the iPhone can accumulate quite a large number of photos and videos, therefore take up a lot of storage space on the device. Lack of adequate storage space on your iPhone can degrade the device’s performance and even prevent you from backing up the data on the device to iCloud smoothly.
When your iPhone is full of pictures and lack of storage space, it is always a good idea to transfer these photos from your iPhone to a laptop for backup. If you have no idea of how to transfer pictures from iPhone to laptop, this article get you covered. Here we will guide you through 3 simple ways that you can download photos from iPhone to laptop PC or Mac.
- Way 1: Transfer Photos from iPhone to Laptop with iManager
- Way 2: Transfer Photos from iPhone to Laptop with Photos App
- Way 3: Transfer Photos from iPhone to Laptop with iCloud Photos
Way 1: Transfer Photos from iPhone to Laptop with iManager
The easiest and most convenient way to transfer photos from your iPhone to a laptop is using Gihosoft iManager. This professional iOS data management tool is designed to make it easy for you to manage all the data on iPhone, iPad and iPod touch. It is primarily useful when you want to move a large number of photos from iPhone to laptop as it allows you to do that fairly quickly and easily.
With the help of Gihosoft iPhone Manager, you can transfer pictures from iPhone to laptop in simple steps. But before we start the transfer process, let’s first learn some of its most notable features:
- It supports to transfer larger amount photos from iPhone to your laptop without using iTunes or iCloud.
- It is helpful in creating a backup of your iOS device in just a few minutes. You’re allowed to view all the data in the backup.
- Not only photos, you can also transfer videos, music, contacts, messages, notes, voice memos, and even app data like WhatsApp chats.
- You can also use it to access and view an iTunes backup file and then export the data in the backup to your laptop.
- It supports all iOS devices including iPhone 11/11 Pro and all versions of iOS firmware including iOS 13.
Free download Gihosoft iPhone Manager from its official site and follow these simple steps below to download photos from iPhone to your laptop:
- Begin by installing Gihosoft iManager on to your computer. Open the program as soon as the installation is complete.
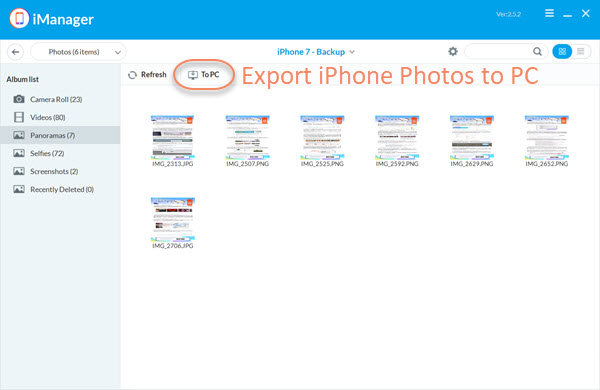
- Now connect the iPhone to the computer using a USB cable and wait for the program to detect the device. Then click on “Backup Now” to begin the transfer.
- After that, click on the “Photos” option to view the transferred photos and select the specific pictures you’d like to transfer from iPhone to laptop.
- Finally, click on the “To PC” button at the top bar to export the selected photos to your laptop.
Way 2: Transfer Photos from iPhone to Laptop with Photos App
You can also easily transfer photos from your iPhone to your laptop using the built-in Photos App. It is available for both Mac and Windows, and you can use it to import iPhone photos to laptop following the steps given below:
If you are using a Windows laptop:
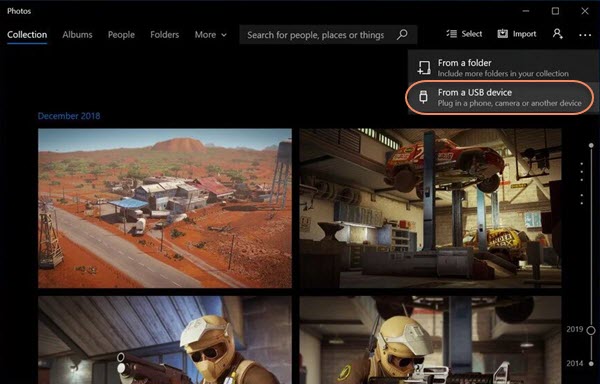
- Connect your iPhone to the Windows laptop using USB cable. Once the device is detected by the computer, the Photos app will launch automatically.
- If not, you can open the Photos app from the Start menu or by double-clicking on the icon on your desktop.
- Click on “Import” and then choose the “From a USB Cable” option.
- Select the photos you would like to transfer and then click “Import and Continue”.
Apart from the Windows Photos app, there are many other ways to transfer photos from iPhone to a Windows laptop, such as using Windows Explorer or Windows Auto Play, etc. For more info, please refer to 5 Quick Ways to Transfer Photos from iPhone to PC.
If you are using a Mac laptop:
- Connect the iPhone to the Mac computer using USB cable and the Photos app will open automatically when the device is recognized.
- If the Photos app doesn’t pop up, you can open it from the Launchpad.
- Click on the “Import” tab and then select the photos you want to transfer.
- Click on “Import XX Selected” or “Import All Items” to begin the transfer process.
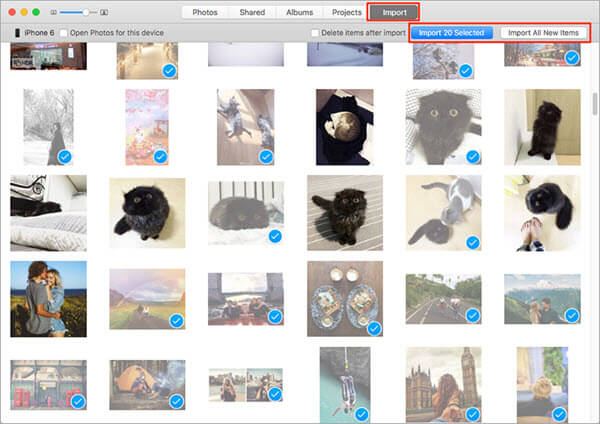
Keep the iPhone connected to the Mac computer until all the photos are transferred.
Way 3: Transfer Photos from iPhone to Laptop with iCloud Photos
You may also be able to transfer photos from your iPhone to your laptop by enabling iCloud Photos. Doing so on your device will allow all the photos on your iPhone to automatically be uploaded to your iCloud Photos Library. Therefore you can easily access the photos in the Photos App in both Mac and Windows. You can also easily download the photos from your iCloud account directly to the laptop.
To get started, you need to enable iCloud photos on your iPhone. Follow these simple steps to do it: Open the Settings app and tap on [Your Name], then tap on “iCloud” and turn on “iCloud Photos”.
Now to access the photos on your Windows laptop, follow steps below:
- Begin by downloading iCloud for Windows on to your computer.
- Once it is installed, launch it and then sign in to your iCloud account with your Apple ID and password.
- Enable “Photos” and iCloud for PC will make a copy of all the photos to your computer.
- You will then be able to find the photos on This PC > iCloud Photos > Downloads.
To access the Photos on your Mac, follow these simple steps:
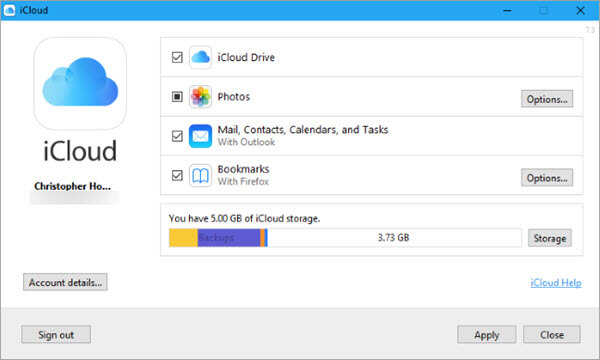
- Go to the Apple Menu on your Mac and then click on “System Preferences”.
- Select iCloud and then sign in using your Apple ID and password.
- Check “Photos” and make sure that the “iCloud Photo library” is enabled.
- Once this is done, all the photos on your iPhone will be uploaded on to the Photos app on your Mac.
The Final Word
With all the Photos on your iPhone safely on your laptop, you can now delete the photos from your iPhone to create space on the device. If you’ve deleted previous photos by mistake and unfortunately there is no backup available, don’t panic, you can rely on Gihosoft Free iPhone Data Recovery to get the lost photos back.