How to Change iTunes Backup Location on Windows and Mac
It is always important to back up all the data on your iPhone or iPad. That goes without saying. An iTunes backup is a great way to keep the data on your iOS device safe from loss. If you accidentally deleted important files on your iPhone and hope to get them back, you can restore iPhone from an iTunes backup. But as you create regular backups, you may have noticed that the backup file accumulate on your computer, particularly if you have more than one device.
Deleting these iTunes backups is not a wise option, most people will choose to move the backups to a different location to free up some disk space. Then, how to do that without compromising the integrity of the backup? In this article, we’re going to share with you the safest way to change the iTunes backup location on both Windows and Mac. Follow the simple guide to get it done easily and quickly.
- Part 1. Where is the iTunes Backup Folder on Windows and Mac
- Part 2. How to Change the iTunes Backup Location on Windows
- Part 3. How to Change the iTunes Backup Location on Mac
- Bonus: Backup iPhone/iPad to Any Location of Your Choice
Part 1. Where is the iTunes Backup Folder on Windows and Mac
Before we show you how to move the iTunes backup to a different location, it is important to determine exactly where the backup folder is located by default. The following is a breakdown of the iTunes backup folder location depending on the operating system that your computer is running:
Location of the iTunes Backup folder on Windows:
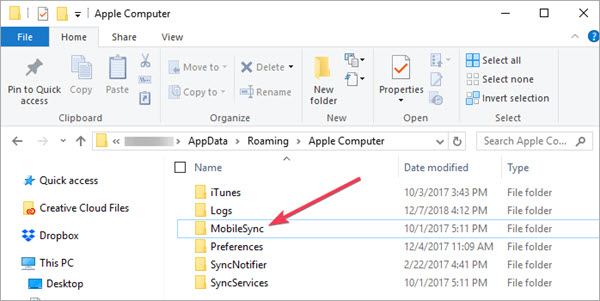
- On Windows PC, iTunes backups are stored in %APPDATA%\Apple Computer\MobileSync
- For PCs running Windows 10, 8, 7 or Vista, the backup file will be located on the path: \Users\[USERNAME]\AppData\Roaming\Apple Computer\MobileSync\Backup
- For Windows XP, the path is \Documents and Settings\[USERNAME]\Application Data\Apple Computer\MobileSync\Backup
- If you downloaded iTunes from the Microsoft Store, the path is a little different: \Users\[USERNAME]\Apple\MobileSync\Backup
Location of the iTunes Backup Folder on Mac:
- On MacOS, iTunes backups are stored in: ~/Library/Application Support/MobileSync and you can therefore find the folder by following the path /Users/[USERNAME]/Library/Application Support/MobileSync/Backup
- If you are running MacOS 10.15, you can create iOS backups using Finder instead of iTunes, but the location of the backup folder remains the same.
Part 2. How to Change the iTunes Backup Location on Windows
To change the default iTunes backup location on Windows, follow these simple steps:
- Begin by opening the default iTunes backup location. To do that, Press the Windows Key + R on your keyboard to open the “Run” dialogue box.
- In the field provided, enter “%APPDATA%\Apple Computer\MobileSync” and then press Enter.
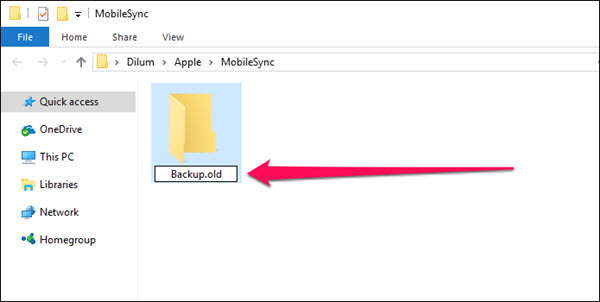
- In the window that opens, you should see a folder named “Backup” that contains all the iTunes backups available on that computer. To change the location of the backup, you will need to rename, move or delete the folder. For instance, you could rename the folder to “Backup-Old”
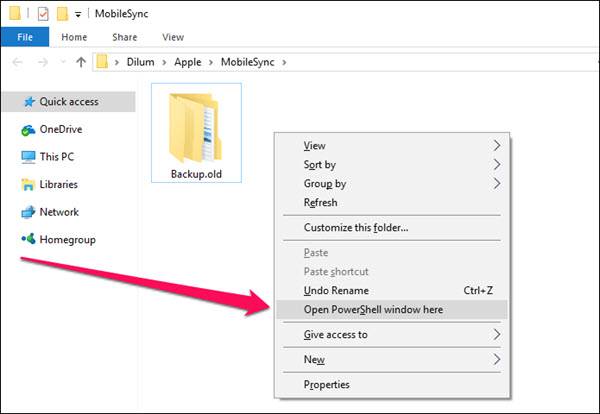
- Once you have renamed the folder, the next step is to create a symbolic link to that folder in the desired new location. To do that, hold down the “Shift” key on your keyboard as you right-click on the opened “MobileSync” window and the select “Open Command Window Here” or “Open PowerShell window here”
- In the command prompt window that opens, enter mklink /d Backup “[desired-new-backup-path]” and press “Enter” to execute the command.
- Restart Windows and iTunes will now store all backups in the new designated location.
Part 3. How to Change the iTunes Backup Location on Mac
To change the iTunes backup folder location on Mac, follow these simple steps:
- Open the MacOS terminal application. You can find it under “Applications > Utilities > Terminal”.
- Enter cd ~/Library/Application\ Support/MobileSync and press “Enter” to instruct the Terminal to change the default location of the iTunes backup.
- Open the current iTunes backup location on in Finder by entering “Open” and then press “Enter”
- In the open Finder Window, you should see a folder named “Backup” that contains all the iTunes backups on that computer. To change the location of the backup file, this folder needs to be renamed, moved or deleted.
- Once you’ve moved, renamed or deleted the backup file, use the command ln -s [desired-new-backup-path] ~/Library/Application\ Support/MobileSync/Backup to create a symbolic link in the desired location.
- Restart the Mac to complete the process and all iTunes backups will be saved in the new location.
Bonus: Backup iPhone/iPad to Any Location of Your Choice
But what if you could choose where you want to store the backup while creating the backup. As you can see from the processes above, it is not easy to control where iTunes stores the backup files. But when you choose to use an iTunes alternative tool, you have the freedom to save the backup anywhere you want. One of the most effective backup tools that you can use to replace iTunes is Gihosoft iManager. In fact, as the name suggests, this is an iOS device manager that can do so much more than just backup your iPhone or iPad.
More features of Gihosoft iManager include the following:
- With iManager, you can create a full backup of all the data on your iOS device in a single click and save the backup to any location on your computer.
- You can also use it to transfer all types of data including photos, videos, messages, contacts, WhatsApp, notes and more from iPhone/iPad to the computer
- It also allows you to access the iTunes backup files on your computer and then easily extract the files from the backup to your computer selectively.
- It supports all iOS devices and all versions of the iOS firmware including iPhone 11/11 Pro and iOS 13.
To backup iPhone/iPad data to any location of your computer using iManager, follow these simple steps:
- Download and install the iPhone Manager on your computer. Run the program after successful installation and then connect the iPhone or iPad to the computer using USB cable.
- Once the program detects the device (you may need to unlock the device to allow the program to detect it), click on “Backup Now” to begin the backup process.
- You can easily select your desired backup location by clicking on “Change Backup Location” and then selecting the folder you would like to use.

Keep the device connected to the computer until the backup process is complete. The program will notify you when the process is complete and you can disconnect the device from the computer. Once the backup is done, you can freely view the data you’ve backed up in details and export selected files to your computer in readable formats.