4 Ways to Transfer Voicemails from iPhone to Computer
The Voicemail service is intended to help you avoiding missed calls and it may contain some important information just like messages and emails. However, your cell phone service provider won’t keep your voicemails forever and they will be automatically deleted when reach the expiration date. If you have large amount of voicemails on your iPhone that you’d like to keep for future reference, you can transfer them to your computer for safe backup. It is also helpful if you have a limited iPhone storage or in some unexpected situations like mistaken deletion, factory reset, device damaged or stolen, etc.
Then how to transfer voicemails from iPhone to computer? In this article, we are going to show you 4 quick ways to save iPhone voicemails to computer so that you can easily access them whenever you want.
- Way 1: Transfer Voicemails from iPhone to Computer with iManager
- Way 2: Transfer Voicemails from iPhone to Computer with AirDrop
- Way 3: Transfer Voicemails from iPhone to Computer with Message
- Way 4: Transfer Voicemails from iPhone to Computer with Mail
Way 1: Transfer Voicemails from iPhone to Computer with iManager
The easiest and most efficient way to transfer voicemails from iPhone to computer is using Gihosoft iManager. This professional iOS data manager can be very useful when you want to download large amount of voicemails on your iPhone and then save them to your computer. The transfer process is very simple to follow, no tech knowledge is required. Apart from transferring voicemails from iPhone to computer, let’s take a look at some of its more noticeable features. They include the following:
- It allows you to transfer and backup data from your iPhone or any other iOS device to computer in a single click.
- It can easily manage the photos, videos, music, contacts, messages, notes, and even app data like WhatsApp, Viber, etc.
- You can also use it to back up all the data on the device to your computer
- With iManager, you can easily access and manage the data in your iTunes backup files and transfer them selectively to the device.
- It supports all iOS devices including the new iPhone 11/11 Pro and all versions of the iOS firmware including iOS 13.
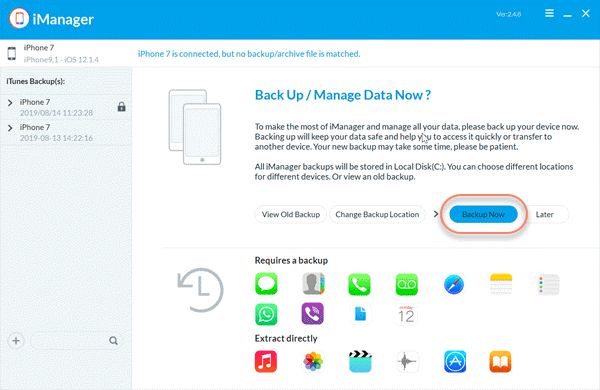
Here’s how to transfer voicemails from iPhone to computer using Gihosoft iManager:
- Download and install Gihosoft iPhone Manager on to your computer and then launch the program.
- Connect the iPhone to the computer with USB cable and wait for the program to detect the device.
- Now in the main window, click on “Backup Now” and the transfer process will begin immediately. Keep the device connected to the computer during the process.
- After that, select Voicemail and choose the voicemails you would like to save, then click on “To PC” to export them to your computer.
Way 2: Transfer Voicemails from iPhone to Computer with AirDrop
If you don’t want to install any third-party application on your computer, AirDrop is a great way to transfer voicemails from iPhone to Mac. It is amazing feature that allows users to share data like photos, videos, voicemails etc. between iPhone, iPad, iPod touch, Mac or any other Apple devices wirelessly. To use AirDrop, Wi-Fi and Bluetooth need to be turned on for both the Mac and iPhone. And it is also important to note that AirDrop is not much suitable to transfer large files. Here’s how to AirDrop voicemail from iPhone to Mac:
- Connect your iPhone to a Wi-Fi network and enable Bluetooth. Turn on “AirDrop” and when prompted, tap “Contacts Only”.
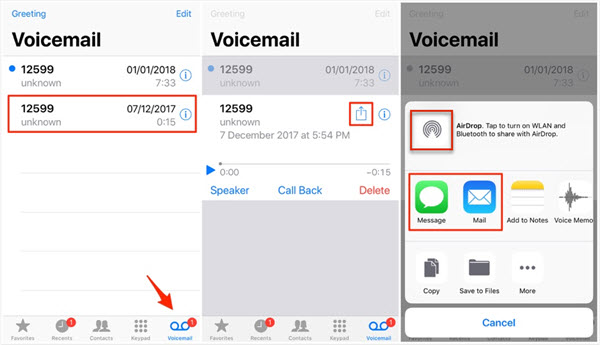
- Now open the Phone app and then go to “Voicemail”.
- Turn on AirDrop on your Mac computer and then connect to the same Wi-Fi network.
- On the iPhone, tap on the voicemail you would like to transfer and then tap on the “Share” icon.
- Select “AirDrop” and wait for the Mac to appear on the iPhone. Tap on to select it.
- Finally, accept the voicemail files on the Mac when prompted.
Way 3: Transfer Voicemails from iPhone to Computer with Message
If AirDrop not working on your iPhone, you can also easily transfer voicemails from the iPhone to computer using Messages. The process of transfer is quite similar to that of transferring the voicemails via AirDrop. All you have to do is to select the voicemail you would like to transfer and then tap on the “Share” icon. You can then select “Message” option from the list of apps and choose the recipient before sending the message. You can then open the message on your computer to download the email.
But just like the AirDrod methon we’ve mentioned in Way 2, the Message method is also not ideal for the transfer of multiple voicemails from iPhone to computer.
Way 4: Transfer Voicemails from iPhone to Computer with Mail
You can also use email to transfer your iPhone voicemails to computer. This method is ideal when you have a small number of voicemails to transfer. Since you can only attach one voicemail at a time to an email, it may take quite some time to transfer a lot of voicemails.
The process of transferring voicemails to computer via mail is very simple, all you have to do is open the voicemail you want to transfer and then tap on the “Share” button. Select the “Mail” option and then enter the email address you want to use. Send the email and then open it on your computer to download the attached voicemails.
Conclusion
Now you’ve learned 4 simple ways to transfer and save voicemails from iPhone to computer. Among them, we strongly suggest you to use the third-party tool – Gihosoft iManager. It can help you transfer all your iPhone voicemails to computer in a single click. If unfortunately you deleted important vociemails on your iPhone and there is no backup available, you can rely on Gihosoft Free iPhone Data Recovery to scan the device and bring the lost voicemails back.