How to Transfer Notes from iPhone to Computer
The Notes app on your iPhone makes the process of recording ideas that pop into your mind or writing down the grocery list much easier. Now it has become the go-to solution for making a to-do list that you can access right on your phone. If the notes you have on your iPhone or iPad contain important and sensitive information, it may become necessary to transfer them to your computer for safe keeping or printing. In this article, we will share three practical ways you can transfer notes from iPhone to computer.
- Way 1: Transfer All Notes from iPhone to Computer at Once
- Way 2: Transfer Notes from iPhone to Computer via iCloud
- Way 3: Transfer Notes from iPhone to Computer via Email
- Extra Tip: Recover Deleted/Lost Notes from iPhone
Way 1: Transfer All Notes from iPhone to Computer at Once
If you would like to transfer all the notes on your iPhone at once, you need a solution that will allow you to do that easily and quickly. One of the best is Gihosoft iManager, a professional iOS data management tool that will allow you to easily access all the notes on your iPhone and then transfer them to your computer. This tool has numerous other features that make it the best solution to transfer notes from iPhone to PC, including the following:
- It allows you to transfer data from your iPhone, iPad or any other iOS device to computer in a single click
- It can also be used to easily transfer photos, videos, music, contacts, messages and even app data like WhatsApp, Viber, etc.
- With iManager, you can easily access and manage the data in your iTunes backup files and selectively export them to computer.
- It supports all iOS devices including the newest iPhone 11/11 Pro and all versions of the iOS firmware including iOS 13.
- It comes with user-friendly interface and super-fast transfer speed. Also it won’t cause any data loss during the data transfer process.
Here’s how to to transfer notes from iPhone to computer via iManager:
- Free download Gihosoft iPhone Manager software on to your computer and follow the setup wizard to install it. Then launch the program.
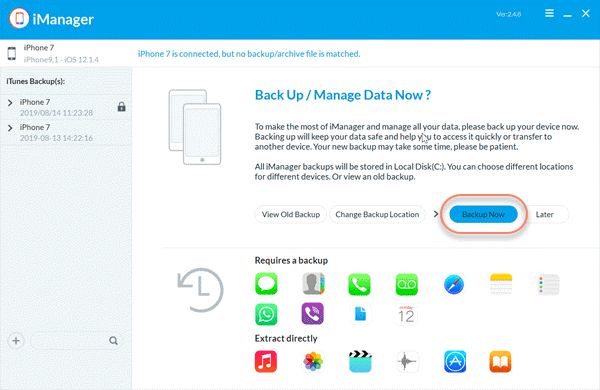
- Connect your iPhone or iPad to the computer using a USB cable and wait for the software to recognize the device. Then click on “Backup Now”.
- After that, click on the “Notes” icon and select the specific notes you would like to transfer, then select “Export to PDF/Text/CSV” at the top to begin the transfer.

Way 2: Transfer Notes from iPhone to Computer via iCloud
If you don’t want to download and install third-party tool, another effective solution to transfer notes from iPhone to computer is through iCloud. You may already know that you can back up your notes in iCloud. It is the iCloud backup that allows you to access the notes from your computer. Here’s how to do that:
- Let’s begin by ensuring that your Notes have been backed up to iCloud. To do that, go to Settings > [Your Name] > iCloud and make sure that “Notes” is turned on.
- Now on your computer, go to iCloud.com and log in with your Apple ID and password.
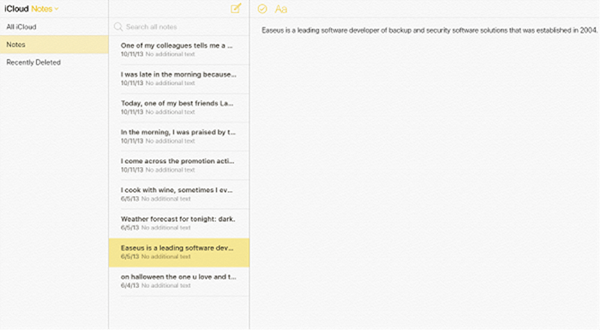
- Click on “Notes” and you should see all the notes on your iPhone. You can manage the notes any way you want including deleting, editing or even adding new notes.
- Simply copy the notes you would like to move to your PC or Mac, and then paste them to a suitable location on your computer.

Way 3: Transfer Notes from iPhone to Computer via Email
Besides using iCloud, you can also transfer notes from iPhone to PC or Mac computer via Email. It is still one of the most popular ways to send data from one device to another because of the simplicity of the process. Many people prefer Email for the the transfer of various types of files like notes, texts, contacts, photos, etc. Follow these simple steps below:
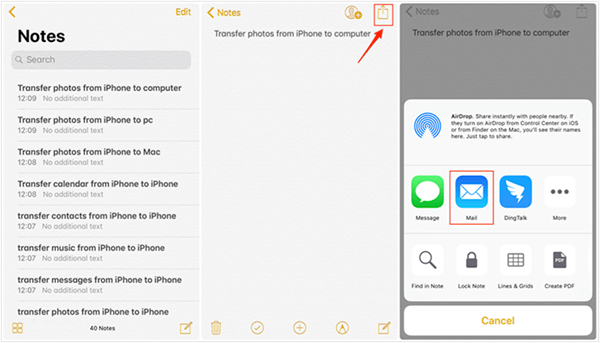
- Open the Notes app on your iPhone to begin the process. Select one of the notes that you would like to transfer and then tap “Transfer” at the top-right corner.
- Choose the “Mail” option as the transfer method and enter the email you would like to transfer the notes to, then tap on the “Send” button.
- Now open the browser on your computer and sign in to your email account. Download the notes attached to the email and save them to a suitable location on your computer.

The only shortcoming of using this email method is that you can only transfer one note at a time, making it a less ideal solution if you have a lot of notes to transfer.
Extra Tip: Recover Deleted/Lost Notes from iPhone
If there are any missing notes on your iPhone, don’t worry, you can use Gihosoft Free iPhone Data Recovery to bring them back easily and quickly. This data recovery program is both reliable and effective. Using it, you can recover deleted or lost notes from iPhone/iPad even without a backup. The following are some of its other features:
- With it, you can recover up to 12 different types of data including messages, contacts, call history, photos & videos, WhatsApp, Viber, voice memos, Safari history and so many more.
- It is useful for the recovery of data from an iOS device when you don’t have a backup or extracting the missing data from your iTunes or iCloud backup files.
- It also recovers lost data under various circumstances including accidental deletion, a lost or broken device, data loss due to an iOS update or jailbreak and other common scenarios
- It supports all iOS devices and all versions of the iOS firmware including iOS 13.
Here’s how to recover deleted/notes from iPhone without backup:
- Download, install Gihosoft Free iPhone Notes Recovery on to your computer and launch the program.
- In the main window, you should see all the different types of data you can get back using this program. Select “Notes” and any other files you want to recover.
- Connect your iPhone to the computer via USB cable and wait for the program to detect the device. Click “Next” to begin scanning.
- The program will scan the iPhone for the deleted/missing notes. The scan may take some time depending on the amount of data on the device.
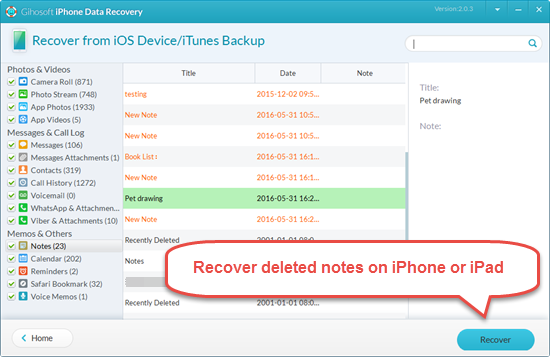
- Once the scan is complete, you should see the notes on the device listed in the next window. Preview and select the notes you would like to recover, then click “Recover” to save them on your computer.

