7 Tips to Fix iPhone Not Syncing with iTunes Issue
As the official iOS device manager, we use iTunes to back up your iPhone and sync your iPhone to computer. But there are times when iTunes doesn’t work as expected. You connect your iPhone but iTunes displays error message instead of syncing with the device. Other times, iTunes may fail to detect the device at all. This problem can be frustrating since you won’t be able to sync music, playlists, videos, media, perform local backups, etc.
Is your iPhone not syncing with iTunes? Don’t worry, you’ve come to the right place. In this article, we will take a look at some of the things you can do to fix the problem and get your iPhone syncing with iTunes again. Also, we will share you an alternative way to transfer and backup data from iPhone to computer without using iTunes.
- Tip 1: Restart Computer and iPhone
- Tip 2: Check the USB Cable/Port
- Tip 3: Update iTunes to Latest Version
- Tip 4: Reauthorize iTunes on Computer
- Tip 5: Try the Wireless Syncing Method
- Tip 6: Update Apple Mobile Device USB Driver
- Tip 7: Transfer and Manage iPhone without iTunes
Tip 1: Restart Computer and iPhone
This syncing issue is often caused by a software problem or conflicting settings on both the device and the computer. To fix it therefore, you should try to restart both the computer and iPhone. Simply turn off both devices and then turn them back on a few minutes later. You can even try to force restart the devices if a simple restart doesn’t work.
Tip 2: Check the USB Cable/Port
This may also happen if there is a problem with the USB cable or the USB port you are using to connect the device. It may therefore be a good idea to use a different USB cable or USB port to fix the iPhone not syncing with iTunes problem. If you are using a third-party USB cable, consider using the official Apple lightning cable as they are less likely to malfunction.
Tip 3: Update iTunes to Latest Version
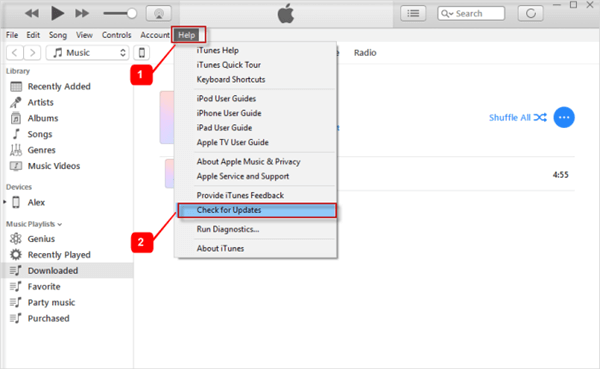
You are also likely to encounter problems like this one if the version of iTunes that is running on your computer is outdated. Updating iTunes should happen automatically, but sometimes you need to update iTunes manually. Just open iTunes and click on “About” to check if there is an update. If an update is available, iTunes will let you know. Once iTunes is updated, check if the iPhone will sync.

Tip 4: Reauthorize iTunes on Computer
If the problem continues or the sync button has been greyed out, you may need to reauthorize iTunes on the computer. Most people don’t know that iTunes uses the authorization system to ensure only a small number of computers can access the device’s data at a given time. You may need to reauthorize a computer if you hadn’t used this particular computer for a while.
To authorize iTunes on your computer, follow these simple steps:
- For PC: Open iTunes and click on the Menu Button. Hold down the “Ctrl + B” on your keyboard and then select “Authorize this Computer”.
- For Mac: Open iTunes and the click on Menu > Store > Authorize This Computer.

Tip 5: Try the Wireless Syncing Method
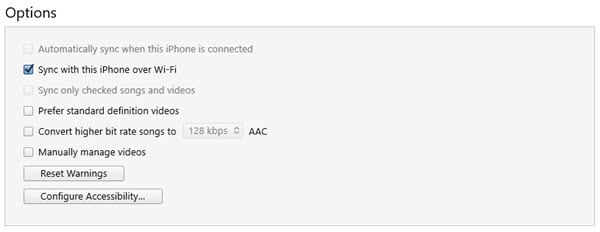
If iTunes doesn’t sync with the device when you connect the iPhone via USB cable, you can try to sync wirelessly via Wi-Fi. To do that, go to Summary in iTunes and choose the option “Sync with this iPhone over WiFi”. Then on your device, go to Settings > General > iTunes Wi-Fi Sync > Sync Now.

Please note this solution will only work if the iOS device and the computer share the same wireless network. If your WiFi network is not available, you should uncheck the option in iTunes and check the next solution.
Tip 6: Update Apple Mobile Device USB Driver
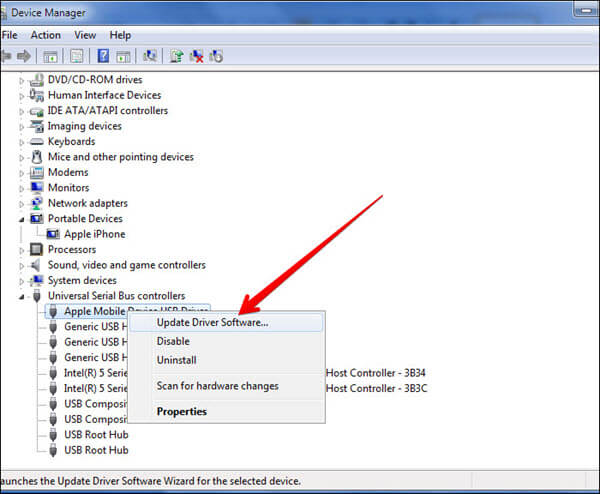
If you are trying to sync the iPhone on your Windows PC but iTunes failed to detect the device, you can try to update your iPhone driver from the Windows Device Manager. To do that, follow these simple steps:
- Open the “Device Manager” on the computer (You can use the search function to find it).
- Scroll down to find “Universal Serial Bus controllers” and expand the menu. Then choose “Apple Mobile Device USB Driver”.
- Now go the Driver tab and choose the option to “Update Driver”.
- Choose “Search automatically for updated driver software” and follow the prompts to update the driver software.

After that, restart your computer to apply the new changes and reconnect your iPhone to iTunes to check if the syncing issue has been fixed.
Tip 7: Transfer and Manage iPhone without iTunes
If you are still experiencing issues with iTunes syncing, you can try using a third-party iOS device manager to transfer and manage iPhone data. There are many iOS device managers out there that can be used to replace iTunes but perhaps the best one is Gihosoft iManager. This tool is as effective as it is easy to use and is unlikely to suffer some of the common iTunes problems. Some of the features that make iManager the best iOS data manager include the following:
- You can use it to transfer and back up all data on your iPhone or iPad to computer in a single click.
- It can manage nearly all types of data on your iPhone including photos, videos, music, messages, contacts, WhatsApp data and so much more.
- You can freely access and view an iTunes backup, easily exporting the data in the backup to the computer.
- It supports all versions of the iOS firmware including iOS 13 as well as all iOS devices even the latest iPhone 11/11 Pro.
Here’s how to transfer and backup data from iPhone to computer using iManager:
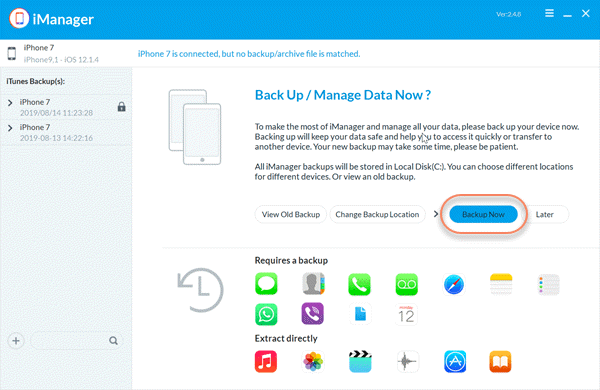
- Download and install Gihosoft iManager to your computer and run the program. Connect the iPhone to the computer using USB cable.
- Unlock your iPhone and tap “Trust This Computer” to let iManager detect and access the device. Once your device is detected, click on “Backup Now” to begin the process.
- When the backup is complete, you can choose any specific data to view all its details and export them to your computer in readable formats.

