How to Transfer Photos from Computer to iPhone 11/XS/XR/X/8/7
You may have amazing photos on your computer that you want to transfer to your iPhone. Then you can share these photos with your friends or post them on social app like Instagram more flexibly. Wondering how to transfer photos from computer to iPhone 11/XS/XR/X/8/7? You’ve come to the right place. In this article, we will introduce how to import photos from computer to iPhone with iTunes, iCloud, Google Photos and AirDrop. Also, you can learn an easy and quick way to transfer photos from iPhone to computer. Keep reading.
- Way 1: Transfer Photos from Computer to iPhone with iTunes
- Way 2: Transfer Photos from Computer to iPhone with iCloud
- Way 3: Transfer Photos from Computer to iPhone with Google Photos
- Way 4: Transfer Photos from Mac to iPhone with AirDrop
- Bonus Tip: How to Transfer Photos from iPhone to Computer
Way 1: Transfer Photos from Computer to iPhone with iTunes
One of the easiest ways to transfer photos from PC or Mac to iPhone is using iTunes. However, iTunes will remove the existing Photo Library on the device and you will lose photos, videos, TV shows, ringtones, iBooks and other media files. Follow these simple steps to transfer photos from computer to iPhone by syncing them via iTunes:
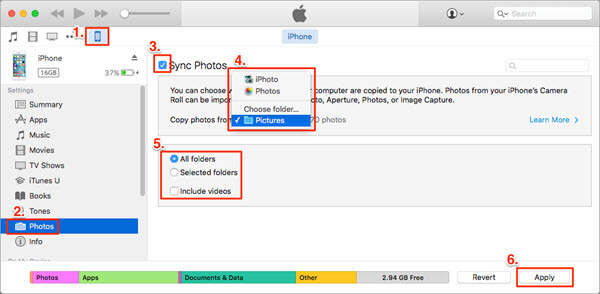
- Connect your iPhone to the computer using USB cable and open iTunes if it doesn’t launch automatically.
- Click on the Device tab and select “Photos”. Click on “Sync Photos” and then select the iPhone folder you want to sync the photos to.
- Click on “Apply” and if you have selected a folder with sub-folders, you may need to select “All Folder” or “Selected” folders before syncing.
If you have enabled iCloud Photos on your iPhone, iTunes won’t allow you to sync photos from computer to the device. You need first go to Settings > [your name] > iCloud > Photos and turn iCloud Photos off on your iPhone. Or you can move to Way 2 to sync photos from computer to iPhone via iCloud directly.
Way 2: Transfer Photos from Computer to iPhone with iCloud
You can also use the iCloud to sync photos between your iPhone and computer. You can easily upload photos from your computer to iCloud and if iCloud Photo Library is turned on your iPhone, the photos will be automatically synced to the device when connected to a Wi-Fi network. Here’s how to sync photos from computer to your iPhone with iCloud:
- Begin by enabling the iCloud Photo Library on your iPhone. You can do that by going to Settings > [Your Name] > iCloud > Photos and then turn on “iCloud Photo Library”.
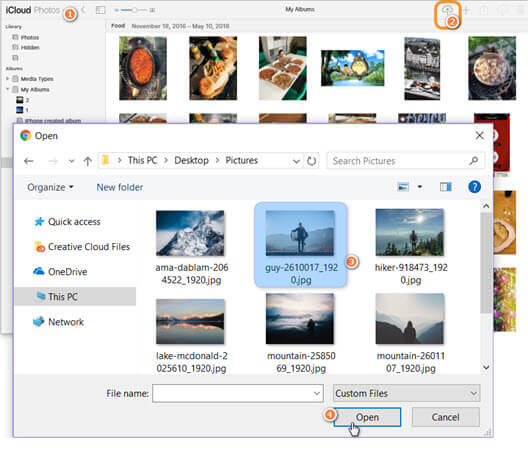
- Now on any browser on your computer, go to iCloud official site and then sign in with your Apple ID and password.
- Upload the photos on your computer to iCloud. You can do that by clicking on the “Upload” button and then select the photos on your computer to add to iCloud.
- Now open the Photos app on your iPhone and when the device is connected to Wi-Fi, the photos will sync to your iPhone.
Please note that if you disable iCloud Photo Library and turn it back on, any photos you have added to your iPhone with iTunes will be removed. Plus, iCloud only provides 5GB storage for free. If you have a large amount of photos to sync, the space will be quickly used up.
Way 3: Transfer Photos from Computer to iPhone with Google Photos
The Google Photos app also provides a easy way to transfer photos from your computer to your iPhone. You can also use other cloud services like Google Drive, Dropbox and OneDrive, which can help you transfer photos from your computer to iPhone in much the same way. Follow these simple steps to use Google Photos to transfer photos from computer to iPhone:
- Go to Google Photos on your computer and sign in with your account. Create a new album.
- Choose the photos from your computer that you would like to upload to Google Photos.
- Now on your iPhone, download and install the Google Photos app from the App Store. Open it and then log in with the same account.
- The Photos will sync automatically and you can then download the synced photos to your iPhone

Way 4: Transfer Photos from Mac to iPhone with AirDrop
If you are using a Mac computer that supports AirDrop, you can easily wirelessly transfer the photos from the Mac to your iPhone with AirDrop. Please note that this method is only suitable for transferring a small amount of pcitures. If you want to transfer your entire Mac photo library, you’d better use iTunes or iCloud Photo Library. Here’s how to AirDrop photos from Mac to iPhone:
- In Finder, select the Photo you want to transfer to your iPhone.
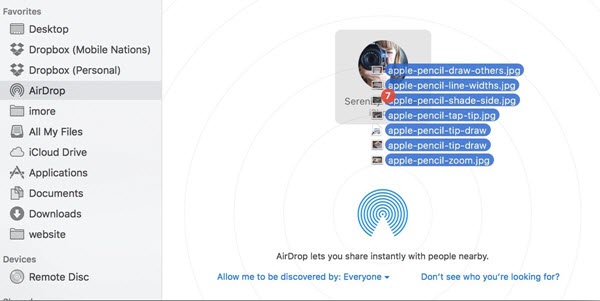
- Open a new Finder window or tab, click “AirDrop” from the side menu.
- Now unlock your iPhone and turn on AirDrop. Ensure it is set to “Everyone”.
- Drag and drop the selected photos to the “iPhone” option in the AirDrop on your Mac.
- When prompted, tap “Accept” on your iPhone to complete the photo transfer.
Bonus Tip: How to Transfer Photos from iPhone to Computer
Above are all solutions that can help you transfer photos from computer to iPhone. But what if you want to transfer the photos from iPhone to computer? The best way is to use Gihosoft iManager. This iPhone data management tool is particularly helpful when you want to transfer numerous photos from the iOS device to your computer. The transfer process is quick and simple. But before we take a look at how to use this tool, let’s first look at the program’s most useful features:
- It supports the transfer of all data from your iPhone, iPad or iPod Touch to computer in just a single click.
- It is also helpful for backing up all the data on your iPhone/iPad to your computer without overwriting the previous backup files.
- iManager can be used to manage all types of data on iOS device including photos, videos, contacts, messages, notes and even app data like WhatsApp.
- You can also use iManager to easily access an iTunes backup file and view the data in it or even export needed files to your computer whenever you need.
- It supports all iOS devices including iPhone 11/11 Pro and all versions of iOS firmware including iOS 13.
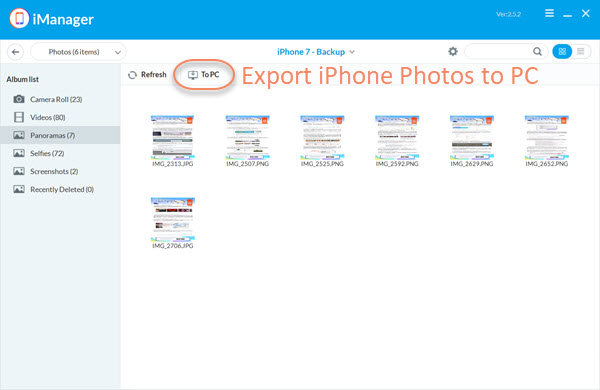
To transfer photos from iPhone to computer using Gihosoft iManager, follow these simple steps:
- Download and install Gihosoft iManager on to your computer. Open the program after successful installation.
- Now connect the iPhone to the computer via USB cable and wait for the program to recognized the device. Once detected, click on “Backup Now” to continue.
- iManager will immediately backup all data on your iPhone. When it is finished, select Photos to view iPhone photos and choose the specific pictures you would like to transfer.
- Finally, click on the “To PC” button at the top menu to save the selected photos to your computer for easy viewing.
