7 Ways to Transfer Photos from iPhone to PC or Mac
The longer you use your iPhone, the more you realize the benefits of transferring photos from iPhone to the computer. With the powerful camera set, people enjoy taking photos with the iPhone. And as time goes, images stored on your iPhone keep piling up eating a mass of iPhone storage space. To free up your iPhone storage space, it is a decent choice to get iPhone photos to your Windows PC or Mac. And it is also a backup preventing iPhone photos from being lost. You have a lot of options to transfer photos from iPhone to computer and here we will show you seven of them.
- 1.Download iPhone Photos to Computer from iCloud
- 2.Transfer Photos from iPhone to PC via File Explorer
- 3.Move iPhone Photos to PC through Windows AutoPlay
- 4.Import Photos from iPhone to Computer with Photos App
- 5.Get iPhone Photos to Mac using Airdrop
- 6.Transfer Photos from iPhone to Computer by Third-Party App
- 7.Backup iPhone Photos to Computer with iPhone Manager
1.Download iPhone Photos to Computer from iCloud
iCloud photos allows you to browse and access all the photos and videos from any of your devices. Thanks to iCloud Photos, when you take a photo on your iPhone, you can see it on other devices and iCloud.com logged into the same iCloud account. Let’s see how to transfer photos from iPhone to PC or Mac via iCloud.
Turn on iCloud Photos
- On the iPhone, go to Settings > [your name] > iCloud > Photos and toggle iCloud Photos on.
- On your Mac, head over to System Preferences > iCloud. Click on the Options button next to Photos, then check iCloud Photos.
- On the PC, Download and install iCloud for Windows, then sign in with your Apple ID. Click on the Options button next to Photos and select iCloud Photo Library.
Download photos to computer
After you activate iCloud Photos, all the iPhone photos are uploaded to iCloud and accessible from your Mac or Windows PC. Now you can start to download your iPhone photos to the computer.
- On Mac, open the Photos and select the photos you need (you may press Command – A on the keyboard to select them all). Then click File > Export > Export [number] Photos in the menu bar. Choose “Export Selected items…” or “Export Unmodified Original For Selected items…” and click “Export”.

- On Windows PC, open iCloud Photos in a File Explorer window. Click on Download photos and videos and select the photos and videos you want, then click Download. The downloaded photos and videos are kept in the location you set in iCloud Photos Options.

Alternative way to download photos from iCloud
If you don’t want to turn on iCloud Photos on Mac or set up iCloud on the PC, there is an alternative for you. You can download iPhone photos to computer from iCloud.com. Here are the detailed steps.
- Visit iCloud.com on a web browser and sign into iCloud account.
- Click on Photos icon and select the photos you need. You can hold down the Ctrl or Command key on the keyboard to multi-select pictures.
- Click the download icon.
Note: Using iCloud to transfer photos from iPhone to computer is definitely convenient, however, nothing can be perfect. The photos you upload to iCloud use your iCloud storage, so if you have no enough space in iCloud to store all photos, this way doesn’t suit you.
2.Transfer Photos from iPhone to PC via File Explorer
File Explorer, also known as Windows Explorer, is a file manger app that you can use to import photos from your iPhone to computer running Windows 10/8/7 efficiently. All you need is a USB cable. But the defect is that you can only import the photos in Camera Roll.
Here’s how to transfer photos from iPhone to PC with File Explorer.
- Step 1: Connect your iPhone to the Windows computer via a USB cable. Unlock the iPhone and choose “Trust this computer” if asked.
- Step 2: Open the File Explorer and double-click your iPhone when it appears under My Computer section. If not, unplug it and plug it back in.
- Step 3: Open Internal Storage > DCIM and click on an APPLE folder.
- Step 4: Select the photos you want to transfer and copy them to the clipboard. You can press “Ctrl – A” to select all photos in the folder.
- Step 5: Open any folder you like on the hard driver and paste copied photos there. Then wait for the process to complete.

Please note that Items synced from iTunes cannot be copied.
3.Move iPhone Photos to PC through Windows AutoPlay
Windows 7/8 has the AutoPlay function in Control Panel that can help transfer photos from iPhone to PC. Similar to File Explorer, you need to connect your iPhone to computer with a USB cable.
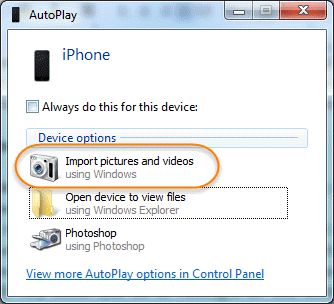
- On windows 7/8, navigate to Start > Control Panel > Hardware and Sound > AutoPlay.
- In AutoPlay interface, make sure “Use AutoPlay for all media and devcies” is ticked, then click “Save”.
- Connect your iPhone to the computer.
- When the AutoPlay window appears, click “Import Pictures and Videos using Windows”.
- A small window will then appear on the bottom right to estimate the total of your photos. Optionally you can tag these pictures, and then click Import to get all images to PC.
If you see no AutoPlay window popping up, here is a workaround for you to move iPhone photos to computer.
- Open File Explorer and right-click your device under My Computer.
- Click “Import pictures and videos”.
- You can click on “Import Settings” or “More Options” in Windows 8 to adjust the import settings.
Note: Windows AutoPlay also only supports to transfer Camera Roll pictures, images in Photo Stream and Photo Library are not included. Moreover, the photos imported are disorganized on your computer. If you are not satisfied with the importing result, skip to Part 6.
4.Import Photos from iPhone to Computer with Photos App
For Mac users, it’s well known that you can directly import photos via the Photos app on Mac. Similarly, now, Windows 10 users also have a Photos app to import photos from iPhone quickly.
Copy iPhone Photos to Mac using the Photos App:
Note: Make sure you have the latest iTunes installed on your Mac.
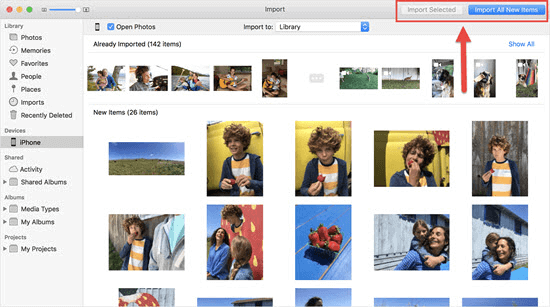
- Connect your iPhone to the Mac and the macOS Photos app will open automatically.
- Click on the Import tab at the top or the device’s name on the sidebar.
- Select the photos you need and click on Import Selected to get photos off iPhone. If you want all new photos, click on Import All New Photos.
Import iPhone Photos to Windows 10 with Photos App:
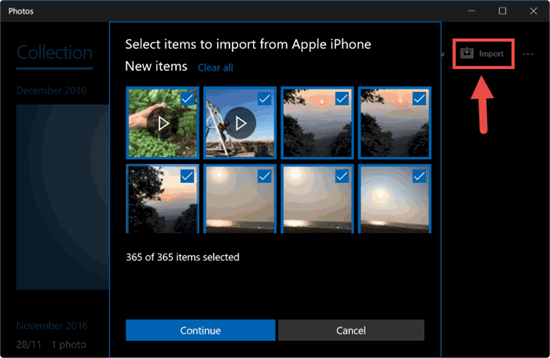
- Connect your iPhone to the PC and then open the Photos app.
- Click Import at the top right and select the photos you want to import.
- Click on Continue to transfer photos from your iPhone to the PC.
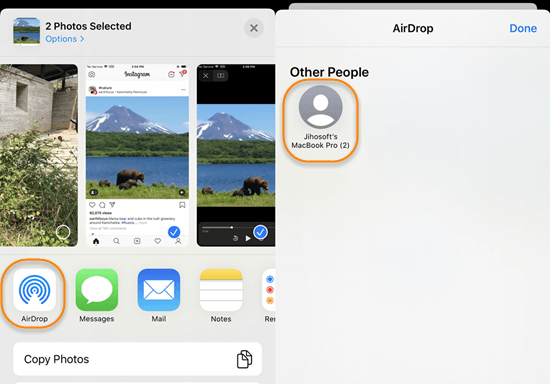
5.Get iPhone Photos to Mac using Airdrop
To transfer photos between iOS devices and Mac, using Airdrop is a good choice. It requires no connection between your iOS devices and Mac via a USB cable. But it is only suitable for one or several pictures. If you have hundreds or even thousands of photos, it is not an ideal method.
- Step 1: Switch on Airdrop on your iPhone
- Go to Settings > General > Airdrop.
- Tap on the Everyone bar or the Contacts only bar.
- Step2: Switch on Airdrop on Mac
- Head to Finder > Go > Airdrop.
- Click on “Allow me to be discovered by:” and choose Contacts Only or Everyone.
- Step 3: Start to import iPhone photos
- Open the Photos app on your iPhone.
- Tap on the Select in the top right corner, and tick the pictures you want to import.
- Click on the share icon at the bottom left, wait until you see the name of your Mac, and flip it.
- Click the Accept when a window pops up on your Mac.
Note: If your photos can’t be opened as JPEG on the computer after transferred from iPhone, it may be the HEIC format problem. Read the guide on How to convert iPhone HEIC photos to JPG to easily solve the problem.
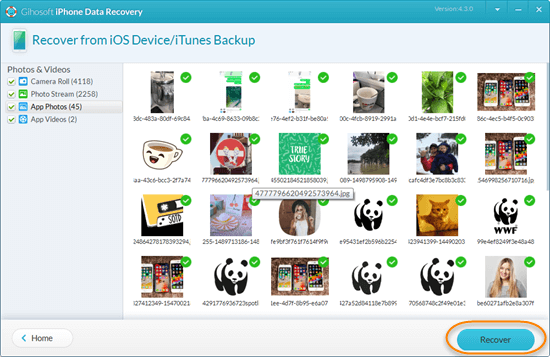
6.Transfer Photos from iPhone to Computer by Third-Party App
Gihosoft iPhone Data Recovery is a data recovery tool that can help you retrieve up to 16 types of files, including photos and videos, from your iOS devices, iTunes backup, and iCloud backup. Aside from photo recovery, Gihosoft iPhone Data Recovery software can also be used as a tool for transferring photos. Follow these steps to transfer photos from iPhone to the computer.
- Step 1: Run Gihosoft iPhone Data Recovery, tick the file type Photos & Videos, click the Next.
- Step 2: Connect your iPhone to the computer. When the program recognizes your iPhone, click on the Next button to start scanning. (Or you can extract photos from iTunes or iCloud backup.)
- Step 3: Select the pictures you want, and click on Recover to copy them to your PC or Mac.
7.Backup iphone Photos to Computer (without iTunes)
When it comes to backing up iPhone data to computer, iTunes is always the preferred method. However, backup in iTunes is not readable or accessible unless you restore the whole backup to your device. So iTunes is not that good choice to backup iPhone photos to computer. Isn’t there a better way to manage this stuff? Well, there are many iTunes alternative to make a backup of iPhone. Gihosoft iManager is typically recommended to you.
Using this app, you can backup photos and other data from your iPhone to computer at ease. And you can view the contents in the backup and export them to readable formats like PDF, CSV, TXT, etc. Besides, it allows you to change the backup location and backup iPhone to to external drive.
- Download, install and launch iPhone Manager on your computer, then connect your iPhone to the computer via a USB cable.
- Once the program detects your device, click the “Backup Now” button. If need, you can click the “Change Backup Location” button to specify any place to store the backup.
- When it finishes backup, click on the Photos icon to view pictures inside the backup and export them.

To sum up
It is beneficial to transfer your photos from iPhone to the computer. On the one hand, it can save the storage space of your iPhone; on the other hand, it creates a backup of your photos and prevents them from being lost. Above all are 7 easy and simple ways we summarize to help get photos from your iPhone to the computer. Some of them are applied to both the Windows PC and Mac, while some of them are applied to Windows PC or Mac respectively. You can choose the one which is best for you according to your needs. If you come up with more methods of transferring photos to computer, please tell us in the comment section.
Related Articles
Recommended Software
- Android Data Recovery
-

- Easy-to-use data recovery tool for Android devices to recover lost files from Samsung, HTC, LG, Motorola etc.
- Windows Mac