5 Simple Tips to Transfer Videos from iPhone to PC
Using your iPhone or iPad to take videos now is really convenient, however, you may quickly run out of storage space. Dealing with inadequate storage capacity on your phone can be frustrating. One way of freeing up space on the device is by moving files especially videos from iPhone/iPad to a computer. Aside from reclaiming more storage space, transferring videos from iPhone to a PC also serves as a safe backup option in case of unexpected data loss.
Whatever your reasons are, this post will share with you 5 effective ways to transfer videos from iPhone or iPad to your PC computer. Browse through all these solutions and choose your preferred one to complete the task.
- Tip 1: Transfer Videos from iPhone to PC with Gihosoft iManager
- Tip 2: Transfer Videos from iPhone to PC with iCloud Photos
- Tip 3: Transfer Videos from iPhone to PC via Photos in Windows 10
- Tip 4: Transfer Videos from iPhone to PC via AutoPlay in Windows 7
- Tip 5: Transfer Videos from iPhone to PC via Windows Explorer
Tip 1: Transfer Videos from iPhone to PC with Gihosoft iManager
Gihosoft iManager is one of the best professional file manager and transfer tool available for iPhone, iPad and iPod touch. This iPhone Manager not only allows you to transfer videos from iPhone/iPad to PC, but works effectively in transferring many other types of data like music, photos, contacts, text messages, WhatsApp, notes, etc. from any iOS device to computer. As an amazing alternative to iTunes, iManager allows you to backup, sync, view and manage data on your iPhone conveniently on your PC.
Other features and tasks you can complete with Gihosoft iManager include:
- You are allowed to backup iOS files to external hard drive or any other location, without using iTunes/iCloud.
- You can freely create a new backup of your iPhone/iPad without necessarily overwriting older backup files.
- You are able to find iTunes backup location and access, view, extract or export data from iTunes backup.
- iManager is compatible with all iPhone models as well as iOS systems, including the latest iPhone 11/11 Pro and iOS 13.
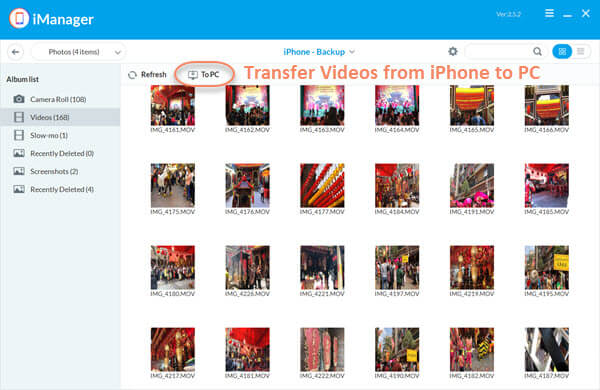
Now that we’ve highlighted some of the features of Gihosoft iManager, we’re going to show you how to transfer videos from iPhone to PC step by step:
- Download and install Gihosoft iPhone Manager on your computer, then run it. Connect your iPhone or iPad to the PC via USB cable.
- Click on “Backup Now” to start the transferring process. You can choose the location stores the videos you want to move.
- After that, click on the “Videos” option, and select the videos you need, then click on “To PC” to begin exporting iPhone videos to PC.
Tip 2: Transfer Videos from iPhone to PC with iCloud Photos
iCloud allows iOS users to gain access to videos and photos from all their iDevice, Mac and even PC. If you own an iPhone and you’ve enabled the iCloud Photos feature, then all the photos and videos on your iPhone would be backed up to your iCloud. You can then easily transfer videos from iPhone to PC with iCloud Photos. Here’s how to do that:
- Sign in to your iCloud account on your iPhone or iPad and ensure you are connected to a reliable Wi-Fi network.
- Go to Settings > [your name] > iCloud > Photos and turn on iCloud Photos, all videos on your device will be uploaded to iCloud with WiFi.
- Download and install the iCloud for Windows app onto your PC and run it. Then sign in using the same iCloud account on your iPhone/iPad.
- Click on “Photos” and choose “Download new photos and videos to my PC”, then click “Done” > “Apply”.

Having completed the above steps, all the videos (including photos) on your iPhone will be transferred to your PC whenever connected to a Wi-Fi network. To access, view and download videos from iCloud to PC, open File Explorer on Windows 10/8 or Windows Explorer on Windows 7, then click on “This PC (Computer)” > “iCloud Photos” > “Download”.
Tip 3: Transfer Videos from iPhone to PC via Photos in Windows 10
If you use a Windows 10 and want to get videos off your iPhone to your PC, then you can make use of the Photos app. The Windows 10 Photos app is just the same as the Photos app on Mac, which allows users to import videos (as wells as photos) from their iPhone to PC computer. Follow the given steps below:
- Connect your iPhone or iPad to the Windows 10 computer using a USB cable.
- Enter your password if prompted to unlock your iPhone and tap on “Trust” on the device to continue.
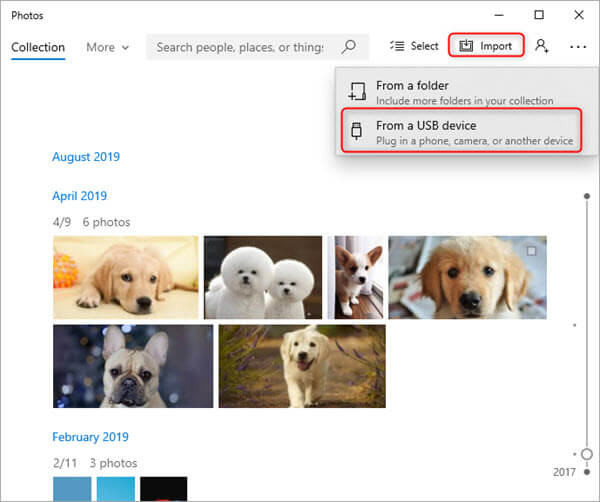
- If the Photos app does not pop up automatically, go to the Start menu on your PC to launch it.
- Next, select “From a UBS device” from the Import option. The Photos app will then search for videos and photos on your iPhone. Wait for it to finish the search.
- Now select the videos you would like to get from your iPhone to your PC, choose the import destination and click “Import Selected”.
Tip 4: Transfer Videos from iPhone to PC via AutoPlay in Windows 7
In the previous method, I showed you how to transfer videos from iPhone to Windows 10 PC. Then what if you’re a Windows 7 user and looking for a way to get videos on your iPhone to your PC? The solution is simple – use the AutoPlay feature. Here’s how to import videos from iPhone to PC using AutoPlay:
- Connect your iPhone to your PC using a USB cable and AutoPlay will show up automatically.
- In the AutoPlay dialog box, click on “Import pictures and videos”.
- Click the Import Settings, then choose or create a new folder to save the videos you want to transfer.
- Choose the videos you want to save and then click “Import” to get videos from your iPhone to PC.

Please Note: When importing videos from iPhone to Windows 7 with AutoPlay, only videos in your iPhone’s Camera Roll can be transferred. Videos in Photo Stream and Photo Library are not supported.
Tip 5: Transfer Videos from iPhone to PC via Windows Explorer
Windows Explorer is now known as “File Explorer” in Windows 8 and 10. Using it, you can get videos on your iPhone to your PC. Just like AutoPlay, this also import Camera Roll videos only. Below are the steps you should follow to transfer videos from iPhone to PC with Windows/File Explorer:
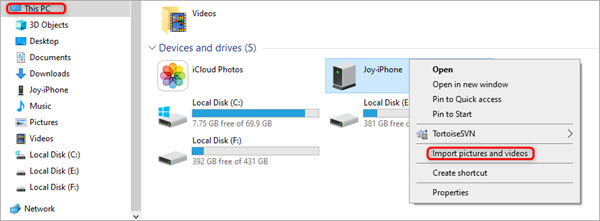
- Connect your iPhone to PC via a USB cable. Open “This PC” and locate your device.
- Right-click your iPhone’s name and select “Import pictures and videos”.
- Select “Review, organize, and group items to import” and then click on “Next” to proceed.
- Now choose the videos you wish to transfer to your PC and click on “Import” to begin transferring the selected videos.
Alternatively, you can transfer videos from your iPhone to your PC by doing this: Go to “This PC” > [your iPhone name] > “Internal Storage” > “DCIM” > “100APPLE”, then copy and paste the videos from your iPhone to your computer.
Conclusion
There you have it – 5 working methods on how to get videos from iPhone to computer. Are you looking to free up memory space on your iPhone by moving videos from your iPhone to a PC? Then go ahead and try any of the solutions above, and I am confident it is all you need to import videos from iPhone to PC.