How to Transfer Photos from iPhone to PC Windows 10/8/7
My iPhone has been saying: “There is not enough available storage to take a photo. You can manage your storage space in Settings. ” How do I solve this problem? I don’t want to delete my beloved photos to free up space, all of them are my best memories!- Jenna asked.
I think most iPhone users have encountered this problem. When increasingly pictures are stored on your phone, the phone will run out of memory. To fix this problem, you have to delete some favorite photos to free up space. In fact, this is not necessary! Here’s a better way to not only keep photos but also clean up memory, that’s to transfer photos from your iPhone to the computer. Furthermore, backup iPhone photos to computer so that you won’t lose any precious photos, and you will find that it could save the day if disaster strikes.
Now with the 5 quick ways below, you can delete tons of photos from your iPhone without hesitation and enjoy taking new photos. Read on and find out how to backup and transfer photos from iPhone to PC easily.
- Way 1: Transfer Photos from iPhone to PC with Gihosoft iManager
- Way 2: Import Photos from iPhone to PC with Windows Photos App
- Way 3: Transfer Photos from iPhone to PC with Windows Auto Play
- Way 4: Copy Photos from iPhone to Computer with Windows Explorer
- Way 5: Transfer Deleted/Hidden Photos from iPhone to PC
Way 1: Transfer Photos from iPhone to PC via Gihosoft iManager
Gihosoft iManager is a powerful and easy-to-use data transfer software that can be used to export data from iPhone to your computer. With it, you can easily transfer contacts, messages, call logs, photos, music, videos, notes, WhatsApp, Viber, voice memos, Safari history and more from iPhone to Windows PC. What’s more, the software supports almost all types of iOS devices and iOS versions, even the latest iPhone 11/11 Pro and iOS 13, as a result, you don’t need to fear about compatibility issues. Next, let’s see how to transfer photos from iPhone to computer via this mobile transfer software.
- Run Gihosoft iPhone Manager software on your computer and connect your iPhone to the computer using USB cable.
- Once your device is detected by the program, tap “Backup Now” on the main interface to begin the transfer process.
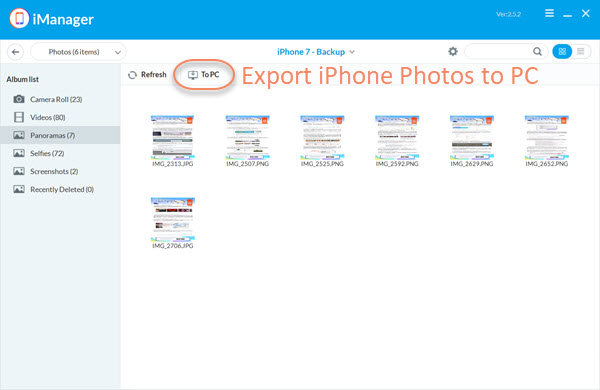
- When the backup is done, click on the Photos icon to view all backed up pictures, then tap on “ To PC” to transfer photos from iPhone to PC.
Tips: During the process of transferring data, please ensure that the phone is continually connected to the computer. Besides, if you’ve backed up your iPhone with iTunes, Gihosoft iManager allows you to view and export photos from the iTunes backup to PC. The steps are also very simple: Run the software on your PC > select the backup file that contains the photos you need > tap on the Photos icon to view and export pictures to your computer.
Way 2: Import Photos from iPhone to PC with Windows Photos App
If you are running a Windows 10 or Windows 8 computer, you can easily import photos from iPhone to PC with the Windows Photos app. However, it only transfer the iPhone Camera Roll photos. Follow the steps below:
- Connect your iPhone to the computer using a USB cable and the Photos app should launch automatically. If not, open it from the Start menu, desktop or taskbar.
- In the top-right corner of the window, click on the “Import” button and then select “From a USB Device”.
- The Photos app will begin searching for pictures on your iPhone, choose the photos you want to import and click “Continue” to begin the import process.

Way 3: Transfer Photos from iPhone to PC with Windows Auto Play
If you are working with a Windows 8/7 computer, you can transfer photos from iPhone to PC with Windows Auto Play feature. Similar to Windows 10, it only transfer photos from iPhone Camera Roll to your PC.
Here’s how to use Windows AutoPlay in Windows 7:
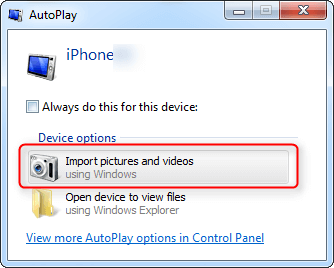
- Plug your iPhone to the Windows 7 PC. Click on “Import Pictures and Videos using Windows” when the AutoPlay window pop-up.
- Click on the “Import Settings” link and tap the “Browse” button to define the destination folder.
- After that, click “OK” and select a tag, then click on the “Import” button to copy Camera Roll photos from iPhone to Windows 7 computer.
Here’s how to use Windows AutoPlay in Windows 8:
- Plug your iPhone to the Windows 8 PC. Wait for the computer to detect the device and tap on “Trust” to continue.
- Open “This PC” and right-click on your iPhone, then select “Import pictures and videos”.
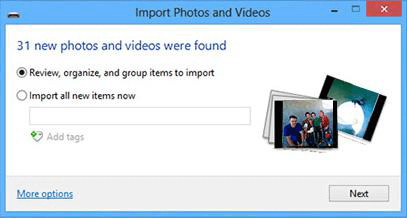
- If you are importing photos for the first time, choose “Review, organize, and group items to import”. If you’ve transferred photos before, select “Import all new items now”.
- Tap on the “More options” link to select the destination folder for your iPhone photos, then click “OK > Next”.
- Select the photos you want to copy, then click on the “Import” button.
Note: When connecting iPhone to your Windows 7/8 computer, but the AutoPlay window doesn’t pop up, you can try to reconnect your iPhone, change another USB cable/port, restart the computer, or install the latest driver for your computer, etc.
Way 4: Copy Photos from iPhone to Computer with Windows Explorer
You can also get photos from iPhone to your computer using Windows Explorer. But it also imports photos from iPhone’s Camera Roll only and your photos are saved in disorder. Here’s how to do it:
- Connect your iPhone to PC using a USB cable and launch Windows Explorer from Start menu, desktop or taskbar.
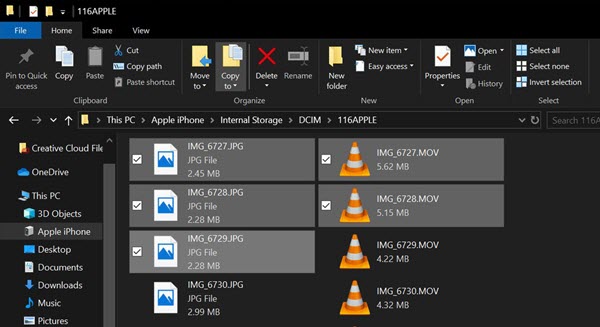
- Click the arrow next to This PC and tap on your iPhone’s Name, then double-click on Internal Storage > DCIM.
- Open any folder to check if it contains the photos you want to transfer. Select the photos you need and copy-paste them to the desired folder on your Windows PC.
Way 5: Transfer Deleted/Hidden Photos from iPhone to PC
Due to some reasons, the photos on your iPhone may be invisible. How to download and transfer hidden pictures from iPhone to PC? Don’t worry. Gihosoft Free iPhone Data Recovery can scan all existing, hidden and even deleted photos in iPhone storage, and then download these pictures from iPhone to computer with ease. Not only iPhone, it can also access, view and save photos from iTunes/iCloud backup, provided you have one.
Here’s how to transfer hidden/deleted photos from iPhone to PC:
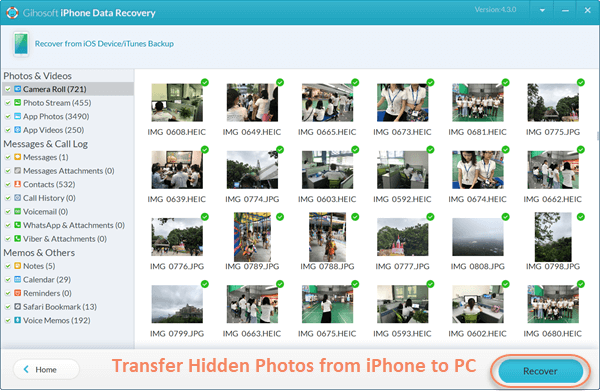
- Launch Gihosoft iPhone Photo Recovery software on your computer and choose “Photos & Videos” that you want to save, then click on “Next” to proceed.
- Connect your iPhone or iPad to the computer using a USB cable. When the program detects the device, click “Next” to begin scanning.
- After scanning, you can preview all found photos and select the items you want to save, then click on “Recover” to transfer hidden/deleted photos from iPhone to PC.
Related Articles
Recommended Software
- Mobile Transfer
-

- Mobile phone transfer tool to move contacts, SMS, photos, videos, music and more between Android and iOS devices.
- Windows Mac