How to Change Media Sync Options on iPhone 11/XS/XR/X/8/7
Q: How do I change my media sync options to allow more storage for updates?
“I’m trying to update my iPhone but iTunes tells me I need to change my ‘media sync options’ to free up more storage. I have no clue what this means. What do I do? Thanks for any help!”

Have you been trying to update your iPhone to the latest version of iOS only to receive a notification that you need to change media sync options to make room for the update? While updating your iPhone to the latest iOS 13 to enjoy many amazing features and functions, the process itself is not without problems and this one is just one of the most common.
This problem can often be frustrating since most people don’t know what it is and how to deal with it. If this is the trouble you are getting when you try to update your iPhone, this article will prove very useful to you. In it, we will look at how you can change the media sync options on your iPhone.
- Part 1. Why You Need to Change Media Sync Options
- Part 2. How to Change iPhone Media Sync Options
- Part 3. Delete Content via Settings to Make More Storage
- Part 4. Transfer iPhone Data to Computer to Make More Storage
Part 1. Why You Need to Change Media Sync Options
You might receive the message: “Update to iOS XXX requires at least XXX MB of free space on your iPhone. Please change your media sync options to make more storage available” when connected your iPhone to PC to update it via iTunes. The main reason you might see this message is because you don’t have adequate storage space on the device to complete the update.
To update the iPhone, you need at least 10% of the total storage space on the device. If you don’t have available storage space on your iPhone, you will need to free up some space on the device which is why the iTunes may ask you to change the media sync options to make storage available.
Part 2. How to Change iPhone Media Sync Options
To change the media sync options on your iPhone, follow these simple steps:
- Connect the iPhone to your computer using the lightning cable that came with the phone.
- Launch iTunes if it doesn’t open automatically. Make sure that you are running the latest version of iTunes.
- Click on the iPhone icon when it appears in iTunes and then under “Settings”, select the type of content that you want to stop syncing.
- Uncheck the box to turn off syncing for the type of data you have selected.
- Click “Apply” to complete the process and save the sync settings.
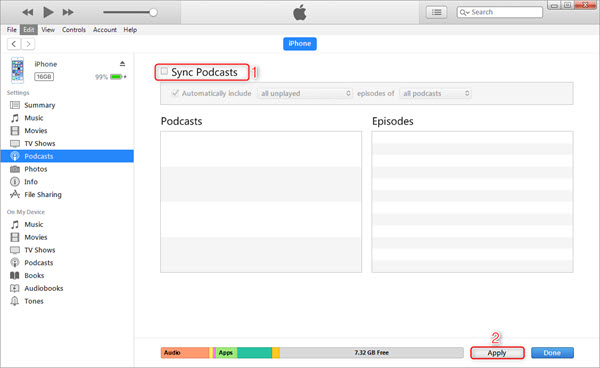
The unchecked data will be removed from the iPhone, creating more space to allow you to update the device.
Part 3. Delete Content via Settings to Make More Storage
Apart from changing the media sync options, you can also create more space on your iPhone by deleting some of the contents on the device via Settings. Here’s how to do that:
- On your iPhone, open the Settings app and tap on “General”.
- Select “iPhone Storage” and choose the app with the content that you want to delete.
- Click on “Delete App”, the app and all its related data will be completely removed from the iPhone.
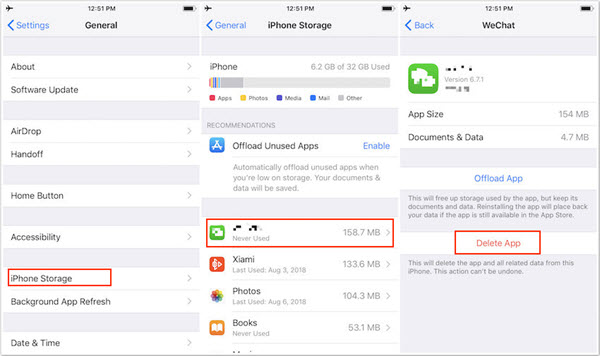
Note: This method will permanently delete the app and all its data on your iPhone. There is no way to undo this until you use third-party iPhone Data Recovery tool.
Part 4. Transfer iPhone Data to Computer to Make More Storage
If you don’t want to completely delete the data to free up space on your iPhone, the best solution would be transferring all or some of the data to the computer and then safely deleting the files on your iPhone to make more storage available. One of the best tool to help you transfer data to the computer is Gihosoft iManager. It is a professional iOS data management tool that will help you easily backup iPhone/iPad data before upgrading. With this tool, you can backup iPhone without iTunes or iCloud and then freely view all your data on computer.
Following are some of the features that make iManager the most ideal solution:
- It allows for the transfer and backup data from your iPhone, iPad or iPod Touch in just a single click.
- iManager can manage all types of data on the iOS device including photos, contacts, messages, notes and even app data like WhatsApp, Viber, etc.
- You can also use it to access an iTunes backup file and export the data from it to your computer.
- It supports all iOS devices including iPhone 11/11 Pro and all versions of iOS firmware including iOS 13.
List the steps on how to transfer data from iPhone to computer for backup and then delete data on iPhone to make more storage,
Here’s how to transfer data from iPhone to computer for backup and then deleted unwanted files on the device to make more storage:
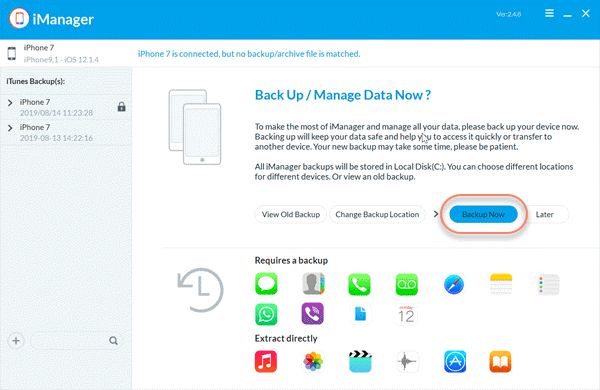
- Download and install Gihosoft iPhone Manager on to your computer. As soon as the installation is complete, double-click on the program to open it.
- Now connect the iPhone to the computer using USB cable. Once the device is detected, you can click on “Backup Now” to begin the transfer process.
- When the transfer process is complete, you can click on the specific data icon to check the data you’ve backed up in details.
- Preview and select the files you want, then click on the export icon to save them on your computer in readable formats.