[Fixed] iPhone Photos Not Uploading to iCloud
“I just turned on the iCloud Photo Library and about 100 photos uploaded to iCloud, then it stopped uploading. I saw an error message that uploading stopped to save battery life and asked me if I want to restart. I said yes and plugged iPhone in to power but uploading still not restart. Any suggestions?”
Being able to back up your photos and videos to iCloud is one of the best ways to keep them safe. Usually, if the iCloud Photos is enabled on your iPhone or iPad, all your photos and videos can be automatically uploaded to iCloud, allowing them to be accessible on all other iOS devices using the same Apple ID. But recently many iOS users have reported that photos not uploading to iCloud from their iPhone.
This problem can be caused by a wide range of problems with the iOS device, such as poor network connection, iCloud server down, insufficient storage in iCloud, etc. If you are troubled with the same problem, you’ve come to the right place. In this guide, we will share 5 effective tips to fix iPhone photos not uploading to iCloud issue.
- Fix 1: Check Network Connection
- Fix 2: Check Apple Server
- Fix 3: Check iCloud Storage
- Fix 4: Enable iCloud Photo Library
- Fix 5: Alternative Way to Backup Photos on iPhone
Fix 1: Check Network Connection
To upload iPhone photos to iCloud, your device needs to be connected to a functioning Wi-Fi network. The following are just some of the things you can do to improve internet connection and then fix photos not uploading to iCloud from iPhone.
Option 1: Reconnect the iOS device to Network
- Step 1: Open the Settings on your iPhone and then turn off Wi-Fi, wait a few seconds before turning it on again.
- Step 2: Still in Settings, tap on WLAN and select the Wi-Fi network you’re connected to. Tap “Forget this Network” and then input the password to connect to the network again.
Option 2: Check the Router
You may want to place your iPhone closer to your Wi-Fi router since distance can affect the connectivity leading to all kinds of problems including this one. If you suspect that the router could be the problem, you can choose to reset the router. Most routers have a little Reset button that you can press to turn off the router and turn it on again.
Please Note: The automatic iCloud Photos backup feature will only work with Wi-Fi. So, if your iPhone are on a cellular data connection, switch to Wi-Fi.
Fix 2: Check Apple Server
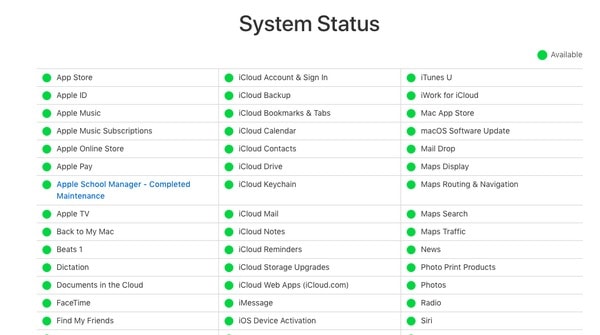
Keep in mind that the photos you upload to iCloud are stored in the Apple Server. If the server is down, you will not be able to upload the photos to iCloud successfully. Fortunately, there is a way to check the Apple server status, just follow these simple steps:
- Step 1: Go to Apple official site to access the Apple Server status page.
- Step 2: Look for iCloud and if there is a red dot next to it, the server is down. If there is a green dot instead, the server is available and functioning.
Fix 3: Check iCloud Storage
You only get up to 5GB of iCloud storage with the free option. If you have too many files depleting the storage space, your photos may not upload to iCloud. Here’s how to check the storage space on your iPhone:
- Step1: Open the Settings and tap on [Your Name], then go to iCloud.
- Step 2: Tap on “Storage” and you should see the available storage space on your account.
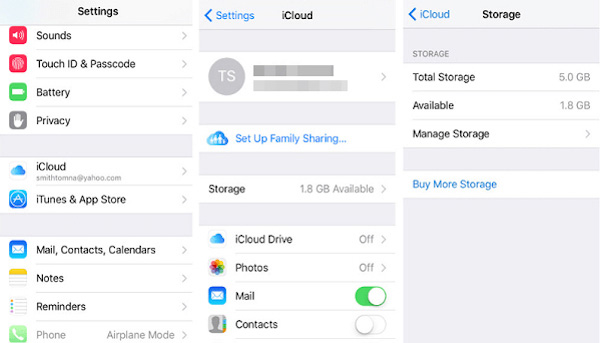
If the storage space is insufficient, you can choose to delete some of the unwanted data to make space for the photos.
Fix 4: Enable iCloud Photo Library Again
Toggling iCloud Photo Library on/off is another great solution for fixing iPhone photos not uploading to iCloud problem. Follow these simple steps to do it:
- Step 1: Open the Settings app on your iOS device and then tap on [Your Name] > iCloud > Photos or “iCloud > Photos” for iOS 10.2 and earlier.
- Step 2: Locate “iCloud Photo Library” and then tap on the switch next to it to turn it off. Wait a few seconds before turning it on again.

Note: If the problem persists, you should also turn on “My Photo Stream” as well.
Fix 5: Alternative Way to Backup Photos on iPhone
If you are still unable to upload iPhone photos to iCloud, you should consider backing up the photos to your computer instead. To do this, you can rely on a specialized iPhone data backup tool that is designed for this purpose. One of the best tools to help you back up the photos on your iPhone to your computer is Gihosoft iManager. Some of its features include the following;
- It allows you to transfer photos from iPhone or iPad to your computer easily and quickly for backup.
- It can also be used to easily transfer and backup other types of data on your device including videos, music, contacts, messages and even app data like WhatsApp chats.
- With iManager, you can easily access the data in your iTunes backup and transfer them to your PC without having to restore the whole backup.
- It supports all iOS devices including the new iPhone 11/11 Pro and all versions of the iOS firmware including iOS 13.
To transfer and backup photos on your iPhone to computer with iManager, follow these simple steps:
- Download and install the iPhone Manager tool to your computer. Launch it and then connect the iPhone to the computer using USB cables.
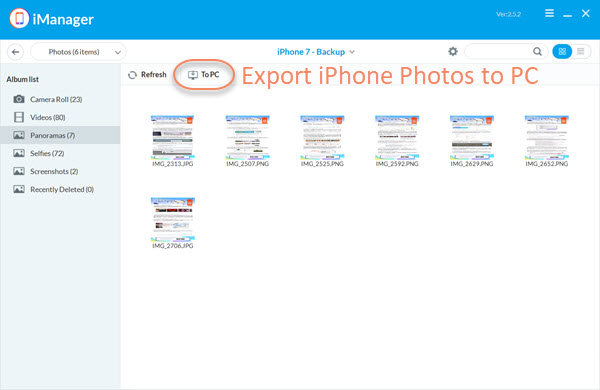
- As soon as the program detects the device, click on “Backup Now” on the main interface to begin the backup process.
- When the backup is done, you can click on the Photos icon to view all photos from your iPhone. Also, you can tap on “To PC” to export photos to your PC.
Gihosoft iPhone Manager allows you to change the backup location. You can even backup photos and data on iPhone to external hard drive.