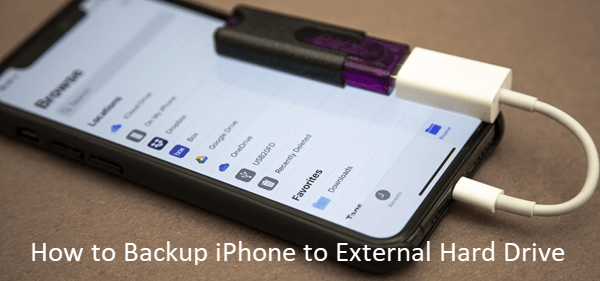
How to Backup iPhone to External Drive (iOS 13 Supported)
Imagine that you woke up one morning and discovered all the data on your iPhone is gone – not a single one of them left. It is really a frustrating situation. Unfortunately, data loss is very common and could happen to anybody. Many factors can cause loss of important files on an iPhone or iPad, such as accidental deletion, iOS update, jailbreak, factory reset, software crash, etc. It is, therefore, a good practice to backup your iPhone or iPad in case of any unfortunate circumstances.
If you back up your iPhone or iPad via iTunes, your backup is stored on your internal drive which can take up a lot of your computer’s storage. This can cause problems on PCs or Macs with limited storage. Of course, you can make a backup to iCloud, but the free iCloud storage is also limited. Don’t worry. A simple solution is to backup iPhone/iPad to an external hard disk drive. How to do that? Read on to discover 3 practical ways you can use to backup iPhone or iPad to an external hard drive on Mac or Windows.
- Way 1: Flexibly Backup iPhone to External Drive with iManager
- Way 2: Copy and Move iTunes Backup to External Hard Drive
- Way 3: Backup iPhone to External Drive with Terminal Command
Way 1: Flexibly Backup iPhone to External Drive with iManager
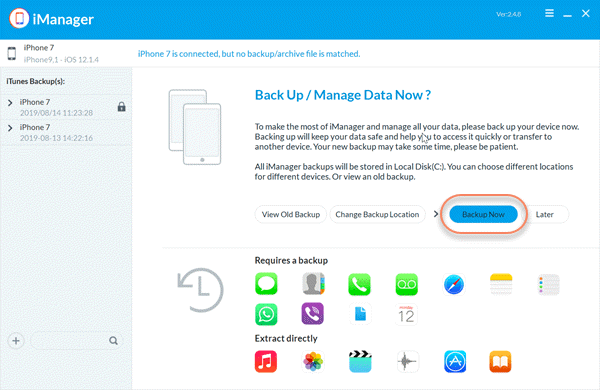
Instead of backing up iPhone/iPad with iTunes or iCloud, you can use a third-party backup program like Gihosoft iPhone Manager. With it, you are able to backup files from iPhone or iPad to an external hard drive directly, including removable USB stick, flash drive, or portable hard disk etc. Plus, you can quickly locate your backups, change the backup location, as well as freely view or export data on your backup whenever you need.
Key Features of Gihosoft iPhone Manager
- Backup photos,, videos, music, contacts, text messages, WhatsApp, notes and more data from iPhone to computer or external drive.
- Create new backup with your iPhone or iPad without overwriting previous backup files.
- Extract and export data from backups to readable formats such as PDF, TXT, CSV for easy viewing or printing.
- Fully compatible with iOS 13 and iPhone 11/11 Pro, iPhone XS/XS Max/XR, iPhone X, iPhone 8/7/6s/6 Plus, iPad Pro, etc.
How to Backup iPhone or iPad to External Hard Drive without iTunes
Gihosoft iManager is very easy to use, and it is available on both Mac and Windows computer. Make sure to download the right version and follow the simple steps below.
- Launch Gihosoft iPhone Manager software and connect your iPhone or iPad that you wish to backup to the computer.
- Also, connect your external hard drive to the computer. Click on “Change Backup Location” to set the external drive as the backup location.
- Click on “Back Up Now”, your iPhone/iPad data will be backed up to the attached external hard drive instead of your computer’s storage.
Way 2: Copy and Move iTunes Backup to External Hard Drive
If there is not enough storage on your computer, you should also consider copying and moving your iTunes backup files to an external hard drive. This will not only help you have a secured backup for your data, but also allow you to free space on your computer. The process is relatively straightforward, follow the steps below:
Step 1: Connect your external hard drive to your PC/Mac.
Step 2: Follow the steps below to find the iTunes backup location.
For Windows users:
- If you are using Windows 7 and Vista, go to: C:/Users/AppData/Roaming/Apple Computer/MobileSync/Backup/
- If you are using Windows 8/10, go to: C:/Users/YOURUSERNAME/AppData/Roaming/Apple Computer/MobileSync/Backup/
- If you are using Windows XP, go to: C:/Documents and Settings/Users/Application Data/Apple Computer/MobileSync/Backup/
For Mac users:
- Press Command+Shift+G on the keyboard to open the Go To Fold interface, then copy and paste: ~/Library/Application Support/MobileSync/Backup/
Step 3: Locate the iTunes backup folder, then “copy and paste” it to your external hard drive.
Please note this way only works if you have made an iPhone backup with iTunes, and the backup files are still inaccessible and unreadable.
Way 3: Backup iPhone to External Drive with Terminal Command
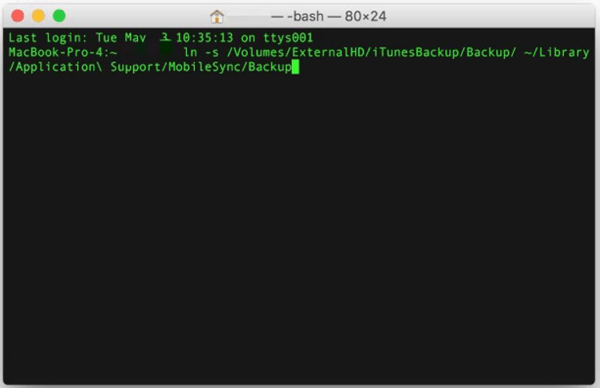
The third option to backup iPhone to an external hard drive involves the use of a symbolic link. You can configure the setting on your computer and direct iTunes backup to specific folder in external drive. However, you need to know some technical knowledge on how to use the command line in terminal and directory structures. Here’s how to do it:
On macOS:
- Locate your iPhone backup made with iTunes on your Mac computer. To do this, type ~/Library/Application Support/MobileSync into Spotlight, then find the folder named “Backup”.
- Connect your external hard drive to your Mac via a USB port. On your external drive, create and name a new folder you’ll use for the backup.
- Copy the “Backup” folder you located in step one to the new folder you created on the external drive. After that, change the name of the “Backup” folder on your Mac to “Old-Backup” or just remove it.
- Next, launch the Terminal application. Go to: Applications/Utilities/ then type the following command: ln -s /Volumes/[External Drive]/MobileSync/Backup ~/Library/Application\ Support/MobileSync/Backup. Remember to replace [External Drive] with the information of your external drive.
- Hit Return and quit Terminal. Your iPhone backup would be saved to your external drive instead of the local drive once the symbolic link is created.
- You can then proceed to delete the Old-Backup folder on your Mac to free up storage space.
On Windows:
- Connect your external drive to Windows computer. Then create and name a new folder on your external drive .
- Move the original iPhone backup to the new folder you just created on your external hard drive. You’ll find the original backup here: C:\Users\[Username]\AppData\Roaming\Apple Computer\MobileSync\Backup. After you’ve moved it, rename it to “Old-Backup”.
- Press Windows key + R to open Run box, then type “cmd” in the field and hit the “Enter” key to open a Command Prompt window.
- On the Command Prompt window, type: mklink /J “C:\Users\[Username]\AppData\Roaming\Apple Computer\MobileSync\Backup” “f:\iOSBackup” then press “Enter” key. Remember to change the [Username] and f:\iOSBackup to your name on Windows and the name of the target backup folder you created.
- You can now launch iTunes and back up iPhone to the external hard drive on your Windows PC.