3 Ways to Transfer Photos from iPhone to USB Flash Drive
It is really a frustrating situation when you unlock your iPhone and find all the photos are gone. Unfortunately, data loss like this happens everyday due to accidental deletion, iOS update, jailbreak, software crash, etc. Thus, it is necessary to backup your iPhone data in case of losing some valued photos and other files.
Many people choose to back up their iPhone or iPad to the computer. However, as time goes by, this way can take up a lot of storage space on the computer. And you can not always keep the computer with you. Then it is a good practice to transfer your photos from iPhone to a USB flash drive as backup. How to do that? This article shows three ways you can use to transfer iPhone photos to flash drive.
Method 1. Transfer Photos from iPhone to USB Flash Drive in One Click
Using some third-party transfer tool like Gihosoft iManager is arguably the most convenient way to save photos to a flash drive from iPhone. This program allows you to manage and transfer photos, videos, music freely from your iPhone/iPad to the computer/USB drive. It supports the latest iOS 13/iPadOS and iPhone 11/11Pro. See what exactly Gihosoft iManager can do for you below.
Key Features of Gihosoft iManager
- Transfer photos from iPhone to computer/USB flash drive in a one click.
- Transferable photos include Camera Roll, Live Photos, Screenshots, iOS 11 HEIC pictures, etc.
- Back up photos and other data from iPhone to external drive/computer.
- Freely access, view and export all kinds of data from your iPhone backup on computer.
- Other files like music, contacts, messages, notes are also available.
Now, download and install Gihosoft iManager on your computer before you transfer photos from iPhone to flash drive.
- Step 1. Open Gihosoft iManager, and then connect your iPhone and USB flash drive to the computer.
- Step 2. When your iPhone is detected, click on Change Backup Location to set the flash drive as the backup location.
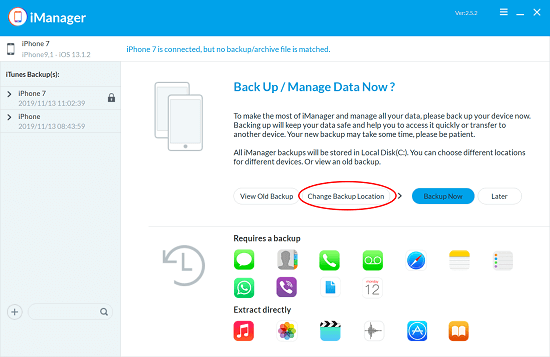
- Step 3. Click on Back Up Now, the program will begin to transfer your iPhone photos to the attached USB flash drive instead of your compute’s storage.
- Step 4. Once the transfer process is completed, you can click the Photos icon to check and export the transferred photos.
Method 2. Save Pictures to Flash Drive from iPhone via Photos on Mac
If you have a Mac computer, the Photos app or the iPhoto on older versions of the Mac operating system can be a good choice for you to transfer photos from iPhone to flash drive. However, you are only allowed to transfer Camera Roll photos from iPhone to USB drive in this way. Photos albums, iCloud sharing photos, iTunes synced photos, Live Photos are not supported.
Here are the detailed steps on how to transfer pictures from iPhone to flash drive on Mac:
- Step 1. Make sure that you have the latest version of iTunes on your Mac, and then connect your iPhone to Mac with a USB cable.
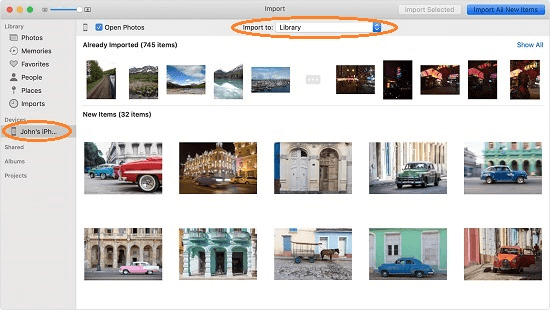
- Step 2. The Photos app automatically opens on your Mac. If it doesn’t, open it manually.
- Step 3. The Photos app shows an Import screen with all the photos on your connected iPhone. If the Import screen doesn’t automatically appear, click the Import tab at the top of the Photos app or click your iPhone’s name in the sidebar.
- Step 4. Select the photos you want to transfer, then click Import Selected or click Imported All New Photos.
- Step 5. Plug your USB stick into the Mac, select and copy the photos, then open the USB folder and paste them there.
If you want to transfer all kinds of the photos on your iPhone, Method 1 is a decent option.
Method 3. Transfer Pictures from iPhone to USB Flash Drive on Windows
For Windows users, you can get photos from iPhone to flash drive using Windows/File Explorer easily. But like on a Mac, only Camera Roll photos on your iPhone can be transferred. Photos in other photo libraries and HEIC photos are not supported by this method. If you need to move all your iPhone photos, photo transfer tool like Gihosoft iManager can be helpful.
Here is how to transfer photos from iPhone to USB flash drive on Windows PC:
- Step 1. Connect your iPhone to the computer using a USB cable, then open it as a portable device.
- Step 2. Click on Internal Storage > DCIM folder and locate the photos you want to transfer.

- Step 3. Connect your USB flash drive to the computer, then copy and paste or drag and drop you want to transfer from the DCIM folder of your iPhone to your flash drive.
This method looks fairly simple, but it is time-consuming to locate the photos you want because you have to open every folder to find the one you need.
To Sum Up
These are the three methods of how to transfer photos from iPhone to the flash drive. The first method which makes use of a photo transfer tool like Gihosoft iManager can be the most direct and easy way to complete this task. And it supports to transfer all kinds of photos to USB stick without limitations. The other two methods are also fairly easy, but due to Apple’s limitation, not all photos are transferable in these two ways. We hope you have put your iPhone pictures on USB flash drive successfully. If you have any queries or suggestions, please let us know in the comment section below.