How to Encrypt a Microsoft Word Document
Having written a Microsoft Word document which includes sensitive or important data on your computer, you may be worried that it could be peeked or modified by someone with ulterior motives. In order to avoid this kind of circumstance from happening, you certainly need to know in detail how to lock a Word document from editing by others. In this way, you will be able to set up this Word document to make sure only you or some certain people have access to it and possess the permission to edit it.
Method 1 – How to Password Protect a Word Document with Gihosoft File Encryption?
Gihosoft File Encryption is an excellent Microsoft Word Encryption tool which can encode your sensitive data or hide these important Word files in case of some unnecessary access to it or unexpected change to it. Only you and others who know your exact password can get access to these encrypted Word documents. Certainly, not only can this encryption tool lock a Word file, but it can also encrypt an Excel file, encrypt a Zip file, and encrypt a PDF file. Next, you will know how to add password to Word document with Gihosoft File Encryption.
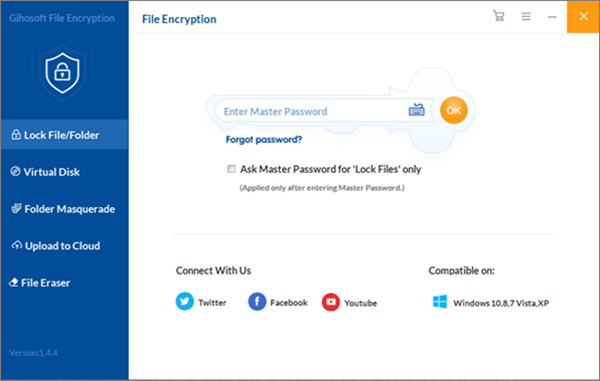
1. Run Gihosoft File Encryption software on your PC. What you see at your first sight is a password box, and you need to set a password to continue using this tool.
2. After you get into the home page, you can see Lock File/Folder option on the left side, and you should click this option. Then click Select Items in the upper taskbar, and you can see a box including Add File and Add Folder. Click on Add File, and now you can choose the target Word document to get locked.
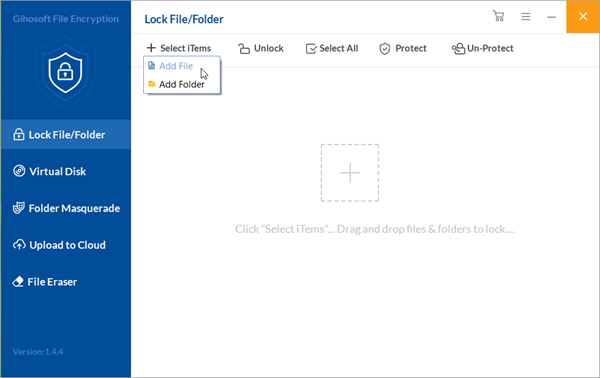
Note: When you try the free version, you can encrypt only 3 Word files for free. If you have more files to get encrypted, you can update this software to its full version for more comprehensive functions.
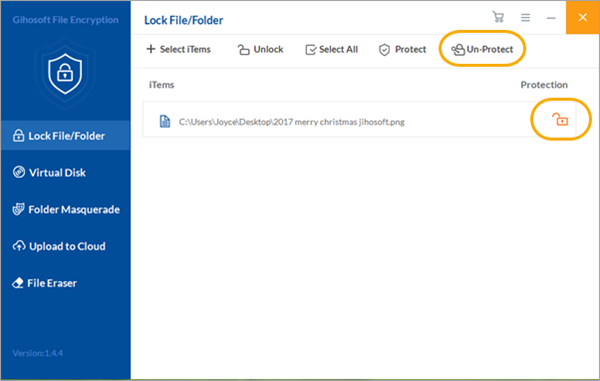
3. Now you can see that this file listed on the page disappears from its original position. You can change its status between protection and unprotection by selecting this file first and then clicking the small lock icon on its right. Another way is that you can first select the file and then click Un-Protect or Protect option. Just click Unlock option the file can be recovered to its original position and meanwhile it will disappear from this page.
Method 2 – How to Lock a Word File Using Microsoft Word inbuilt Encryption feature?
If you just need the protection feature followed with Microsoft Word, then the operation procedure will be very easy for you because these available options are stated intuitively and concisely without complicated steps.
First, open a Word document on your computer, click File > Info > Protect Document, and then you can see 5 options listed as the following picture. Each one of these 5 options corresponds to a specific setting for this Microsoft Word file. Just choose one of these options based on your own needs.
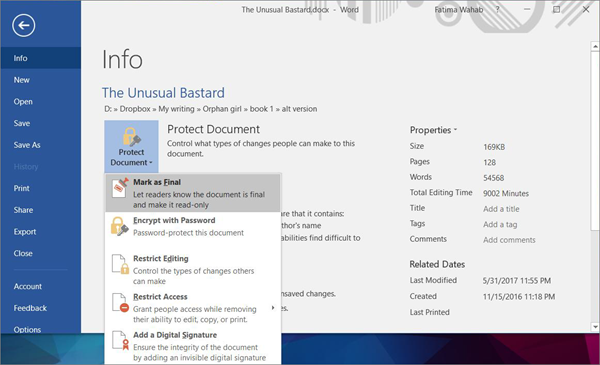
Mark as Final: Make the document read-only.
If a Word document is marked as final, it means typing, editing, commands, and proofing marks are not allowed, leaving it read-only. The Mark as Final command helps you tell others that the document being shared is the final version. It also prevents reviewers or readers from inadvertently making changes to the document.
Microsoft Word will first ask you to save it before you mark a document as final. When you open it again next time, you will see a yellow reminder saying MARKED AS FINAL at the top of the document. If you need to remove its status of read-only, clicking on Edit Anyway is OK.
Encrypt with Password: Set a password to encrypt the Word document.
When you click Encrypt with Password, you will see the Encrypt Document dialog box appearing. Just type a password in the Password box, and then confirm it again according to the prompt. Attention: Microsoft can not recover your lost or forgotten password, so make sure that these passwords and relevant file names are kept properly.
Restrict Editing: Make a restriction to the editing type of the document. After you choose Restrict Editing, you will see these 3 options as follows:
- Formatting restrictions: It restricts formatting options, preserving the appearance of the document. You can click Settings to select the allowed styles.
- Editing restrictions: You decide the editing type of the document or you can cancel the editing permission. In addition, you can specify the users who can edit the file by clicking Exceptions or More users.
- Start enforcement: Click Yes and then click Start Enforcing Protection to select user authentication or password protection. Besides, you can also add or delete the editors who have restricted permissions by clicking Restrict permission.
Restrict Permission by People: Restrict permissions with a Windows Live ID or a Microsoft Windows account. You can click Restrict Access to add permissions, or you can choose to apply for permissions through templates used by your organization.
Add a Digital Signature: Add a digital signature visible or invisible.
Digital signatures use computer passwords to verify digital information such as documents, emails, and macros. Create a digital signature by typing a signature or using a signature image to establish authenticity, integrity, and non-repudiation.
Conclusion: What I have talked above are the two main methods about how to lock a Word document on computer. If you have any question in the operation procedure of Gihosoft File Encryption, you can also refer to the user guide of Gihosoft File Encryption we have specially prepared for you! And welcome to leave your message in the comment area below!