3 Best Ways to Encrypt Files on Windows 10/8/7
What does it mean to encrypt a file? Well, encrypting a file means the translation of data into a secret code, which can effectively prevent your file from leaking or being stolen just like a protective cover. For your data security, encryption is for sure the best choice for you. You can encrypt a file with encryption capabilities built in Windows system or with the help of some best file encryption software.
Before you start to lock a file on Windows: However, attention please! What you also should know is the uncertainty of encryption security because of various complex factors. For example, hackers can bypass encryption through building a keylogger on your computer. Then you will probably be at risk if you store encryption keys and passwords in an unencrypted file.
Because when you encrypt a single file with windows file encryption tool which is normally called EFS (Encrypting File System), your computer will automatically store an unencrypted version of that file for you in its temporary memory. That’s why a hacker can still be able to access it. You’d better choose the best way to encrypt files on computer if your data is really valuable.
- Part 1. Encrypt Files on Windows with Best File Encryption Software
- Part 2. Lock Files with Windows Built-in File Encryption Methods
Part 1. Encrypt Files on Windows with Best File Encryption Software
Maybe you have ever tried to encrypt your files with the Windows file encryption tool EFS, but you may find that the Encrypt contents to secure data option is always grayed out. Actually, this is a common problem for some Windows versions.
Hence, here we recommend you a best file encryption software named Gihosoft File Encryption. This encryption tool offers the files strong security, which should prevent any intruders. And it mainly protects your files with password, so the password you set should be familiar to yourself and difficult for others to guess or break.
To encrypt a file on your computer, you can follow the steps below:
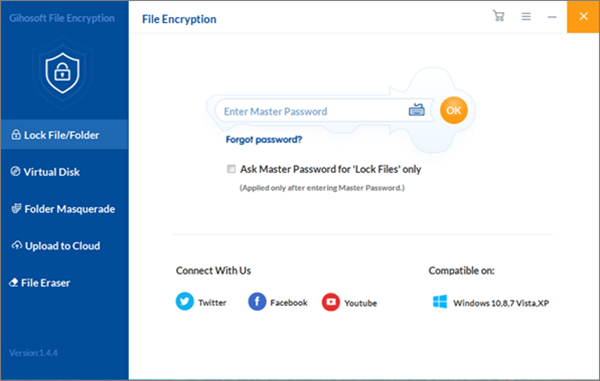
Step 1. Open this software on your computer. In order to protect all your files, you need to set a master password first. Remember this password, it is important.

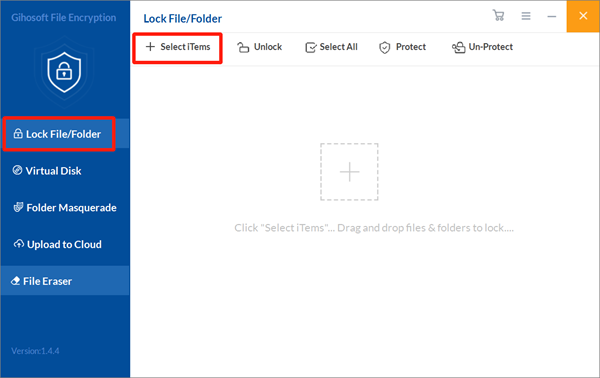
Step 2. Click on “Lock File/Folder” option on its home page and then click “Select Items”. Then you can see a drop down box, and select “Add File” to add files you want to lock here. Another way to add files here is to click the symbol + in the middle of the page.

Step 3. Finally, the previous file will disappear from its original location but you can find it listed on this page. If you want to check the encrypted files later, you can click the “Un-Protect” or “Unlock” choice.
Part 2. Lock Files with Windows Built-in File Encryption Methods
There are two Windows built-in file encryption tools for you to encrypt files without third party software. One is the BitLocker, the other is the EFS. BitLocker is the preferred and most secure method but you are not allowed to easily select individual files to encrypt. You have to create an encrypted file container using VHD to do this. EFS is the alternative however not recommended for super-sensitive data.
Option 1. Using BitLocker
BitLocker encrypts your whole hard drive (or a removable device). If you need to unlock an encrypted drive, you have to enter the correct password or use a USB to unlock the PC when it’s inserted.

BitLocker is available on:
- Windows Vista and Windows 7: Enterprise and Ultimate editions
- Windows 8 and 8.1: Pro and Enterprise editions
- Windows 10: Pro, Enterprise, and Education editions
- Windows Server 2008 and later
Note: BitLocker doesn’t support Windows Home editions. BitLocker works with the support of Trusted Platform Module (TPM) hardware. A TPM chip enables your device to strengthen encryption security. For example, access may easily get dictionary attack if encryption is only at the software level. However, TPM is at the hardware level, so it can effectively protect against guessing or automated dictionary attacks.
Check if your device has a TPM chip:
- Step 1. Press the Windows key + X on your keyboard and select Device Manager.
- Step 2. Expand security devices.
- Step 3. If you have a TPM chip, one of the items should read Trusted Platform Module with the version number.
How to encrypt a file with BitLock?
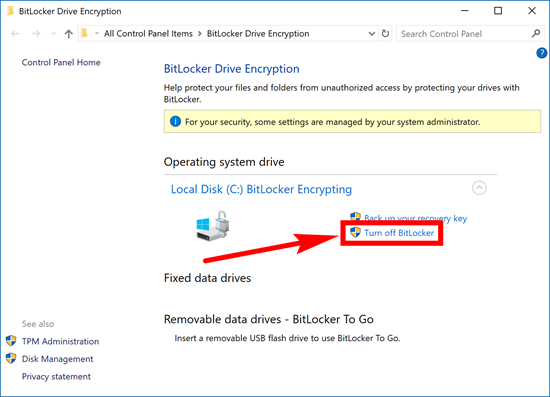
Step 1. Go to the Control Panel to click System and Security, and then click BitLocker Drive Encryption.
Step 2. Under BitLocker Drive Encryption, click Turn on BitLocker.
Step 3. Select Enter a password or Insert a USB flash drive. If you have chosen to use a USB flash drive as a trigger to unlock your drive, you can choose to do this with a password or smart card. In this example, we will use a password.
Step 4. Enter a password and confirm it, and then click Next.
Step 5. Select how to save a recovery key to regain access to your drive in case you forget your password (e.g. on a USB flash drive or to your Microsoft account), and click Next.
Step 6. Select an encryption option: Encrypt used disk space only (faster) or Encrypt entire drive (slower), and click Next.
Step 7. Choose from two more encryption options: New encryption mode (best for fixed drives) or Compatible mode (best for removable devices), and click Next.
Step 8. Check Run BitLocker system check, which ensures that the recovery and encryption keys will work, and click Continue.
Step 9. Last, verify that BitLocker is turned on. To do this, go to My PC in Windows Explorer and check for a Lock icon displayed next to the drive.
To disable or suspend BitLocker:
- Step 1. Press the Windows key + E to open Windows Explorer and then click This PC.
- Step 2. Right-click the encrypted drive and select Manage BitLocker.
- Step 3. For each drive or partition encrypted, you can select to suspend BitLocker or completely disable it. Select the option you want and follow the wizard.
Option 2. Using Encrypting File System (EFS)
EFS is another Windows file encryption tool for encrypting files on NTFS drives. Then how to open encrypted files? Well, the key is the only necessary factor, otherwise any individual or app can’t open these locked files. Instead of encrypting the whole drive like BitLocker, EFS gives you the choice to manually encrypt individual files and directories. If you just need file encryption against nosy family members, then EFS will be the best choice for home users like you!
Only when the user who has locked files logs in can these files be accessible. Windows creates the encryption key which is encrypted itself and saved locally. This encryption process is not so complex that it’s inevitably not secure enough. A strong login password is highly recommended! Encrypting File System is only available on: Professional, Enterprise and Education editions of Windows.
How to encrypt a file with EFS?
- Step 1. In Windows Explorer, right-click on the file or folder you wish to encrypt.
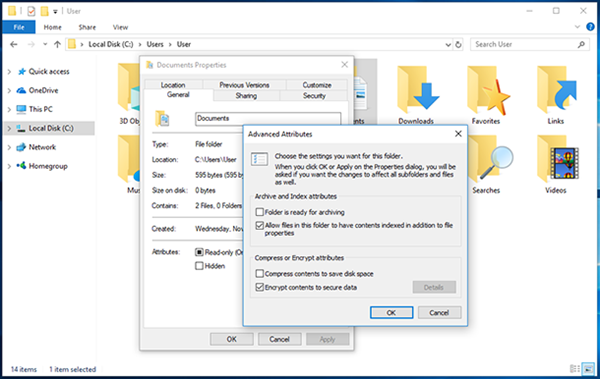
- Step 2. From the context-menu, select Properties and then click on the Advanced button at the bottom of the dialogue box.
- Step 3. In the Advanced Attributes dialogue box, under Compress or Encrypt Attributes, check Encrypt contents to secure data.
- Step 4. Click OK and then click Apply.
- Step 5. If you selected a folder to encrypt, a Confirm Attribute Change dialogue box will be displayed asking if you want to encrypt everything in the folder. Select Apply change to this folder only or Apply changes to this folder, subfolders and files, and click OK.
- Step 6. Click on the Back up your file encryption key pop-up message. If the message disappears before you can click it, you can find it in the Notification Area for your OS.
- Step 7. Ensure you have a USB flash drive plugged into your PC and then click Back up now (recommended).
- Step 8. Click Next to continue and then click Next again to create your certificate.
- Step 9. Accept the default file format to export and click Next.
- Step 10. Check the Password: box, enter your password twice, and click Next.
- Step 11. Navigate to your USB drive, type a name for the certificate and key you want to export, and click Save. The file will be saved with a .pfx extension.
- Step 12. Click Next, Finish, and then OK.
- Step 13. Eject your USB drive and put it somewhere safe.

To unlock a file:
Follow the first four steps above, but uncheck the Encrypt contents to secure data box in Step 3.
I guess this article can certainly help you a lot! So you can also share these 3 ways to encrypt a file on PC with your families or friends to help them solve similar problems too! And welcome to share your favorite methods about how to lock a file with us in comment area below!
