How to Manage & Organize Photos on iPhone

If you just keeping taking photos with your iPhone and never organize them, it won’t be long before you realize that your pictures are cluttered in the photo library and take up substantial memory of the phone. Therefore, to better retain wonderful memories, taking pictures is important, so is organizing photos on the iPhone. In this way, you can easily browse the photos you need as well as free up the capacity of your device. This article introduces some tips to help you manage photos on the iPhone.
6 Tips to Manage Photos on iPhone
- 1.How to delete individual photos
- 2.How to create new photos albums
- 3.How to delete entire albums
- 4.How to Favorite a photo on iPhone
- 5.How to compress photos on iPhone
- 6.Transfer photos from iPhone to computer
- 7.Use some photo organizer apps for iPhone
- Extra Tips to Recover Deleted Photos on iPhone
1.How to delete individual photos
When there are too many photos cluttering up your iPhone storage, you can delete those images which are not so important, or you will never look at again. Removing superfluous images is the best and most direct way to manage photos on iPhone better.
- Access the Photos app on your iPhone.
- Tap on the “Select” option in the top right corner of the screen, and select the photos you want to delete.
- Click on the delete icon, which looks like a trash can in the bottom right corner.
- Tap on “Delete Photos” in the pop-up prompt to confirm the option.

All the deleted photos will be moved into a folder called “Recently Deleted” and kept there for 30 days. You can just leave your deleted photos in that folder, and after 30 days, they will be automatically deleted forever. Or you can head over to the “Recently Deleted” folder and remove the photos there manually.
Among the deleted photos, you may not want to delete some of them. These photos are great except for people or things that should not be there. If so, you can try the Photo Eraser to remove unwanted parts from photos or repair surroundings, then you can get perfect pictures.
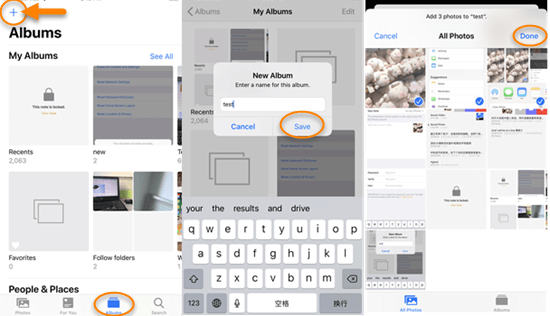
2.How to create new photos albums
Another way to organize photos on the iPhone is that you can create a special album for a certain type of photos such as the screenshot and tab them so that you can find these pictures quickly when you need them.
- Step 1: Open the Photos app on your iPhone, and tap on “Album” in the bottom pane.
- Step 2: Click the “+” icon in the top left corner. Give a name to the new album, and tap on “Save”.
- Step 3: Select the photos and videos that you want to add, then tap “Done”.
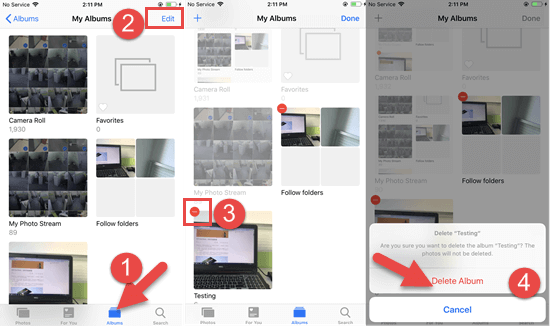
3.How to delete entire albums
Deleting an album is as simple as creating one. You can delete any of the albums you have created in the Photos app, except the built-in album folders, including Camera Roll, Favorite, and My Photo Stream. Moreover, the photos in the album you delete won’t be lost.
- Step 1: Launch the Photos app on your iPhone, and navigate to Albums on the bottom right of your screen.
- Step 2: Tap the “Edit” option in the top right corner, and then the delete icon in the top left corner of the albums you want to remove.
- Step 3: Tap on “Delete Album” to confirm the deletion, and click the”Done” option in the top right corner.
4.How to Favorite a photo on iPhone
iPhone automatically organizes your photos by Years, Months, Days, or All Photos, allowing users to quickly and easily view pictures and videos. But you can add your favorite photos to the Favorites folder so that you can find them conveniently. Just open a photo in the Photos app, and tap on the heart-shaped icon on the bottom. Then this photo will be added to the Favorite folder.
5.How to compress photos on iPhone
Generally, the purpose of managing photos on iPhone is to maximize the memory utilization. For some photos you don’t want anymore, you can delete them. But for those precious photos, deleting them is not an ideal option. At this time, you can compress the precious photos and change their size. It is an excellent way to organize photos on the iPhone.
- Step 1: Go to the Photos app on your iPhone, select some photos, and tap on the “Action” option in the bottom pane.
- Step 2: Then navigate to the “Mail” icon in the pop up prompt, and click on it.
- Step 3: Fill in your email address, and tap “Send” option in the top right corner.
- Step 4: Select your preferred size, and the compressed photos will be sent to your email.
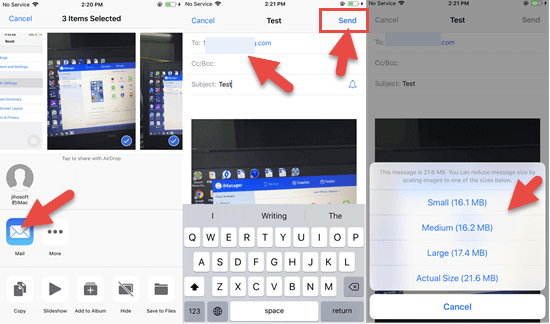
Please note that you are allowed to compress at most five photos each time, so it will be a bit tedious if you have a bunch of images to compress. Besides, you need to download the compressed photos to your iPhone and delete the original ones to save up space.
6.Transfer photos from iPhone to computer
Even if you insist on organizing your photos on iPhone regularly, the number of pictures is increasing over time while the phone’s memory is decreasing. In this case, you can transfer your photos from iPhone to computer for backup so that you can clear more storage space on your phone.
7.Use some photo organizer apps for iPhone
If you don’t want to always organize photos on the iPhone manually, you can utilize some third-party photo organizer apps like Google Photos. It can help you store photos in the cloud safely and classify them with smart tabs. It also has the visual search feature which enables you to search your photos by the people, places, and things in them without tagging. Of course, there are many other photo organizer apps for iPhone, you can find the most suitable one on the Internet.
Extra Tips to Recover Deleted Photos on iPhone
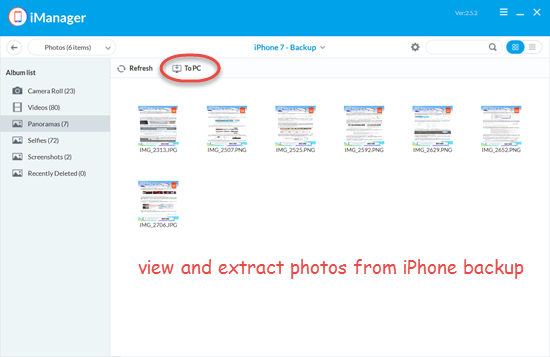
1.Extract photos from iPhone backup selectively
It may happen that you have deleted some precious pictures accidentally during the process of organizing photos on iPhone. You can always recover the deleted photos by restoring your iPhone from an old backup. But the current data on your device will be overwritten by the backup contents. If you don’t want that, you can use Gihosoft iManager to extract the photos you need from the backup.
- Open Gihosoft iManager on your computer and choose an iTunes backup.
- Click on the “Photos” icon and you can view all the photos inside the backup.
- Then select the deleted photos you want and click “Export” to extract them onto the computer.
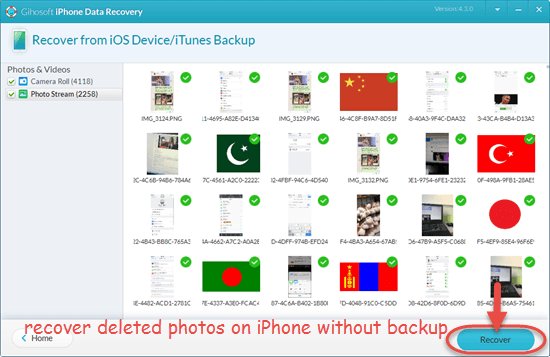
2.Retrieve deleted photos from iPhone without backup
If you have no backup available, you need to turn to a third-party recovery tool.
Gihosoft iPhone Data Recovery is a reliable software to help you recover deleted photos from the latest iPhone, iPad, and iPod touch directly. It can deeply scan your device for lost photos.
- Step 1: Launch this program, select the file types related to the photos, and click on the “Next” button.
- Step 2: Connect your iPhone to the computer and click on the “Next” button. This program will start to detect and scan your iPhone thoroughly.
- Step 3: When the scanning is over, you can preview all the photos on your iPhone. Select the images you need, and click the “Recover” button to save them to the computer.
Conclusion
These are the tips to manage photos on the iPhone. Don’t forget to organize your photos when you are busy taking pictures. Regularly organizing photos on iPhone can help free up more storage space and make a better use experience. If you know more tips or have any suggestion, please leave them in the comment section.