How to Enable and Use Remote Desktop Connection in Windows 10
Remote Desktop Protocol (RDP) has been an important feature long since Window XP. After numerous of updates, this feature has been more refined pretty well and now we have a masterpiece version of it in Windows 10. In this article, we will learn how to enable Remote Desktop on Windows 10 and use it like a pro.
- What We Can Do after Enabling Remote Desktop in Windows 10
- How to Enable Remote Desktop in Windows 10
- How to Use Remote Desktop to Connect to Windows 10 PC Remotely
- What if Windows 10 Remote Desktop Connection Not Working
What We Can Do after Enabling Remote Desktop in Windows 10
With similar features as TeamViewer, Windows Remote Desktop makes our daily life and work more convenient and easier. It works like a charm for certain tasks at the cost of minimum time and money.
- access your home/office computer while traveling somewhere via smartphone or borrowed computer.
- Get computer troubles fixed by technician without visiting or express delivery, like free photo recovery.
- Perform administrative tasks with the help of Remote Desktop as well.
- Give a presentation or demonstrate a software without appearing in the spot.
How to Enable Remote Desktop in Windows 10
To perform the above charming purposes in your laptop or desktop, you have to enable Remote Desktop in your Windows 10 first as it is disabled by default.
If you use the latest version of Windows 10, Remote Desktop can be easily enabled by going to Start menu > Settings > System >Remote Desktop and clicking the switch under Enable Remote Desktop.
If you have disabled Windows 10 auto update and cannot find the option as described above, please follow steps below:
- Step 1. Click Start menu and type System in it, then press Enter when it shows up.
- Step 2. Click on Advance System Settings at the left side of the page.
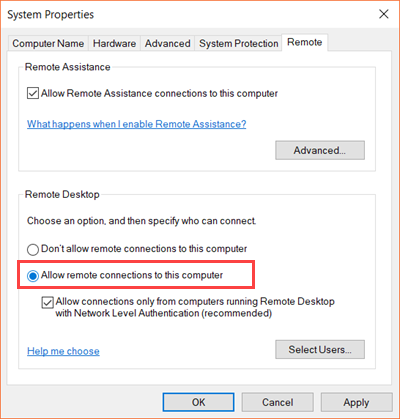
- Step 3. When System Properties shows up, click on Remote tab on the top-right.
- Step 4. Choose Allow remote connections to this computer.
- Step 5. Click Apply > OK.
Note: You may be prompted for administrator password if you’re not an administrator.
Now Windows 10 Remote Desktop connection has been enabled on your Windows 10 computer. Can’t wait to have a try? Keeping reading for how to use Remote Desktop in Windows 10.
How to Use Remote Desktop to Connect to Windows 10 PC Remotely
Before we start connect to a Windows 10 PC remotely, here are two prerequisites that should concern you.
- The target Windows 10 PC must have enabled Remote Desktop as shown above. Of course, someone on the side should open the target computer.
- You must know the IP address of the target computer. Check the IP address of a Windows 10 computer:
-
- Press Windows key + R at the same time. This will open Run window.
- Type cmd in the box and hit Enter. Command prompt will open.
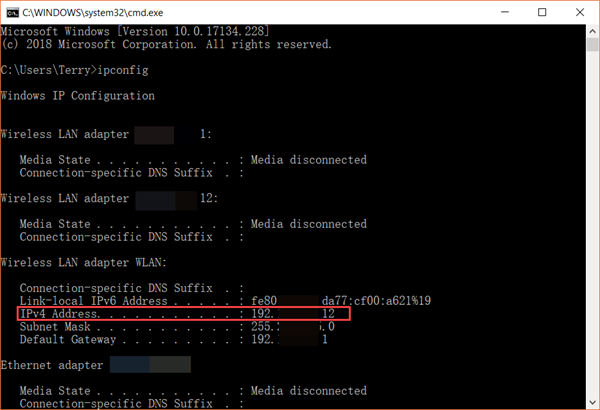
- Type ipconfig in Command prompt and hit Enter.
- Check and remember the string after IPv4 Address. This is the IP address that will be needed.
-
Are you ready? Let’s go.
- Step 1. Click Start menu and type Remote Desktop Connection.
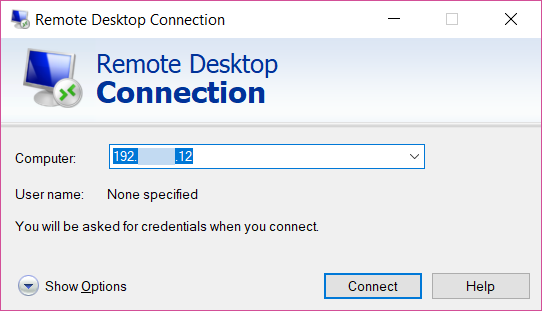
- Step 2. Hit Enter, Remote Desktop Connection window will pop up.
- Step 3. Input the IP address that you get at the above part, then click Connect.
Note: If you don’t want to remember the IP address, then click Show options > Save As. Next time you can open the saved file and get the IP address automatically filled.
- Once connected, you can log in the target Windows 10 computer.
Now, you can do what you want with the remote computer. Actually, it is still a little complicated setup Windows 10 Remote Desktop Connection for the first. Anyway, it is a method that really works for remotely controlling a computer.
What if Windows 10 Remote Desktop Connection Not Working
Due to the varieties of Windows 10 computer, it is possible that Remote Desktop may not work for your PC. Here are two matters you need to check.
- The first thing you have to do is disable your firewall software temporarily as it may interfere in the connection.
- Look back to How to Enable Remote Desktop part, on Step 4, untick the box before “Allow connections only from computers running Remote Desktop with Network Level Authentication (recommend)”.
If Windows 10 Remote Desktop still doesn’t work, feel free to drop a line in the comment area. We will try our best to help you fix the problem