2 Ways to Import Pictures and Videos in Windows 10/11
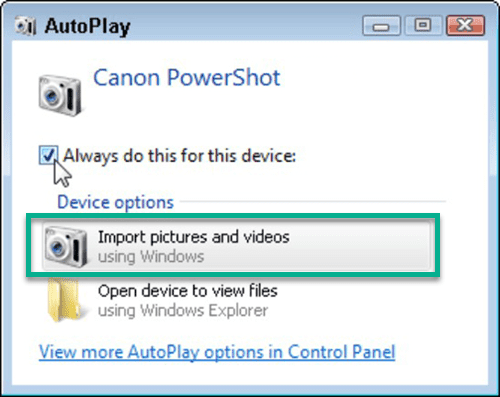
When it comes to moving and transferring photos and videos to a Windows PC, a lot of Windows 7 users know that there was a feature to do it automatically. Right, “Import pictures and videos” feature still exists in Windows 10/11 yet not as active as it was when AutoPlay pops up immediately once a removable device is connected to PC. If you’re used to the typical method of importing pictures and videos for Windows, please keep reading. In this article, we are going to introduce how to enable AutoPlay manually for Windows import pictures and videos and available workaround in Windows 10/11.

Tips: In case you lost precious pictures and videos during the transfer or due to other accidents, don’t hesitate to use RePicvid Free Photo Recovery. This program will help you recover photos from computer, SD card, hard drive and flash drive 100% free.
Method 1. Enable AutoPlay in Windows 10/11
In Windows 7, the AutoPlay window pops up when a camera or mobile phone is connected to your computer via a USB cable, allowing users to take further actions, such as Import pictures and videos. However, the option no longer appears automatically in Windows 10/11, or in Windows 7 when AutoPlay is disabled. To fix it, we can enable AutoPlay manually.
For Windows 10/11
- Step 1. Go to Settings > Devices.
- Step 2. Click on AutoPlay tab from the left pane.
- Step 3. Toggle on the switch under Use AutoPlay for all media and devices.
As you can see on Step 3, it allows users to choose the default action for different devices, including removable drive, memory card and iPhone/iPad/Android phone.
For Windows 7
- Step 1. Open Control Panel, go to All Control Panel Items > AutoPlay.
- Step 2. Configure the options for devices, software and CDs.
From now no, whenever you plug in a media or device to your computer, AutoPlay will pop up. If you want to import media files to your computer, just choose “Import pictures and videos” on the pop-up window. Surely, Apple users have more ways to transfer photos from iPhone to PC.
“Windows Import Pictures and Videos” is a really helpful feature for photographers using digital cameras and mobile phones. People can back up their images and videos in a regular base so as to avoid accidental data loss. Though accidents are inevitable in a sense, it is always easier to make precaution measures than to restore lost files.
Method 2. Import Pictures and Videos in Windows 10/11 with Photos App
If you find the AutoPlay pop-up annoying, Photos app in Windows 10 is a workaround to manually import photos and videos from camera and mobile phone to computer. It will import photos and videos from USB devices (iPhone, Android phone, camera, etc.), and manage all your media files in one app.
- Step 1. Connect your device to computer via a USB cable.
- Step 2. Click Start menu, type Photos and select it from the result.
- Step 3. In Photos app, click Import > From a USB device, then follow the wizard.
This app is also the default photo viewer in Windows 10 since Windows Photo Viewer is missing. Photos is not necessarily an excellent image viewer as there are a lot of free photo editing software for Windows PC. However, it works great for Windows Import Pictures and Videos as a basic app.
Final Thought
In this tutorial, we have learnt how to enable Windows AutoPlay in case it is disabled or hidden in Windows 10/11. Some people might find “Windows Import Pictures and Videos” not efficient to manage their files properly, but not everyone is willing to spend extra time in learning how to use advanced photo & video managers. We hope this simple function will help new beginners manage and back up their multimedia data easily. Don’t forget to share this article to your friends if you think it is useful.
