iPhone HDR Explained: How to Shoot HDR Photos on Your iPhone
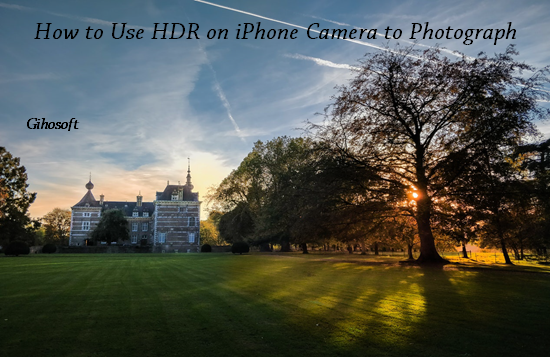
When you were walking in the sun, a beautiful scenery came into your sight. You habitually took out your iPhone and with a snap, capture the scenery by your iPhone camera. However, you may dejectedly find the picture was overexposed or underexposed. This problem can be solved easily, as long as you use the HDR feature on iPhone. But what is HDR on iPhone camera? How to use iPhone HDR to take well-exposed photos? Read through this article, you will learn about why and how HDR brings you better photography experience.
- Part 1: What is HDR on iPhone Camera
- Part 2: When to Use HDR & When Not to Use
- Part 3: How to Use HDR in iPhone camera
Bonus Tips: Are you frustrated with those accidentally lost photos? Maybe it takes you a lot of effort to get those dramatic photos and some of them are really rare. Don’t worry. Gihosoft iPhone Data Recovery will help you recover your lost photos.
Part 1: What is HDR on iPhone Camera
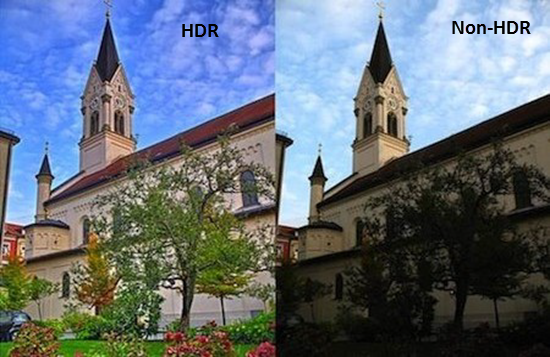
HDR is the abbreviation of High Dynamic Range. HDR on iPhone camera is an amazing setting to help iPhone camera get a picture with more dynamic range and details both in shadow and highlights so that the picture will preferably reflect the real visual effect of environment. Generally, iPhone camera cannot capture the color and detail in bright and dark areas at the same time. This will cause the highlights in the photo being too bright while the shadows too dark when shoot a high contrast scene. But HDR enables iPhone camera to capture several different exposures at different luminosities and coalesce the best parts of these exposures to make one well-exposed picture. Maybe the literal explanation is abstract, then you can feel the difference of HDR and Non-HDR pictures from the following image.
Part 2: When to Use HDR & When Not to Use
It is true that HDR on iPhone camera is very useful, however, its function can only be reflected under certain circumstances.
When to use HDR:
Capture a high-contrast scene
As we mentioned before, HDR help your iPhone camera capture more color and details in the very dark and very bright areas at the same time, so it is suitable for some cases when you need to shoot a scene of high contrast, for example, landscape photography. There are always some parts brighter or darker than other parts in a scenery. HDR will help balance the exposure at different luminosities.
Photograph an object in direct sunlight
If you photograph an object exposed to direct sunlight with normal iPhone camera, it may happen that dark parts of the object are exposed properly while the highlights are overexposed, being gray or white, with color and details lost. Using HDR will retain the dark parts meanwhile catch the color and details in highlights.
Shoot a subject backlit
It is easy to create an unpleasant exposure when you shoot a subject backlit without HDR. Light behind the subject will affect the normal camera’s choice of exposure and make the subject in pictures too dark to be seen clearly. HDR can lessen the influence of light behind the subject on camera and get appropriate exposures for the subject.

When not to use HDR:
Prepense high contrast photography
Sometimes you may think your photos are flat and toneless, the high contrast photography is a good way to change your photo style. High contrast photography means the light intensively focusing on illuminated and dark areas. In other words, the highlights is brighter and the shade is darker. While HDR will lessen the sharp color contrast effect. Thus, if you want to get a brilliant high contrast picture with iPhone camera, turn off the HDR.
Seek the silhouette effect
Silhouette photography makes dreamlike and dramatic pictures for you. The silhouette effect is often produced when the subject you shoot has a strong luminosity behind. If you use HDR at this time, the silhouette effect will disappear as HDR can balance the light from your subject and the background and retain the details of the subject.
Photograph a fast-moving object or when you are moving
To create a single well-lit picture, your iPhone camera with HDR need to capture different exposures and blend the best parts of them. This will result in the time for shooting a HDR photo a slightly longer than shooting a normal one. When the object is moving or when you are moving, the camera with HDR will capture different exposures for the object from different angles, which will cause the ghosting effect. There is a good news that the Smart HDR feature of the new iPhone XS camera, iPhone XS Max and iPhone XR, works with the moving object.
Part 3: How to Use iPhone HDR to Take Photos
HDR shooting model in iPhone is helpful in photography and you may want to learn how to use it in your iPhone camera now. But before you shoot a photo using HDR in iPhone camera, it is better for you to know how to make your iPhone save both the HDR photo and Non-HDR photo or just the HDR photo.
Go to the Settings app and navigate to Camera. You will see the Keep Normal Photo at the bottom of the screen. If you have an iPhone 8, iPhone 8 Plus or iPhone X, there will be Keep Normal Photo as well as Auto HDR. Toggle the Keep Normal Photo on if it is turned off and your iPhone will save both of the HDR photo and Non-HDR photo. As for the Auto HDR in iPhone 8, iPhone 8 Plus and iPhone X, it is better to be toggled off, because if it is toggled on, the HDR won’t be present in Camera app.
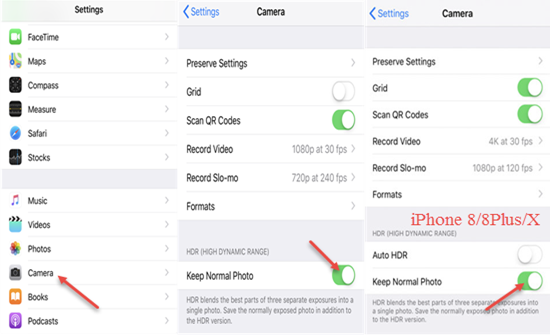
Now, open the Camera app on your iPhone and you will find the HDR option at the top of the screen. Tap on it, there will be three HDR settings: Auto, On and Off. You can determine to turn HDR on or off manually. If you choose the Auto option, your iPhone will determine when to use HDR. It seems the Auto option is more convenient, but if you want to get pictures that satisfy your expectation, it is better to disable the Auto option.
To take a perfect photo with iPhone, just turning on the HDR is not enough. You need to make sure your iPhone is still and your subject is in focus. What’s more, HDR is not always applicable for each scene. For example, when you capture the sunset scene, slight underexposure can make the color more stunning. Remember to compare the photo of HDR version and Non-HDR version.
Bottom Line:
In short, HDR, as one of the best settings of iPhone camera, enables you to shoot perfect photos with appropriate exposure. But not all the photography requires the HDR, it should be used when it is needed. If you have any query or views, welcome to leave them on the comment section.