How to Stop iPhone from Taking Photos in HEIC in iOS 12
Apple introduced the HEIC/HEIF image format in iOS 11. The main aim of the image format is to compress the file size up to 50 percent without sacrificing quality so as to free up iPhone/iPad space. It is to be noted that HEIF is more efficient in image management than the popular JPEG. However, the newly launched HEIC/HEIF image format is not widely accepted in all platforms, which means it’s hard to view the HEIC photos you taken on other places than iOS devices. Due to it you may want to prevent your iPhone from continuing capturing images in HEIC in not only iOS 11 but also iOS 12. Don’t worry. You are able to switch between HEIF and JPEG formats on iPhone easily. This technique will be useful if you would like to edit the images using a photo editing software, which don’t provide this particular image format. In this article, you will learn how to stop iPhone from taking photos in HEIC in iOS 12.
Part 1: How to Save Photos in JPEG instead of HEIC on iPhone Running iOS 12
- Start the Settings app on your iOS device.
- Scroll down to “Camera” and click into it.
- Then press into “Formats”.
- Then select More compatible, which lets your iPhone won’t take HEIC anymore.
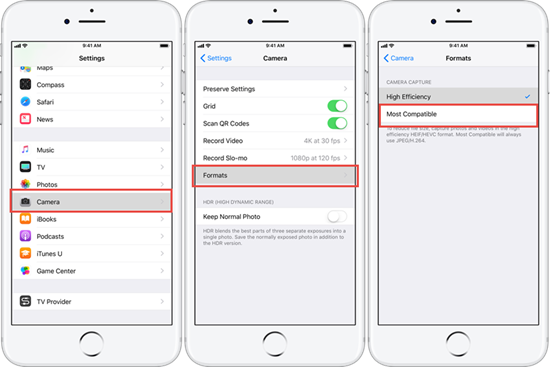
From now on your iPhone will take JPEG photos and disable HEIC in camera. However, you will need to go into High Efficiency every time you want to shoot 4K at 60 fps and 1080p at 240 fps. Also this won’t work on those HEIC photos already taken, so you may have to convert those existing HEIC photos to JPG for daily use.
Part 2: Automatically Convert HEIC Photos to JPEG While Transfering to PC
You can automatically convert HEIC images to JPEG when transferring to Mac or PC using the latest version of the iOS 11/12. And in this progress, you don’t need to install any other third-party software, you just need to change the settings on your iPhone.
- You should tap on Settings icon and then select Photos.
- Now scroll down and select Automatic.
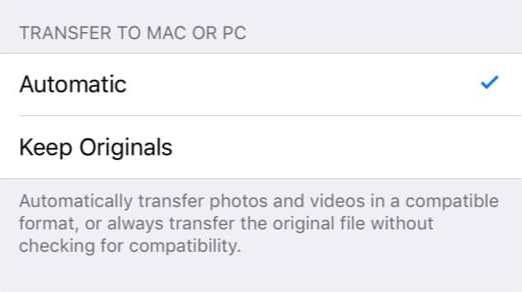
Your HEIC photos will then automatically convert into JPG when you transfer them to your PC. Take advantage of this feature will not only let you take higher quality photos without using too much space, but also easily transfer images in a compatible format accepted everywhere.
Although HEIF is not yet widely supported, it may be the future. Therefore, it is suggested that you opt for JPEG only when you have to deal with the problem of incompatibility. If you have any question or suggestion, feel free to leave a comment below.
You may also need:
How to Convert iPhone HEIC Photos into JPEG
3 Ways to Recover Deleted HEIC Photos on iPhone or iPad
4 Easy Ways to Transfer Photos from iPhone to Computer