How to Enter/Exit iPhone Recovery Mode & DFU Mode (iOS 12 or iPhone Xs/X/8/7/6)
Although Apple iPhone is a premium smartphone, you will face problems with the iOS platform during daily operations. There could be variuos issues, such as iPhone stuck on Apple logo, iPhone reboot loop, iPhone white screen or black screen. If you face any of these problems, you will have to put your iPhone into DFU mode or Recovery mode, which will enable you to repair iPhone using iTunes. In this article, we will tell you how to enter and exit DFU and recovery mode for iPhone XS Max/Xs/XR/X/8/7/6s.
Plus, if your iPhone can’t exit recovery mode, you can use Gihosoft iPhone Data Recovery to rescue photos and videos stuck in recovery mode first. This software is a powerful software which can also help you retrieve deleted iMessages, voicemails, contacts and so on.
- Part 1: What You Need to Know About Recovery Mode
- Part 2: What You Need to Know About DFU Mode
- Part 3: DFU Mode VS Recovery Mode
Part 1. What You Need to Know About Recovery Mode
1. About iPhone Recovery Mode
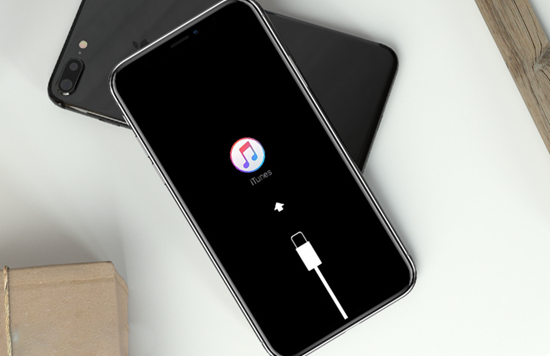
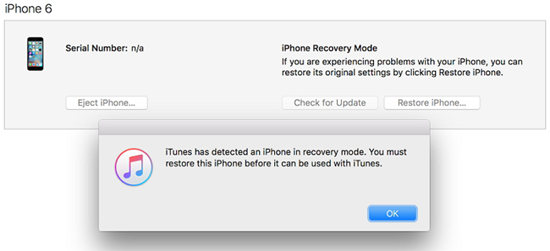
Recovery Mode is a mode that helps you force restore the iPhone to current iOS version when the device meets a problem. You can perform the recovery process even if the firmware on your phone is damaged while not changing your current iOS version. There are case that iPhone won’t work after an iOS updat, and it is a handy tool for you to bring back the damaged iPhone back in action.
2. When You Need to Use Recovery Mode
It is not necessary to put iPhone into recovery mode every time when you are trying to restore it. You can directly restore device from iTunes or iCloud. However, you should use the Recovery Mode if your iPhone can’t work normally in the following scenarios.
- Installation of a new iOS firmware
- Updating to the latest iOS version.
- After restoration of iPhone from a backupRestoring iDevice from an iTunes/iCloud backup.
- iOS Updating from beta version to public version.
- iPhone stuck on logo screen, white screen or such.
You should activate the Recovery Mode in all situations where you are unable to work with the device normally. But note that recovery mode will completely wipe out your iPhone and all the existing date including settings will be deleted, After which your iPhone will be empty as you just purchased it. So to avoid big data loss, you’d better capture a complete backup of all the files regularly before using recovery mode. This will enable you to restore the files back to your device from backup anytime.
3. Steps to Enter iPhone Recovery Mode
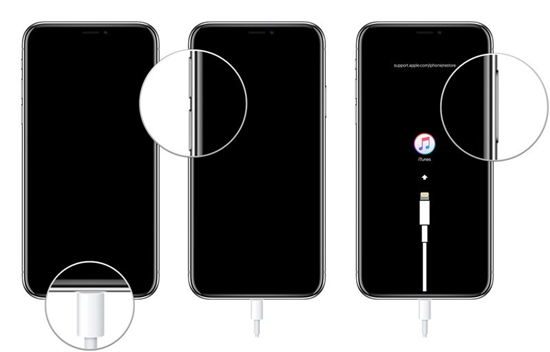
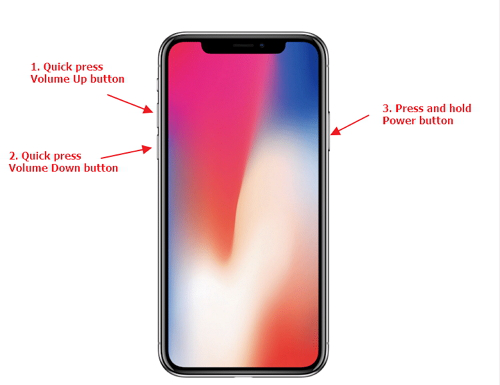
Steps for iPhone 8/8 Plus & iPhone X/XS/XR/XS Max to Enter Recovery Mode
- Plug in iPhone to your computer, and run iTunes.
- Quickly press the Volume Up button, and then the Volume Down button.
- Then press and hold the side button until “Connect to iTunes” appears on the screen. You now are in iPhone recovery mode.
Steps for iPhone 7/7 Plus to Enter Recovery Mode
- Shut down your iPhone 7/7Plus.
- Press and hold the Volume Down button.
- Meanwhile connect your iPhone with computer.
- Release the buttons until you can see “Connect to iTunes” on the screen.
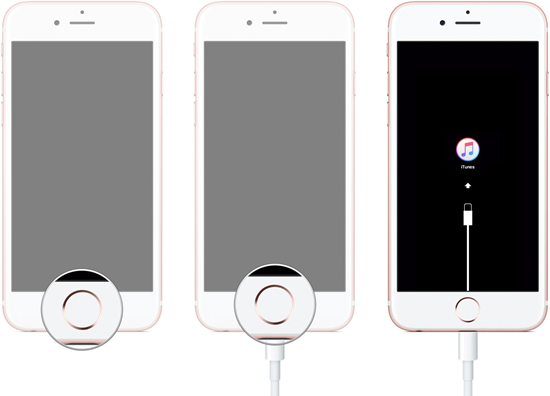
Steps for iPhone 6s & Earlier Models & iPad to Enter Recovery Mode
- Turn off your device (iPhone/iPad/iPod Touch) You should press and hold the Home button, and at the same time connect your device to computer.
- Run iTunes, and hold the buttons until you view “Connect to iTunes” on the screen.
4. Steps to Exit iPhone Recovery Mode
To exit Recover Mode, you just need to force restart your iPhone
For iPhone 8/8 Plus & iPhone XS/X:
You should press the Volume Up then the Volume Down buttons and hold the Side button until you see the Apple logo on the display.
For iPhone 7/7 Plus:
Press and hold the Side and Volume Down buttons simultaneously. Don’t release them until you see the Apple logo.
iPhone 6s/6 Plus & Earlier Models:
You need to hold the Home and Sleep/Wake buttons until you view the Apple logo on the iPhone display.

Part 2: What You Need to Know About DFU Mode
1. About DFU Mode
The Device Firmware Update aka DFU Mode enables you to restore the iOS firmware to your iPhone/iPad/iPod touch from any condition. The DFU mode is mainly use to solve more critical problems associated with your iPhone/iPad, including updating or downgrading iOS.
2. When Should You Use iPhone DFU Mode
Most time recovery mode can help you solve your device issue, but still there are some situations that you will need to use DFU mode.
- Jailbreak iPhone or un-jailbreak the device. The iPhone ships with restrictions as to how you can work with your iPhone. You can’t install specific apps outside the App Store or customize the theme, and hence you may want to jailbreak iPhone to gain more control over the handset.
- Downgrade iOS if you feel that the new iOS version that you have installed is not working as per your expectations. Solve all the problems that can’t be fixed by the recovery mode.
3. Steps to Enter DFU Mode
For iPhone 7/8 or iPhone X/XS/XR:
- First connect your iOS device to your computer.
- Launch iTunes and turn Off your iPhone.
- You should press and hold the Side button for 3 seconds. Don’t release the Side button, and now you should press and hold the Volume Down button as well for10 seconds. (If Apple logo show up then you need to start again)
- Then release the Side button but keep holding the Volume down button for another 5 seconds. (If you see “Connect to iTunes” on the screen, then you need to start again.)
- If the screen still stay black, then you’ve successfully enter the DFU mode.
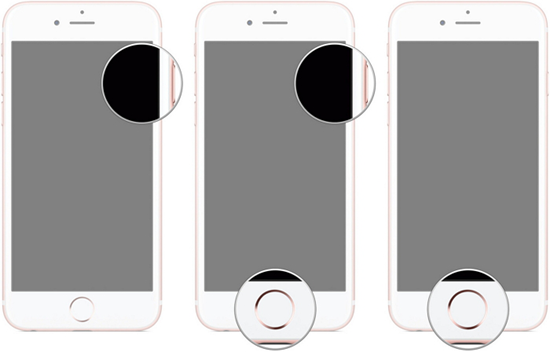
For iPhone 6/6 Plus & Earlier Models & iPad:
- Connect your iOS device to computer and run iTunes.
- Turn off your iPhone/iPad/iPod Touch.
- Press and hold the Sleep/Wake button for 3 seconds.
- Don’t release it, and press and hold the Home button together for 10 seconds. (Apple logo appearing means you need to start again)
- After that, release the Sleep/Wake button and hold the Home button for another five seconds. (If you see “connect to iTunes” then please restart the process.)
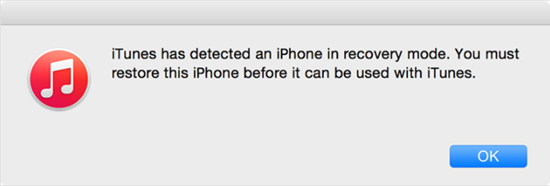
If you successfully enter DFU mode, the scree of your iPhone will stay black. And it will be detected by iTunes as a device in recovery mode.
4. How to Exit DFU Mode
You just need to simply force restart your iPhone to exit DFU mode, with the same steps of exiting recovery mode mentioned above.
Part 3: Difference between DFU mode and Recovery mode
The primary difference between DFU mode and Recovery mode is related to iBoot. While the DFU Mode skips the iBoot, the Recovery mode makes use of iBoot during the restoring and updating process of your iPhone. If you use the DFU mode, you can downgrade the installed firmware because of the absence of the iBoot agent.
The iBoot is basically a bootloader on iOS devices, and it will be activated while the iPhone is in the Recovery Mode. The purpose of iBoot is fix some issue by restoring the whole device. But it will compare the iOS version you want to install with the current iOS version you have on the iOS device during the process, and once it find out the iOS version you want to flash on device is previous than the current one, or Apple already close the authentication of the iOS, then iBoot will refuse to work on. That’s why if you downgrade firmware, you should do it in DFU mode.
Outside iBoot, the recovery mode and DFU mode are almost the same. If you meet firmware issue on iPhone/iPad in daily life, first try recovery mode; if that not much help, then use DFU mode. If still your issue can’t be fixed, you may go ask for Apple Support. Just remember to back up your device first to avoid any data loss.
Conclusion
If you are a hardcore user of iOS devices such as iPhone, iPad and iPod, you should know the tips and tricks associated with the usage of the device. The DFU and Recovery modes will help you manage your device easily during emergency situations. It is absolutely essential to learn the techniques related to these two modes for smooth functioning of the system. If you have any question or suggestion want to share with use, welcome to leave a message in the comments below.
You may also like:
How to Unlock a Disabled iPhone Without iTunes
4 Tips to Fix Unable to Install iOS 12 Update
How to Free Up Storage on Your iPhone (Any Generation)