What is iTunes Helper & How to Disable it from Windows/Mac PC
When you install iTunes on your PC or Mac, an Apple Utility service known as iTunesHelper.exe also gets automatically installed into your computer. This application automatically runs in the background whenever you open your computer.
But it might not be a good thing to always have such service running at your back. Sometimes users may experience some issues on their computer, such as lagging in the program, memory leak, CPU drainage and even computer freezing, all due to the iTunes Helper. Hence these issues can be solved easily by disabling the iTunes Helper.

Tips: Want to extract deleted photos or videos from your iTunes backup? You can always use Gihosoft iPhone Data Recovery to view and extract your precious data from iTunes backup easily.
- What is iTunes Helper
- Why You Need to Disable iTunes Helper
- How do You Disable iTunes Helper on Windows & Mac
What is iTunes Helper
Before we disable the iTunes helper, we better know what it is. iTunes Helper has a single purpose as it runs in the background. It is designed to detect whenever an iOS device is plugged into the computer so that it can automatically launch the iTunes application. Apart from this, it does not fulfill any other task. However, sometimes it may fail to work and thus iTunes need your manual operation.
Windows Task Manager has deemed iTunes to be of high impact. This classification means that the iTunesHelper also has a significant impact on how fast your PC turns on when iTunes is enabled as a startup program. As now our computers are already bound with many startup program, adding one more could bring big burden and slow down the device.
Why You Need to Disable iTunes Helper?
If you like to sync your iPhone with the cloud directly, then you may not sync your device with your PC. In this scenario, it can be quite annoying if the iTunes application pops up every time you plug in your device to the computer.
Apart from this, since the iTunes application is classified as high impact, it can make your computer run slower than it should. Thus the iTunes Helper has also been known to cause issues such as draining your CPU power, causing your computer to hang frequently, and interfering with the efficient functioning of your device etc. If you face such problems, then turning off your iTunes Helper may be helpful.
How do You Disable iTunes Helper on Windows & Mac Computer
The process of disabling your iTunes Helper only takes a few minutes on your Windows or Mac PC. Just follow the steps mentioned below.
For Windows:
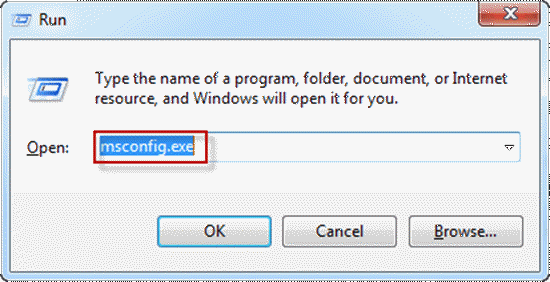
- Open the Run Application by press the Windows Key + R together or typing “Run” in the search box on the Start menu (Windows 10: bottom left of the screen).
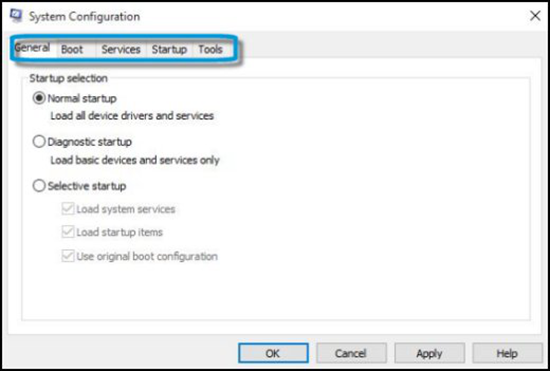
- In the dialogue box that appears, type in “msconfig.exe” and then press the enter key; a Windows Configuration Utility dialogue box will pop-up.
- Tap on the ‘Startup’ tab.
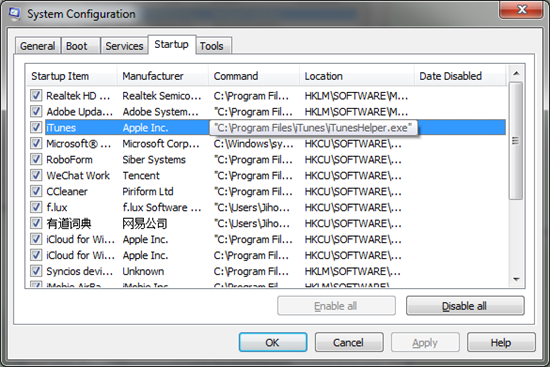
- Look through the list of applications until you find a file that says “iTunesHelper.exe”
- Unselect the Startup Item ‘iTunes’, and click on OK to apply the changing.
- You will need to restart your computer either manually or automatically to fully adapt the change.
For Mac:
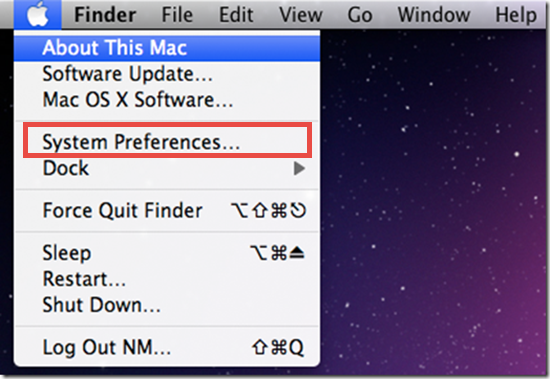
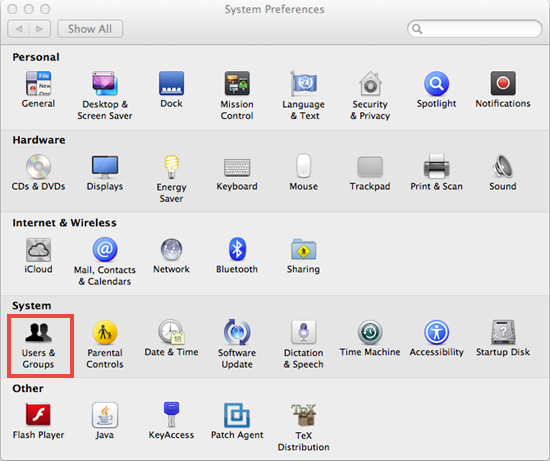
- Click on the Apple Logo on the top left-hand corner of your screen; from the drop-down menu select System Preference, and you will be redirected to the settings panel.
- In the settings panel for System Preferences, select the “Users & Group” option.
- On the left-hand panel, select your account name, then select the “Login Items” option on the right. A list of the applications allowed to launch at startup will appear.
- Scroll through the options and look for “iTunesHelper” and then select it.
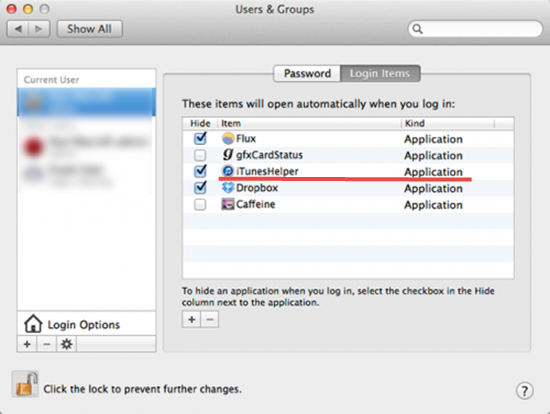
- Finally, select the minus (-) sign at the end of the dialogue to remove iTunes helper from the list on Mac.
Conclusion
Above are the two valid methods to disable the iTunesHelper from startup items on Windows and Mac computer, both of which will hopefully help you resolve issues with your iTunes helper. We already store tons of file and data on our computer, so it’s better to lighten its burden by removing trivial items like iTunes helper. After disabling the iTunes helper, you will see your computer performing a better and faster job. If you have any question or other good suggestion, welcome to share in the comment with us.
Related Readings:
- How to Fix iTunes Error 1671 When Updating iPhone/iPad
- How to Find iPhone/iPad Backup Location on Mac or Windows PC (iTunes)