6 Ways to Transfer Contacts from Android to iPhone for Free
The thought of buying a new phone is appealing especially if you are moving from a different platform to the popular iOS. However, what most people do not anticipate is the stressful process of transferring your data and information from one phone to another. The process will be even more complicated if the phones use different mobile operating systems, like you need to transfer contacts from an Android phone to an iPhone.
Contact list is one of the things greatly important to us since it records the ways we contact with others, so it’s also one of the difficulties you need to conquer when you move from your Android phone to the iPhone. It’s not a easy task to import contacts from Android to iPhone especially if you are a newbie and most. In this article, we offer 6 ways to move your contacts from Android to iPhone for free.
Bonus tips: If you want to recover deleted contacts from iPhone even without backup, you can always use the professional tool Gihosoft iPhone Data Recovery.
- Tip 1: How to Use Share Contact to transfer Your Contacts to iOS
- Tip 2: How to Import Contacts from Android to iPhone via Move to iOS
- Tip 3: How to Use Your SIM card to Move Contacts to iPhone
- Tip 4: How to Transfer Contacts through Your Google Account
- Tip 5: How to Move Contacts to iPhone via iTunes
- Tip 6: How to Check the CardDAV Settings to Transfer Contacts
How to Use Share Contact to transfer Your Contacts to iOS
If your contacts are less than fifty, you can send the contacts to iPhone by the Share Contact feature of Android devices. This will wrok better if there’re a few contact needed to be transferred. Follow these steps to move contacts from Android to iPhone easily:
- Go to the Contacts application on your Android phone.
- Check the contacts that you want to transfer.
- Send the contact via email or text. This will surely be received on your iPhone.
- Save the contacts manually on iPhone.
Remember that this will only be convenient if you are transferring less than 10 contacts. Otherwise, it would already be a burden for you need to save the contacts one by one.
How to Transfer Contacts from Android to iPhone via Move to iOS
Though you may not know, there is a service that can help your transfer your contacts from an Android device to an iPhone. Called Move to iOS, it can make the transfer of contacts much easier for you. The steps are outlined below:
- You need to download the Move to iOS app on your Android device from Google Play Store. Before you start downloading and installing, check if the device has enough storage. It’s better to connect your device to a charger as it can drain your battery. These steps work best on the latest models like the iPhone X, iPhone Xs and iPhone Xs Max.
- First open the Move to iOS app on your Android phone, and click Continue on the interface. Read through the Terms and Conditions and then click > Next.
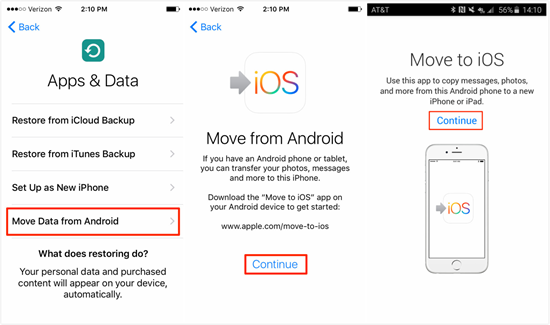
- Turn your iPhone on. When you first setting up your new iPhone, you will see the option “Move Data from Android” on the Apps & Data page, click on it and you will receive a code.
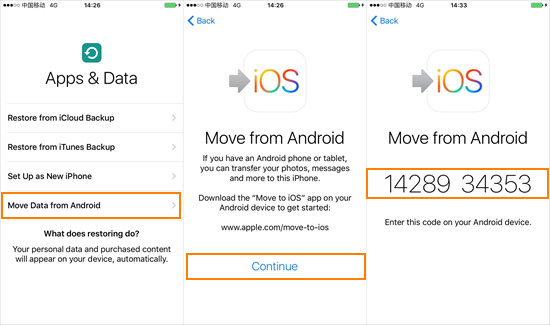
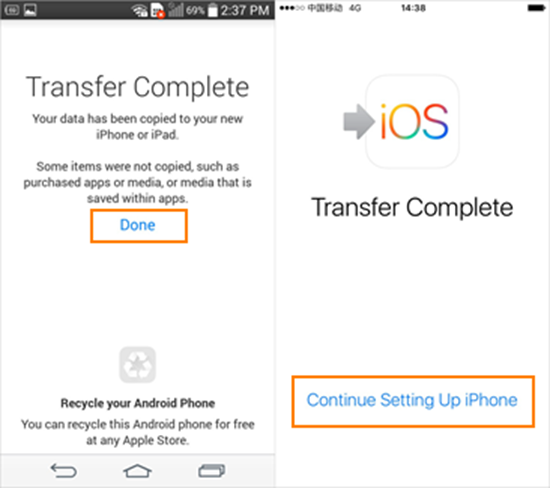
- Enter the code on your Android. This will initiate the transfer process. Check on the Contacts option before you press Next.
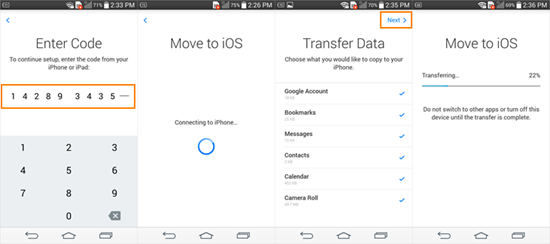
- Click on Done on Android and continue setting up your iPhone.
How to Use Your SIM card to Move Contacts to iPhone
One of the easiest ways to transfer contacts is by utilizing your SIM card. Just remember that a SIM card can’t hold more than 250 contacts on its storage.
- You just need to copy your contacts into your SIM card. Then remove your SIM card from the Android device and transfer it to the iPhone.
- Turn your iPhone on and go to Settings > Contacts. There, you will see an Import SIM Contacts option. Wait for a few minutes for the process to finish.
How to Transfer Contacts to iPhone through Your Google Account
If you have using Google for years, you would know that Google has its own service to transfer contacts from one phone to another. This is possible for Google maintains a cloud server that keeps contacts in sync. As both iOS and Android devices support Google, you can use it to copy your contacts from Android to iPhone.
- Sync your contacts with Google on your Android phone if you haven’t set up Auto Sync.
- Add your Google account to the iPhone Settings > Accounts & Passwords > Add Account > Gmail, and hen turn on the Contacts slider on the Gmail setting page. Make sure that your iPhone is connected to cellular data or Wi-Fi so the contacts will sync automatically.
How Move Contacts from Android to iPhone via iTunes
The iTunes is a good platform to transfer data to your iPhone device. Similarly, you can use it to sync contacts to iPhone.
- Connect your Android smartphone to a PC or laptop. Make sure that the contacts will sync with Windows Contacts.
- Connect your iPhone to the same PC or laptop. Open iTunes and then click the iPhone icon on the interface. Tap the Info menu and check the box near Sync Contacts. If the option is unavailable, turn off iCloud contact syncing on your iPhone.
- Choose Windows Contacts on the drop-down menu, tick on All Contacts and then click Apply.
How to Check the CardDAV Settings to Transfer Contacts
CardDav utilizes a server to transfer contact data easily. Read below for instructions on how to copy contacts from Android to iPhone.
- Go to your iPhone’s settings. Go to Settings > Passwords & Accounts.
- Click on Add Account and then Select Other.
- From the list, tap on Add CardDav Account.
- You will be asked to enter information on the fields:
- For server, enter “google.com”.
- For the username and password, enter your Google email and password. Input a brief description of your account as well.
Final Thoughts
Since not all phones are using the same mobile operating systems, the transfer of contacts may seem a little difficult. But as the items above show, there are a lot of options to transfer contact for those replacing their Android with iPhone. Now you no longer have to manually type and add your contact details when changing device; the process can be quite easy. Hopefully, these tips will serve as a big help to you. If you have any question or good suggestion, welcome to share with us by commenting.