How to Enable Android Developer Options and Its 12+ Benefits
Looking to play around with your Android phone and are wondering what it can do more? While you do have access to a great many features on your phone, do you know that a new world awaits you if you enable to Developer mode? A word of caution though – things can go wrong quick before you know it.
What are the Android Developer Options?
If you would have ever rooted your Android phone, you would have noticed the steps mention you to unlock developer mode on Android followed by enabling USB Debugging and OEM Unlocking. If you are an Android smartphone user, you might know that the operating system has many amazing features, but they are hidden away to protect the software. We don’t even know what the use of most of these features is.
Android Developer Options (ADO) is no different and is present specifically for developers to test the software and the apps that they are developing on that particular operating system.

Why Should Enable Developer Options?
Developers enable it to note down bug reports, debug over USB, and capture CPU usage to check their software’s impact on the operating system.
The name, Android Developer Options, itself makes the feature sound so important. If you aren’t a developer, you will probably not know much or anything about the software but we know you are excited to know more.
Let’s take a look at seven benefits of enabling the hidden feature:
1. Speeds up the phone
Your phone plays some animations when you switch between apps. If you have a slow phone, these animations make it slower. If you want the phone to regain its speed and switch quickly between animations, you can enable the Developer Options on Android. Using this feature, you can alter the level of animations or turn it off completely.
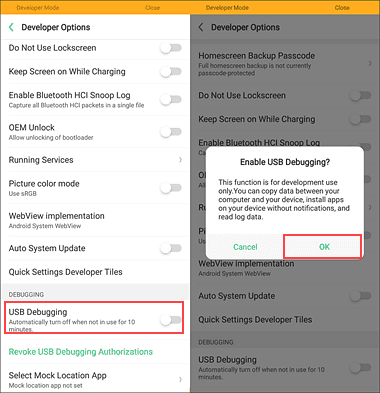
2. Enables USB debugging
When you enable USB debugging on an Android phone, you can transfer an app that you recently programmed into the phone using a USB. After you attach the USB cord, you can send commands from the computer to the Android device and check how your app is working. The feature is also used to unlock, root, or install a custom ROM on the phone. You will need to enable it to use the Android Debug Bridge command feature that allows you to transfer files from the Android mobile phone to your computer and back.
3. Makes playing high-end games easy
If you want to play games with high-end graphics without any lagging or disturbing, you will have to switch on the Android Developer Options feature. You will have to enable the Force 4x MSAA setting of the feature, which improves graphics and image clarity.
4. Take a desktop backup and add password
After you activate the feature and enable USB debugging, you can transfer data from your phone to the computer. If there are more people who use the same computer, you might want to protect all the data with a password. All you have to do is enable the Desktop backup password of the ADO and the data gets encrypted.
5. Helps you set a fake GPS location
Android operating system has some really cool hidden tricks and being able to fake your GPS location is one of them. It comes handy when you are playing games like Pokemon! GO or want to conceal your location while using certain types of apps. Switch on the Mock location app in the settings section of the ADO.
6. Background activities
With Android Developer Options, you can limit the background app activities by restricting the number of apps that use a lot of energy. It gives more power to the foreground apps, making them work faster than usual. Tick the box next to Don’t Keep Activities in the Settings to switch off the function.
7. Keeps phone awake
When you keep your Android phone on charge, the screen turns off automatically. If you want to keep the phone awake from switching off, go to Settings > Developer Options > hit Stay Awake. The function comes handy when you are testing an app.
8. To view CPU Usage Overlay
You can use the CPU Usage Overlay function to check what happens in the background on your Android apps. When you switch on the feature, you can see the statistics to know how your Android application works. The data is displayed in a neat bar graph pattern on the top of your screen.
9. Switch from Dalvik To ART
Dalvik is the process virtual machine available on an Android phone. However, it is discontinued now. If you want to switch from Dalvik to Google’s experimental machine called ART. Go to Settings > Developer Options > Select Runtime > Use ART. You must remember that not all apps support ART since it is an experimental technology. If you want to use an app that doesn’t, you will have to switch back to Dalvik.
10. Perform advanced reboot
When you enable advanced reboot, you can add new features to your phone’s power menu. Your phone gives you two new options against Reboot and Shutdown options, which are Bootloader and Recovery. You won’t anymore need to press several buttons to reboot the phone but select the advanced reboot options in the setting.
11. Enable Hi-Fi Codecs
Android Oreo supports Hi-Fi Audio Codecs but you can switch it on other versions of the operating system too. It enhances the audio quality when you connect your phone to a Bluetooth speaker. Go to Bluetooth Audio Codec in the settings. It is set to Use System Selection by default and below if as several other options that you can select. Experiment with them and select the one that you like the most.
12. Turn off GPU Rendering Profile
If you have noticed some delay in graphics on your apps, you can turn on the GPU rendering profile in the settings. It enables your phone to use its acceleration feature and offer a smoother audiovisual experience.
How to Enable Developer Options on Android?
The method to turn on developer mode Android is the same all types of Android devices but the OEMs change the process slightly. Don’t worry about any technicalities because the process doesn’t involve any coding. Let’s take a look at how to enable developer options:
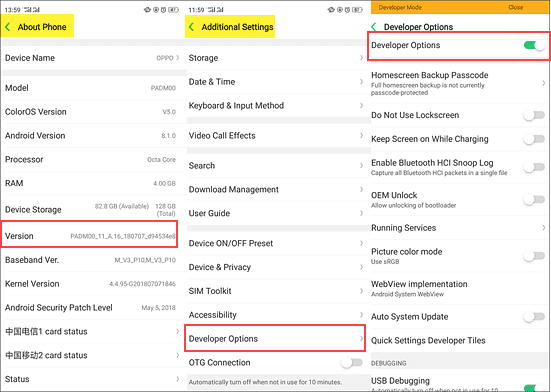
- Step 1. Go to Setting and tap on General. Select About phone.
- Step 2. Scroll down in the Software Selection section and find the Build Number.
- Step 3. Tap on the Build Number five times continuously until a message appears on the screen. This message reads — You are now a developer! In some OEMs, you will have to tap for seven or more times.
- Step 4. Go back to Settings and find Developer Options. Enable it.
The Android Developer Options feature is now activated. All you have to do is start using it to your advantage.
How to Disable Developer Options on Android?
You cannot permanently disable the feature unless you reset the factory settings. However, you can hide or turn off developer mode on a temporary basis. The process is just as simple as it was to enable the feature. Here are two ways on how to disable Developer Options:
1. By clearing data
- Step 1. Go to Settings and then Apps.
- Step 2. Keep swiping across until you access the All apps tab.
- Step 3. Scroll to Settings and hit Clear Data.
2. By switching the button
- Step 1. Go to Settings and search for Android Developer Options.
- Step 2. Move the circle from on to off and the feature will be disabled.
This process will hide the feature. If you want to enable it, you will have to follow the enabling process that we mentioned above.
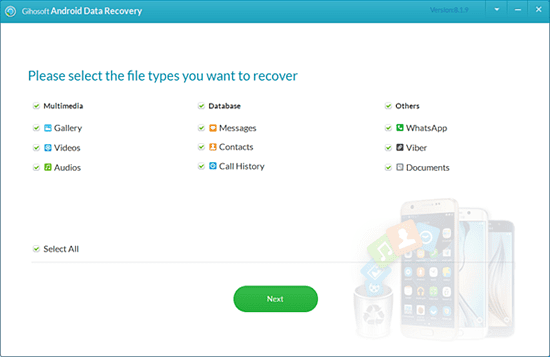
Tip: If you need to recover deleted data from an Android phone, first you need to activate the developer options, then turn on the phone’s USB debugging and connect the phone to the computer. This way our free Android data recovery software can recognize your phone and scan your lost data.
Conclusion
In this article, we talked about the simple ways to enable and disable developer mode on Android. The Android Developer Options doesn’t affect the way your Android phone works. The feature offers plenty of benefits and uses but you should know where to draw the line.
Related Articles
Recommended Software
- Android Data Recovery
-

- Easy-to-use data recovery tool for Android devices to recover lost files from Samsung, HTC, LG, Motorola etc.
- Windows Mac