How to Format a Hard Drive on Windows and Mac
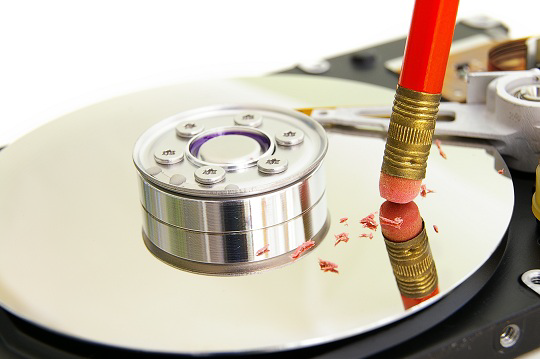
If you want to discard or sell an old hard drive, formatting this hard drive will be a necessary step that you cannot skip. And apart from wiping your personal data, formatting can also hep you prepare a new hard drive for use, check the hard drive for errors, switch your drive between Windows and Mac, and so on. In short, formatting a hard drive is a quite helpful operation when you use it. Then do you know how to format a hard drive on Windows or Mac?
Part 1. 5 Common File Systems You Should Know
When set up a new hard drive to computer, you will be asked to format the hard drive with a File System. What is noteworthy is that different operating systems (like Windows or Mac) use different file systems. You have to choose a proper one for your OS. So, this article lists out some popular file systems for you to reference:
NTFS: It is the format used by Windows computers. When we connect an external hard drive to Mac in this format we will see a “Read only” warning, which means that the Mac can not modify the external disk files since it is in NTFS format. Despite this, you can read the files and copy them to the Mac for example. On a Windows computer it works perfectly well, to read and write data on it.
FAT32: It is the format that you will see in all the pendrives, because it is a format compatible with Windows, macOS, Linux … and also players, televisions and any other device that accepts USB connection. The downside is that its use is limited to files of not more than 4 GB, so you can not be able to copy a file that is larger than 4GB into it.
ExFAT: Similar to FAT32, ExFAT can also be read and wrote on both Windows and Mac. The difference is that ExFAT allows you to store files over 4 GB, which makes it an ideal choice for users.
Mac OS Plus: This is the format used by Apple for your Mac computers, it is the equivalent of NTFS. We can also find it under the name of HFS + and there are different variants that encrypt or not the files: Mac OS Plus (with registration), Mac OS Plus (with registration, encryption), Mac OS Plus (case./Minus., With registration ) or Mac OS Plus (uppercase/small, with registration, encrypted).
APFS: It is the new format implemented by Apple in its latest versions of the operating system, and it is the recommended format for any computer with macOS. This format can also be found in different variants depending on whether the content is encrypted or not: APFS (encrypted), APFS (uppercase/minus) or APFS (uppercase/minor., Encrypted).
Part 2. How to Format Hard Drive for Mac
Now that we have known the differences between 5 different file systems, what if you have to use an NTFS hard drive on Mac? No worry. You can format your hard drive on Mac and give it a new format with Disk Utility. But be aware that formatting a hard drive means losing all the data stored in it. Therefore, make a copy of the files that interest you before formatting it. If you forget to backup beforehand and lose important photos and videos from it after formatting, please hurry to use this free Photo Recovery to recover deleted data from internal/external hard drive.
Once you have a copy of the data that interests you, follow these steps:
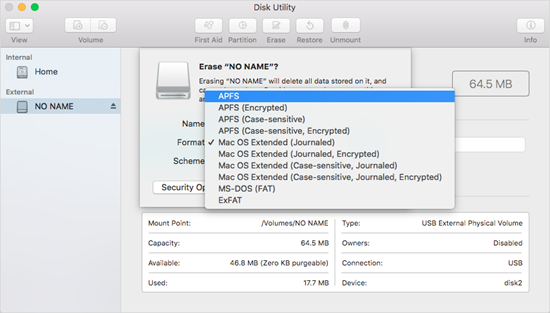
- Open the Disk Utility app on your Mac.
- Select from the sidebar the hard drive (this includes the external hard drives too) that you are interested in formatting, and click “Erase” at the top of the window.
- In the Format drop-down menu choose the option that interests you.
- Name the external disk.
- Click on Delete and press OK.
- After a few seconds the disk will be completely erased and the new format you have chosen will be applied.
- Now is when we can re-copy the files inside it or give it the utility that we want.
Part 3. How to Format a Hard Drive for Windows
You can format a hard drive for Windows via two methods: Windows Explorer or Disk Manager. Please note that it may take hours to format your hard drive for Windows if it is too large.
Windows Explorer
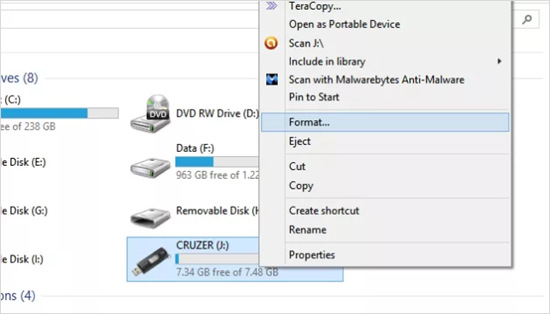
- Connect your drive to computer if you are using an external hard drive.
- Open Windows Explorer and locate your drive.
- Right click it and you will find the “Format” option in the pull-down menu.
- In Format window, choose a proper file system with above description.
- Name your drive and check the box in front of “Quick Format”.
- Tap on “Start” button and the formatting process will begin.
Disk Manager
It is also very easy to format your hard drive on Windows with Disk Manager:
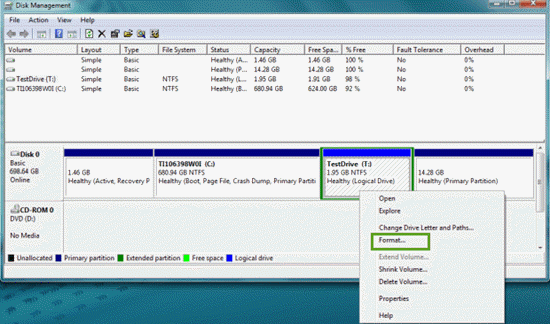
- Open Disk Manager: press and hold the Windows key + (R). Then type compmgmt.msc and press the Enter key.
- Select the drive or partition that you want to format from the list.
- Right-click and choose “Format”. Do make sure you have choose the right hard drive.
- Name your drive and select the file system you need. Then click “OK”.
Note: You cannot format the C drive through these ways, because it is the primary partition where your operating system is installed. If you really nee to format the C drive, please boot the operating system to another drive first.