How to Reset Trust This Computer on iPhone and iPad
“Trust This Computer” is one of the examples proving how Apple tries to secure user devices. This feature allows users to choose whether to protect their data against a strange computer or to authorize the permission to it in their own computers. This is not a problem until it doesn’t work well.

As a matter of fact, iOS users have different opinions over security levels. Should you trust a working computer? Accidentally tapped “Trust” or “Don’t Trust” on your iPhone or iPad, how to undo this? Why the prompt doesn’t appear on my iPhone? Why iPhone keeps asking if I trust this computer after I made a choice? Don’t worry. In this post we’ll show you how to trust and untrust a computer on iPhone and iPad as well as several other tips:
- Part 1. What Exactly Does “Trust This Computer” Mean?
- Part 2. Why “Trust This Computer” Not Appear on My iPhone?
- Part 3. How to Untrust a Trusted Computer on iPhone and iPad
- Part 4. How to Trust a Computer after Don’t Trust on iPhone/iPad
- Part 5. Why Does iPhone Keep Asking If I Trust This Computer?
Part 1. What Exactly Does “Trust This Computer” Mean?
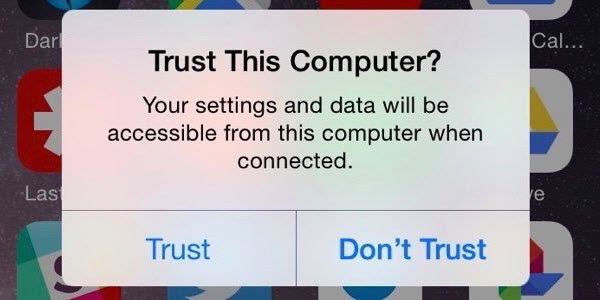
When you connect your iPhone, iPad, or iPod touch to a computer for the first time, a prompt will ask whether you “Trust This Computer”. Trusting a computer exposes your phone’s data to it – everything you can access via iTunes, including photos, videos, contacts, messages, settings and other content. To recover or transfer data on iPhone/iPad with desktop software like Free iPhone Recovery or Phone Data Transfer, you should tap “Trust”. Conversely, you can tap “Don’t Trust”, which can help to protect your iPhone/iPad from malicious chargers and ensure no one can access your iDevice from a computer without your passcode.
Part 2. Why “Trust This Computer” Not Appear on My iPhone?
When trying to follow an online guide or tutorial, many people find the prompt of “Trust This Computer” is not appearing on their devices’ screen. In that case, if your computer or iTunes detects the iDevice already, you may skip this step and continue. Otherwise, it means that you have made a choice before. Thus, you need to follow the instructions below to reset “Trust This Computer” and make a choice again.
Part 3. How to Untrust a Trusted Computer on iPhone and iPad
Occasionally, we have to connect iPhone or iPad to an unfamiliar computer. If you trust the computer mistakenly and worry about the serious risk, here is how to undo it:
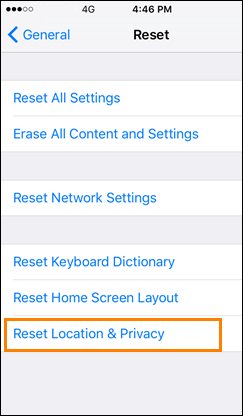
- On iPhone, go to Settings > General > Reset.
- Choose Reset Location & Privacy.
- Connect iPhone/iPad to the formerly trusted computer.
- The alert message will pop up. Tap “Don’t Trust”.

Notes:
- To revoke authorization from all the computers that your device has trusted, you can choose Reset Network Settings in step 2.
- Reset location & privacy and network settings won’t delete data from your devices.
Part 4. How to Trust a Computer after Don’t Trust on iPhone/iPad
If you accidentally tapped “Don’t Trust” and now you actually do want to trust the computer to access your iPhone/iPad from it, please follow steps below:
- On iPhone, go to Settings > General > Reset.
- Choose Reset All Settings. The iPhone will restart.
- Connect iPhone to the computer and open iTunes.
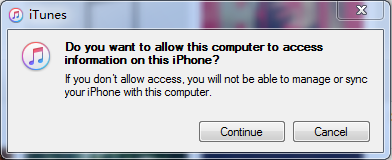
- iTunes will ask you to allow this computer to access information on your iPhone.
- Click Continue. iTunes should recognize your iPhone in a minute.
- Disconnect and reconnect iPhone to computer. Tap “Trust” from the promt.

Notes:
- Reset all settings won’t delete data from your device. But settings like WiFi password will be cleared.
- Make sure your iTunes is up to date.
- If your iPhone is running on an OS lower than iOS 8, you’ll have to choose Erase All Content and Settings to reset Trust This Computer, which will delete all data and files from your device.
Part 5. Why Does iPhone Keep Asking If I Trust This Computer?
A lot of iPhone users have reported the issue of “Trust This Computer” keeps popping up when connecting to the same PC and they have to tap again and again. The problem occurs in both Windows and Mac computers, but there is still not yet an official solution for it. Luckily, some Windows users find the tips below helpful:
- Click Start menu, type Control Panel and open the application.
- Go to Programs and Features.
- Right-click on Apple Mobile Device Support, and then choose “Repair”.
- Disconnect and reconnect your iDevice to computer.
Bottom Line
USB connection is very convenient but there are always annoying issues, such as iPhone not showing up on PC. We hope the solutions to “Trust This Computer” in this tutorial are helpful for you. Don’t hesitate to share your experience with us in the comment so that more people will benefit.
