How to Sign PDF Documents on iPhone, iPad & Mac
With everything being technologically and digitally advanced, gone are the days when you could only send your signature for documents by fax. Now all this can be done right on your iPhone, iPad or MacBook. But a lot of people are still struggling to do their signatures on the digital screen, and the reason behind this is that they don’t know how to add digital signatures on any document they want. So if you are one of those people who have trouble with it, then this tutorial is going to teach you three different ways to sign a PDF on any Apple device that you have.
- Part 1: How to Sign a PDF Document Directly on iPad or iPhone
- Part 2: How to Sign Your Pdf Documents on Mac
How to Sign PDF Documents Directly on Your iPad or iPhone
When you are on the go, you will need to sign important PDF documents. It is going to be a real tricky situation if you send the crucial documents without the official signatures. So you will need to know how to make digital signatures sooner or later in your life. In order to sign a document right from your iPad or iPhone, you need to follow this tutorial below properly.
- First you should install a PDF reader on your iPhone or iPad to open PDF documents. The most widely used one is Adobe Acrobat Reader, or you can use Foxit pdf, both of which are free. For more you can check on the 8 Best PDF Reader & Editor Apps for iPhone and iPad. Here we take Adobe Acrobat Reader as an example.
- Up next you can open the document from anywhere in the PDF reader. You can access PDF from email, Airdrop, or even from the cloud or Dropbox.
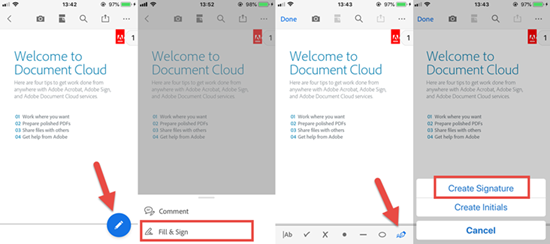
- Once you have opened the file you want to add a signature on, click the blue round button with a pen on it at the bottom right, and choose “Fill & Sign” in the later pop-up
- Then tap on the pen icon at the bottom menu and click on “Create Signature”.
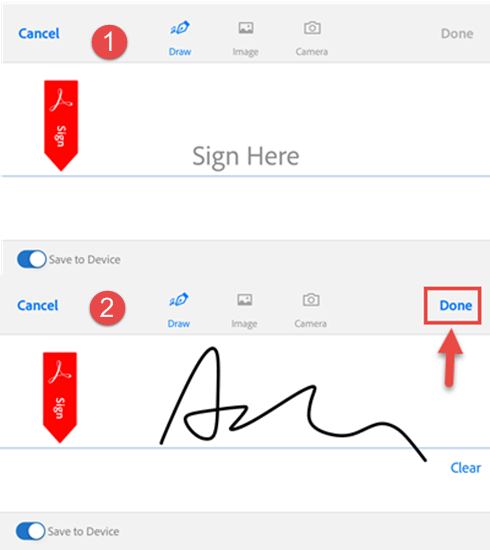
- You will then be shown an open space on screen where you need to make and save your signature. The signature can be done either with your fingers or with your stylus; both are good to go.
- After you are done with the signature and really satisfied with the outcome, tap on the “Done” option on the top. Or if you are not satisfied, you can click “Clear” and sign again.
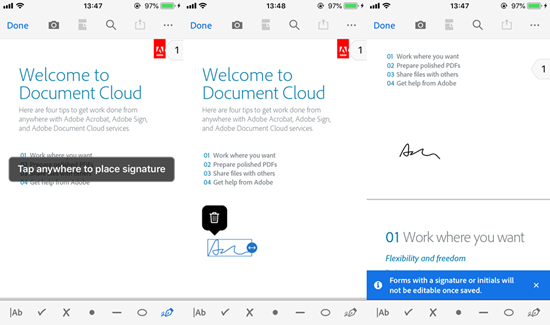
- After you save your signature, you will be back to the PDF document. Just tap on anywhere you want to place your signature. Then with a little adjustment, the signature will then be added to the document once you click “Done”.
Wasn’t this absolutely easy? The signature you created here can be used for all documents opening in the Adobe Acrobat Reader, and you can create more than one digital signature for your need. Apart from the digital signature function, the Fill & Sign feature will help you add dot, line or circle to the PDF, and you can highlight or add some text as note with the Comment feature on that document or reference later.
So this part is all about how to sign a PDF on your iPhone/iPad, now let us check out how to add signatures on a Mac.
How to Sign Your Pdf Documents on Mac Computer
If you want to sign any document in your mac, then you will need to use the iSight camera. Also, you will need a pen and paper for this. Since you Mac computer is not touch sensitive, you cannot do the electronic signature directly on the screen. Now, we will tell how one can do the signature on a piece of paper and then scan to use on the required documents. Let us look at the steps to understand better.
- Open the document that you need on the Preview app, and after that, click the Signature option on the Markup Toolbar. There will be two options on the screen: Camera and Trackpad. Choose “Camera”.
- Later an instruction will appear on your screen asking you to sign your name on white paper and then holding it closely to the camera for scan. Follow it.
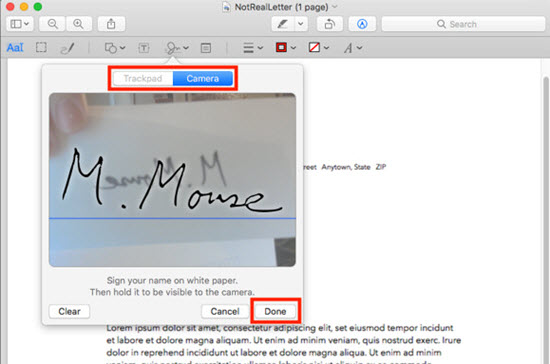
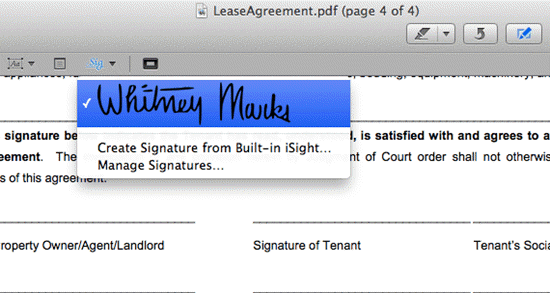
- After the camera clearly scanned your signature without crook or tilt, you can click “Done” to save the signature. Afterwards you can use it on any document on your Mac from the Signature icon at the Markup Toolbar.
Besides iSight camera, you can also use Adobe Acrobat Reader to add electronic signature on Mac, since this app has offered synchronization feature for signature as well. You just need to sign up an account on Adobe PDF reader, and then create a digital signature on your iPhone or iPad with the above method we mentioned, then your signature will be synced for using after you log in the same account on Mac.
Bonus tips: If you lost any important data like note from iOS device, you can always use Gihosoft iPhone Data Recovery to retrieve deleted notes from iPhone or iPad for free easily.
WindowsFree DownloadWin Version MacFree Download<sm
Final Thoughts
So these are the two easiest methods by which you can sign your PDF documents both on your Apple iPhone as well as on your Mac and iPad. Follow the steps carefully so that you achieve the perfect results at the least possible time. For most people doing a electronic signature with their fingers on screen is a skill that can be mastered through practice, not as hard as one images. Now you can insert signatures on your iPhone wherever you want. If you have any question, welcome to leave comment below to let us know.