How to AirDrop on Mac, iPhone and iPad in 2019
We must tell you that Air Drop is one of the quickest and easy ways to transfer photos, videos, copy files, PDF, or other file types from an iPhone to your Mac, your Mac to iPhone, from your iPhone to a friend’s iPhone, or any other scenarios that includes an iPhone, iPad and a Mac. Why we suggest this is because of its fast nature than sending files via email. Also, it won’t use up any of your data allowance which might be possible while sending a text message. Did you know that you can use AirDrop to send any link of a webpage to your friends/colleagues, share any location on maps, share contacts, and a lot more things?
You must also know that AirDrop lets you to share music from iTunes, Passbook passes, and apps with AirDrop. All you have to do is press and hold the “app icon” that can be found on the Home screen. You must continue to do this until you see an option to share. With Air drop you can share Notes or Pages documents. You must also remember that you can add other people to collaborate from the apps themselves.
When you are sharing among two iPhones or iPads your proximity must be close enough for the Bluetooth to work. In case you are sharing to or from a Mac, you will need Wi-Fi enabled on the Mac. You must remember that Air Drop will not work if you are using the Wi-Fi to share your wired connection to other devices and the Bluetooth is turned on.
You must also know that all Apple devices can use Air Drop. Today we have made a list of Apple devices that are perfectly capable of AirDrop at the bottom of this page.
How to Air Drop from iPhone to iPhone/iPad
Here we will show you how to AirDrop from iPhone to iPhone/iPad. When you want to either send or receive between an iPad and iPhone, you needed to start AirDrop. Since iOS 11, AirDrop has been on by default – This means as long as your Wi-Fi has been turned on, or your Bluetooth is within range of the other person), you will be clearly able to send the file to the other iPhone or iPad using AirDrop.
On airdrop from an iPhone or iPad:
- First you will check if the Bluetooth or Wi-Fi is on: You can open “Control Centre” by just swiping upwards and then make sure that the Wi-Fi and Bluetooth icons are clearly blue.
- Next, on the device that you are sending from, you need locate the file that is needed to share with your friend. e.g. In case you’re looking for an image to share you will have to open the Photos app and find that image, If it’s a contact that needs to be shared, you will have to open the Contacts file and find the relevant contact card.
- Post selecting the photo or file, you will tap on the Share icon that resembles a square with an arrow pointing upwards. You’ll can see it in most apps, although sometimes you will just see the word ‘share’.
- Next, a page will open with various sharing options like Message, Mail, and many more. On reaching the page, above that row you’ll initially see the AirDrop icon, but after a few seconds/minutes this will be replaced by icons that represents people and devices you can share it with. It will definitely indicate if it’s an iPhone, iPad, or Mac.
- After all this, you will tap on the icon for the person you want to share with, and your photo or file will quickly be shared with them. This will only take place when they accept the transfer request.
- You must also know that you can send as many files or photos as you like, and you can also send them to multiple contacts at once.
- After you are done sending the photo or file you will see the word ‘Sent’ under the person’s device in your Air Drop row.
On receiving with iPhone or iPad:
- As mentioned above, you must check that Bluetooth or Wi-Fi is on: You will have to open the Control Centre by swiping upwards and make sure the Wi-Fi and Bluetooth icons are completely blue.
- Next, when your friend attempts to share any content with you, an alert will pop up and appear on your device. It will ask if you wish to Accept or Decline this transfer request.
- You will be given an option to accept the transfer. Only after you accept, the content will begin with the downloading.
- We must also tell you that in case you are Air Dropping between your own devices, you won’t see any option to accept or decline. This happens as long as both the devices are signed into the same Apple ID.
Where are the Air Drop files saved on iPhone?
You have transferred the files, but are you still wondering where have your files gone now that they have been transferred to the other iPhone?
The answer to this is that the content that has been sent should appear in the relevant app. This means photos will appear in the Photos app, location information will appear in Maps etc.
What if you can’t see/see your iPhone/iPad for AirDrop?
If the iPad or iPhone you share is not shown in the list of potential AirDrop destinations, there are a few possibilities. Bluetooth or Wi-Fi can be turned off. AirDrop itself may be disabled. Perhaps your’ mate’ may have it set to receive only from a contact person (and inexplicably don’t have your details).
To decide if one of the above is the case, begin by clicking on the iPhone or iPad that you won’t receive to verify that Bluetooth and Wi-Fi are on. (Double test the same on the send device).
Now check that AirDrop is not turned off: go to Control Center and press and hold the area where you can see the icons for AirPlane, WiF, and Bluetooth mode.
This will take you to a second screen with AirDrop and Personal Hotspot options. An AirDrop should be on default, but if this is not the case, tap the icon (you should now notice that you have fixed the problem).
It is likely, however, that AirDrop is on but that the system is set to receive only from Contacts. In that scenario, click the AirDrop button and change from Contacts to Everyone (your friend might want to switch back to Contacts later if they want to stop getting AirDroped by people they don’t know about.) If the iPhone or iPad still doesn’t show up, and you’ve tested all the usual suspects: turn it off and on again, check the code up to date, and make sure the phone is capable.
Once you’ve done transferring files, you might want to turn off AirDrop on your iPhone or iPad, so we’ll show you how to do that here. LINK How to AirDrop from iPhone to Mac Setting up your iPhone to Mac AirDrop files is a process similar to the one mentioned above.
How to AirDrop from iPhone to Mac
On the sending iPhone or iPad
- Check the Bluetooth or Wi-Fi is on: open Control Center by swiping up and make sure the Wi-Fi and Bluetooth icons are green.
- Locate the thing you want to upload to the Mac on the computer you’re sending from. Okay, e.g. To share a photo, open the Photos app and find the picture, if it’s a contact you share, open the Contacts file and find the relevant entry.
- Once you’ve selected an image or folder, click the Sharing icon (it’s a square with an upward arrow, you’ll see it in most devices, but sometimes you’ll just see the word ‘sharing’).
- The site will open with several sharing options (Message, Email, etc). Above that line, you should initially see the AirDrop icon. Still, after a few seconds (sometimes minutes), it should be replaced by icons that represent people and devices that you can connect with (for example, if they are iPhone, iPad or Mac).
- Tap the icon that represents the Mac that you want to share with, and your photo or file will be shared with that device as long as the transfer is accepted. (If you send files from your own iPhone to your own Mac so that you don’t have to accept the transfer task, it will happen automatically.) The transferred data will be downloaded to the Downloads file (which you can find in the Dock).
- After sending a photo or file, you will see the word sent in your AirDrop row under the device of the person.
On the receiver of Mac…
For earlier versions of macOS, it was possible to enable AirDrop by opening the Finder window, but this is no longer necessary. All you need to do is make sure Wi-Fi is on.
Make sure your Wi-Fi is turned on your Mac. This should be made clear if the curved Wi-Fi icon in the menu at the top right of the screen is red. If this is not the case, select this icon and choose Switch Wi-Fi On. (Alternatively, open System Preferences > Network and verify that Wi-Fi is linked. If this is not available, click the Wi-Fi tab and choose Switch Wi-Fi On).
When the file is ready to be sent, you will receive a Mac warning asking you to authorize the sharing of a file. (If you share a file with your Mac from your iPhone, you won’t see the warning, the transfer will take place automatically).
Approve the move, and the file will appear in your Downloads folder (which you can find in the Dock tab).
If your Mac uses the same Apple ID as your iPhone, you won’t see a warning, but the file will immediately be moved to your Downloads folder.
Where are the AirDrop files on Mac?
All files sent to the Mac using AirDrop land in the Downloads folder, as opposed to iPhone or iPad where they would appear automatically in the corresponding app. That’s why you might still want to transfer images sent this way to Images, and so on.
What if you can’t see/see the Mac for AirDrop?
There are a few options if the Mac you’re trying to send doesn’t show up for AirDrop.
Test that Internet Sharing is not turned on. (We clarify how to test it out, and how to shut it off below).
Make sure that both phones are connected to the same Wi-Fi network.
Switch it on Bluetooth.
Sometimes just opening the Finder window and selecting the AirDrop section is enough to’ wake up’ with AirDrop.
Open the Finder window and press the Favorites tab on AirDrop. You will see the’ Allow me to be discovered’ option and the selection of All, Just Contacts, or No One. Use Contacts Only or Both. (Everyone is probably the best one if you want to make sure that your Mac is visible in this instance).
How to turn off Internet sharing
The Mac can share its Internet connection via Wi-Fi, in which case you would see an Arrow pointing up to where you would usually see the Wi-Fi icon. (We have a guide on sharing your Internet connection from your Mac to your iPhone if you want to know how).
When you share your link from Mac to your iPhone or iPad, you will need to stop doing this and register all devices on the same Wi-Fi network. To do so, go to System Preferences > Sharing and turn off Internet Sharing by unchecking the box next to that option.
How to AirDrop from Mac to iPhone/iPad
How to use AirDrop from Mac to iPhone / iPad AirDrop from Mac is only available via Finder, but it is now possible to choose AirDrop as a Share option. We’re going to show you why.
On the send out of Mac
Here’s how to get AirDrop through the Finder.
- Make sure your Mac has Wi-Fi on it. (If you share your Internet connection from Mac to iPhone or iPad, you will need to stop doing this and log both devices to the same Wi-Fi network as explained above.)
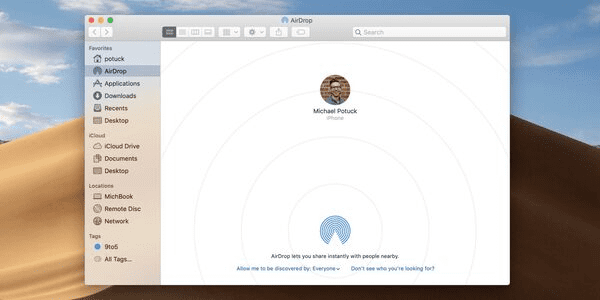
- Open the Finder window and select AirDrop from the options on the left.
- Check that either’ Everyone’ or’ Contacts Only’ appears next to’ Allow me to be discovered.’ If the’ No One’ choice appears, click on it and choose an option that will make your Mac available. (To maximize your Mac’s likelihood of seeing your phones, or vice versa, we suggest making sure that you can be seen by everyone.) As long as the iPhone or iPad has AirDrop switched on and is not sleeping, you should see it appear in the AirDrop window of the Finder on the Mac.
- Drag and drop the photo or folder to the iPhone icon.
The blue ring will appear, and the iPhone symbol will circle as the file is transferred.

- When sending a photo or document, the word sent appears under the phone icon Instead, you may want to transfer the file or photo from within the app, right-click it, or use Quick Look to display the file and then click the Transfer icon (for Quick Look, select the file and press the Space Bar). Follow the following instructions to share from your Mac: Look for the Share icon (a square with an arrow pointing out). You’ll see this in the top right of the Quick Look window, the Safari tab, and the Photos section, while you’ll see it in the Window on the left. Select this button, and then choose AirDrop from the list that appears.
- If you don’t see the Sharing icon, there will likely be a’ Transfer’ or’ Collaborate’ option. Click on this, and you should see AirDrop as an option as well.
- The screen will open to listing the available devices. Only click on the one you want to share with, and wait for the file to be transferred.
On the iPhone/ iPad getting
As above, you will need to make sure your Bluetooth or Wi-Fi is switched on.
When a Mac user sends a file or photo, you should see a warning asking for your approval of the transfer before it is copied (unless you share your iPhone with your Mac, and both are logged in using the same Apple ID).
Please accept the warning, and the file will be transferred.
You will see a warning to the incoming file.
If you’ve sent a picture, you’ll find it in your iPhone Photos app. All file types must end up in the app in question unless it’s not clear which app they should be using. For example, we sent a PDF to our iPhone and were given the opportunity to open it in nine different apps.
If you have any problems with an iPhone or an iPad that does not receive a file, please take a look at our advice above.
Also Read: Users who are used to download videos from YouTube and other KeepVid websites may be desperately looking for sites like KeepVid to record videos from online.
How to AirDrop from Mac to Mac
This is very close to Airdropping from Mac to iPad or iPhone. As above, you can either share your files by dragging them to the AirDrop Finder window, or you can choose to AirDrop as a Share option.
There are, however, a few differences in the way AirDrop operates on older Macs, which we’ll discuss below.
On the send out of Mac
Follow the above advice for AirDropping from Mac via the Finder or using the Share option.
On the receiver of Mac
Make sure your Wi-Fi is on and that you are wired to the same Wi-Fi network as the other Mac.
Test if Bluetooth is on (open System Preferences > Bluetooth).
When a file is sent from another Mac, you should see a pop-up to inform you that a file is being shared.
To approve the move, click Save (or click Decline).
We’re talking about what to do if another Mac or iOS device can’t see you above, but to recap: if the other Mac can’t see you, open the Finder window and select AirDrop.
You will see the option’ Allow me to be discovered’ in the Finder window and the options of Everyone, Contacts Only, or No One. Make sure you are discoverable by choosing the right choice. To improve your Mac’s chances of seeing your phones, and vice versa, we suggest making sure that you can see how to transfer files via AirDrop to an older Mac As described above, there are a few variations in the process of sending files to or from an older Mac.
On the send out of Mac…
In the AirDrop browser, press’ Don’t see who you’re looking for.’
Choose the option to Check for an Older Mac.
You should see the Mac that you are trying to share with in the AirDrop window, drag the folder that you want to share to it.
Compatible Macs, iPhones and iPads AirDrop will not work on all Macs and iOS devices, so it may not be a functionality you can take advantage of.
Tips: If you want to back up your iOS device to the computer in a viewable way, transfer data from iPhone to iPhone directly without iCloud, and add contents to iPhone/iPad without iTunes,you need download Gihosoft iPhone Manager by clicking the button below and begin to transfer files from PC or Mac to your iPhone in an easier way than ever.
AirDrop is (apparently) supported by the following Mac models: MacBook Pro (Late 2008) or later, with the exception of MacBook Pro(17-inch, Late 2008) MacBook Air (Late 2010) or later MacBook (Late 2008) or later, with the exception of black MacBook (Late 2008) iMac (Early 2009) or later Mac Mini (Mid 2010) or later Mac Pro (Early 2009 with AirPort Extreme chip, or Mid 2010) iPhone 5 or later iPad (4th 2010).